EasyManuals Logo

Yale Assure Lock 2 User Manual

Yale Assure Lock 2
68 pages
To Next Page IconTo Next Page
To Previous Page IconTo Previous Page
Page #17 background imageLoading...
Page #17 background image
15
P/N YRD604-KD-BLE-0047 Rev A
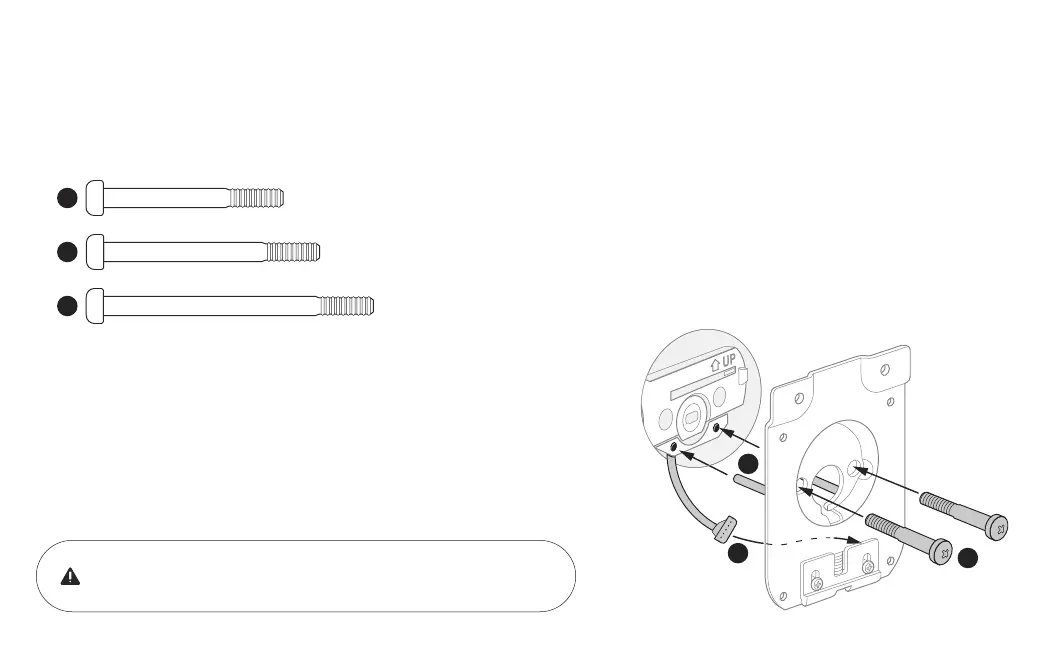
1. Refer to measurements B, C, and D on the Door Checker (page 5) to select screws.
x 2 Teal Screws (13/8” door thickness)
x 2 Black Screws (13/8” - 13/4” door thickness)
x 2 Silver Screws (13/4” - 21/4” door thickness)
B
2
3
4
C
D
4
Install Mounting Plate
2. Route the wire cable into the designated slot in the mounting plate.
3. Guide posts of the mounting plate into the holes on the exterior keypad.
4. Tighten screws with a screwdriver to secure the mounting plate. As you tighten
the screws, make sure the mounting plate and the keypad are straight.
Ensure that the wire cable is not pinched to prevent it from
reducing your lock’s battery life.

Table of Contents

Questions and Answers:

Question and Answer IconNeed help?

Do you have a question about the Yale Assure Lock 2 and is the answer not in the manual?

Yale Assure Lock 2 Specifications

General IconGeneral
Lock TypeDeadbolt
ConnectivityBluetooth, Wi-Fi (with module)
Power Source4 AA Batteries
Battery LifeUp to 1 year
Auto-LockYes
WeightVaries by model
Keypad TypeTouchscreen
CompatibilityAmazon Alexa, Google Assistant, Apple HomeKit
InstallationDIY, fits standard doors
Door Thickness Compatibility1-3/8" to 2-1/4"
User CodesUp to 25
Weather ResistanceWeather resistant
BacksetAdjustable 2 3/8" or 2 3/4"
Warranty1-year on electronic parts
FinishSatin Nickel, Oil Rubbed Bronze, Black Suede
Backup Power9V battery terminal

Related product manuals