Recording
Recording process
20
Recording process
The recording process includes the following steps.
With the
, a unit of recording/playback data is called a project.
1. Set the recording format (WAV/MP3)
(→P.81)
•
When set to MP3, a stereo mix will be recorded
regardless of the number of tracks.
• You can also make automatic recording (
→
P.25),
pre-recording (
→P.27
), backup recording
(
→P.30
), low cut (
→P.74
), compressor/limiter
(
→P.75
) and metronome (
→P.72
) settings, for
example.
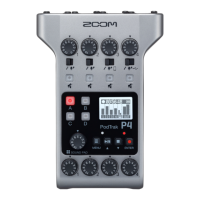
2. Select recording tracks (→P.22)
•
Use the track buttons to select. When the selected
track indicator lights red, the input signal can be
monitored.
• Press two track buttons at the same time to use them
as a stereo track (stereo link).
3. Adjust input levels
•
Use the
for each input.
•
Adjust so that the level meter stays in the yellow
when the loudest sound is input.
•
When connecting a device with a standard output
level of +4 dB or the level stays too high for any
other reason, set the PAD switch to −20.
•
You can also adjust the side mic level (when using
an MS or stereo shotgun mic) (→P.29) and show
the VU meters (→P.89), for example.
•
You can overdub
(→P.31), mix
down to a stereo file
(→P.48) and check
project/file informa-
tion, for example.
•
Start recording:
•
Stop recording:
•
You can also make
mark settings.
•
Pause recording:
•
Start playback:
•
Stop playback:
•
Make settings as desired for
marks, AB repeat (→P.38),
playback speed (→P.37)
playback pitch (→P.41),
playback mode (→P.40), and
the project mixer (→P.42).
•
Connect an XY mic
or other mic capsule.
(→P.07)
•
Connect mics,
instruments and other
equipment to Inputs
1–4. (→P.08)
Connect
Overdub
and edit
Record
(
→P.20
)
Prepare to
record
Turn power on
(
→
P.15)
Playack and
check (
→P.34
)