Do you have a question about the AC Infinity CONTROLLER 69 PRO and is the answer not in the manual?
Details compatibility with EC motors and the use of a Molex adapter.
Ensures power source conformity and adherence to local code restrictions.
Emphasizes reading instructions and seeking professional help if needed.
Tips to prevent RFI affecting sensor probes, including cord placement.
Automation controls based on climate, VPD, timers, and schedules.
Mounting via magnet or kickstand for optimal viewing.
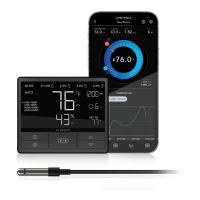
Bluetooth/Wi-Fi enabled for remote access to data and automations.
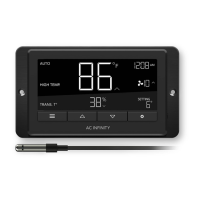
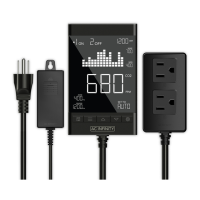
LCD display shows key data like temperature, humidity, and VPD.
Connect up to four devices for simultaneous or independent programming.
Options for Fahrenheit/Celsius, clock, calibration, and custom transitions.
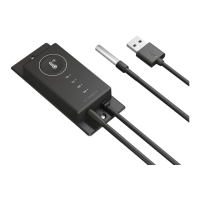
Details all included items like controller, probe, adapters, and mounting hardware.
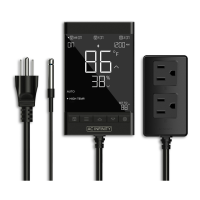
Steps for plugging in devices and sensor probes for initial operation.
Using included hardware for organizing and securing device cables.
Instructions for securely mounting the controller to a wall using anchors.
Attaching the controller to steel surfaces using the built-in magnet.
Securing the controller using bolts with a mounting plate (not included).
Managing cords through grooves and using the kickstand for desktop placement.
Connect multiple grow devices for centralized control and programming.
Details Molex adapters, extension cables, and expansion dongles for connectivity.
Utilizing the controller's four ports to power and control multiple devices.
Connecting multiple devices via dongles and extending connection chains.
Cycles through connected devices (ALL, 1-4) for programming.
Cycles through programming modes like OFF, ON, AUTO, VPD, TIMER, CYCLE, SCHEDULE.
Cycles through settings: DISPLAY, CLOCK, °F/°C, CALIB, TRANS, BUFF, LEAF.
Adjusts current mode values; hold to reset to OFF/Default.
Shows connected devices and their current levels.
Shows current temperature, humidity, and VPD with trend indicators.
Indicates current mode and displays the current time.
Shows remaining time for timers and allows user setting adjustments.
Notifies of controller status, lock, CLIMATE, and TIMER alerts.
Select ALL port for simultaneous, numbered ports for individual programming.
Details OFF Mode and Minimum Level settings for device operation.
Sets the active level for devices and serves as the maximum for other modes.
Sets high temperature trigger to automatically activate/deactivate devices.
Sets low temperature trigger to automatically activate/deactivate devices.
Sets high humidity trigger to automatically activate/deactivate devices.
Sets low humidity trigger to automatically activate/deactivate devices.
Sets high VPD trigger to automatically activate/deactivate devices.
Sets low VPD trigger to automatically activate/deactivate devices.
Sets countdown timers for devices to turn on or off automatically.
Sets continuous ON and OFF durations for devices to cycle.
Sets daily ON and OFF clock-time schedules for device automation.
Adjusts display brightness and locks/unlocks the controller.
Changes displayed units (°F/°C) and adjusts the current clock time.
Calibrates temperature, humidity, and VPD readings from the sensor probe.
Configures gradual level shifts based on temperature changes.
Configures gradual level shifts based on humidity changes.
Configures gradual level shifts based on VPD changes.
Creates a trigger-off point to prevent rapid device shutoff based on temperature.
Creates a trigger-off point to prevent rapid device shutoff based on humidity.
Creates a trigger-off point to prevent rapid device shutoff based on VPD.
Displays icons for Advance Programming, Auto Mode, Timer, and VPD alerts.
Icons for Wi-Fi status, display lock, general alerts, and alarms.
Resets settings to default and locks/unlocks the controller.
Turns display off and provides a quick way to enter OFF Mode.
Resets values or automatically adjusts settings with button presses.
Instructions for downloading and using the AC Infinity mobile application.
Step-by-step guide to pair the controller with the app via Bluetooth.
Guide for connecting the controller to a Wi-Fi network using the app.
Tips to resolve issues during the Wi-Fi connection process.
View the connected controller and its unique ID within the app.
Clarifies compatible devices and the definition of 'level' for controller settings.
Addresses issues with devices not turning off or running at low levels.
Helps prevent rapid cycling in AUTO Mode and sets minimum speeds.
Resolves pairing problems, explains location permissions, and interference issues.
Brief descriptions of AC Infinity's grow tents, duct fans, and grow lights.
Details the two-year warranty, exclusions, and contact information.
| Connectivity | Wi-Fi, Bluetooth |
|---|---|
| Power Supply | AC Adapter |
| Compatibility | AC Infinity Devices |
| Operating Voltage | 5V DC |
| Amperage | 2A |
| Sensor Ports | 4 |
| Fan Ports | 4 |
| Control Ports | 4 |
| Weight | 0.5 lbs |
| Display | LCD |
| Control | Manual Control |
| App Compatibility | iOS and Android |