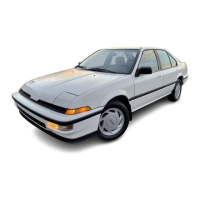
1. As illustrated in the
removal
steps
ot this
proce-
dure. use a commercially
-
available air-impact
driver attachment
modified to fit the diameter of the
valve
guides.
In
most
cases,
the same
procedure
can be done using
the Valve Guide
Driver and a
conventional hammer,
COMMCRCIALLY.AVAILABLE
VALVE GUIDE
DRIVER
az mm +- sz mm
{3.43
inl
I
tz.zt
in)
tfr
10.8
mm
10.42
inl
5.3 mm
(0.21
inl
I
_{l
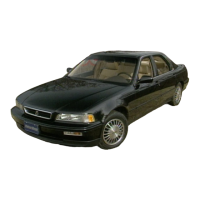
R.mov.l and
In3trll.tion
VALVE GUIDE
DRIVER.
5.5
mm
07742
-
q)101tt0
Select the
proper
replacement
guides
and chill
them
in the freezer section of a
refrigerator for
about an hour.
Use a
hot
plate
or oven to evenly heat the cylinder
head to 300'F
(150"c).
Monitor the temperature
with
a cooking thermometer.
CAUTION:
.
Do
not
us9 a
iorch; it may warp ths hsad.
.
Do not
get
ths
head hottor than 300"F
(150"C);
excsssivo hgat may
loogen the valvo soaG.
.
To
avoid
burns, use hsaw
glovo3
whon handling
the heated cylindor
h€ad.
Working from the camshaft side, use the driver and
an air hammer to drive the
guide
about
2 mm
(0.1
in) towards the combustion chamber.
This will
knock off some of the carbon and
make removal
easier.
CAUTION:
.
Always wear ssfcty
gogglos
01 a taca rhiold
whcn using thc air hrmmcr,
.
Hold tho.ir
hammer
diroctly
in line with tho
v6lvo
goido
to
prov.nt
drmaging tho driv6r.
Turn the
head
over and
drive the
guide
out toward
the camshaft side of
head.
lf
a
valve
guide
still won't move, drill
it
out
with
a
8.0 mm
(5/16
in) bit, then try again.
CAUTION; Drill
guid6
only
in oxtromc cs3os:
you
could
dlmsgo tho cylinder hoad if tho
guidc
brcakr.
VALVE GUIDE DBIVER.
5.5 mm
07742
-
0010100
6. Remove the
new
guide(s)
from the refrigerator, one
at a time,
as
vou
need them.
(cont'd)
l
o
-_
-\
i
oc)

 Loading...