Home
Acura
Automobile
TSX 2004
Removal And Installation
Page 62 (Securing the Power Steering Fluid Line Bracket)
Acura TSX 2004 - Securing the Power Steering Fluid Line Bracket
76 pages
Manual
To Next Page
To Next Page
To Previous Page
To Previous Page
Loading...
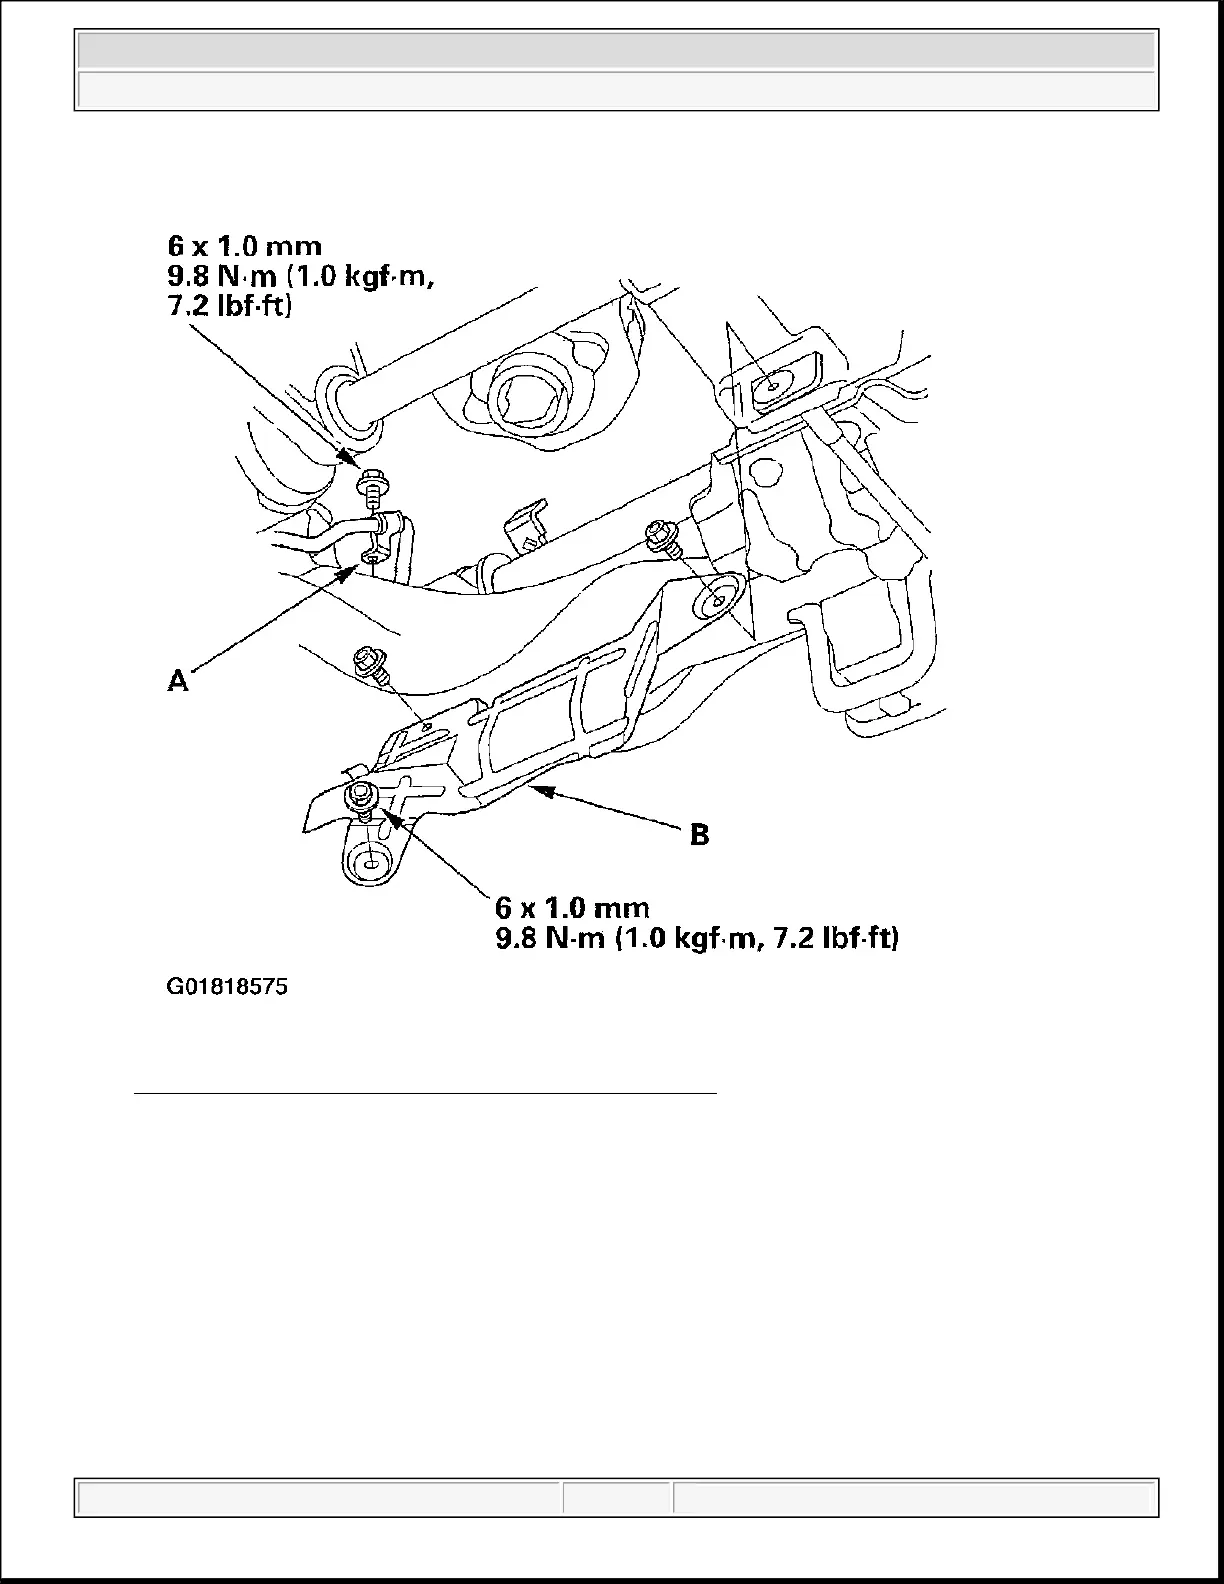
Fig. 61: Securing The Power
Steering Fluid Line Bracket
37.
Install the exhaust pipe A, its mount (B), and NEW
g
askets (C).
2004 Acura TSX
2004 AUTOMATIC TRANSMISSIONS
Removal & Installation - TSX
Wednesday, March 12, 2008 9:44:48 PM
Page 62
61
63
Table of Contents
Main Page
Removal & Installation - TSX
1
Transmission Removal
1
Special Tools Required
1
Removing the Drain Plug
2
Disconnecting Connectors
3
Removing the Transmission Range Switch Connector
4
Disconnecting 3Rd Clutch Transmission Fluid Pressure Switch Connector
5
Disconnecting the Shift Solenoid Harness Connector
6
Removing the ATF Cooler Hoses from the ATF Cooler Lines
7
Removing the ATF Cooler Hose from the Hose Clamp
8
Removing the Ground Cable
9
Transmission Upper Mount Bracket Plate & Transmission
9
Removing the Harness Clamp & Hose & the Bolts Securing the Hose Clamps
10
Removing the Clamp Bracket
11
Attaching the Special Tool Adapter
13
Installing the Engine Support Hanger to the Vehicle
13
Disconnecting the Hose from the Vacuum Line
14
Removing Components
15
Removing the Exhaust Pipe
16
Removing the Steering Gearbox Heat Shield
17
Removing the Bolt Securing the Power Steering Fluid Line Bracket
17
Removing Power Steering Fluid Line from Its Clamps on Front Subframe
18
Removing the Engine Stiffener
19
Removing the Drive Plate Bolts While Rotating Crankshaft Pulley
19
Removing the Shift Cable Cover
20
Removing the Rear Mount Stop
21
Removing the Power Steering Fluid Line Bracket from the Front Subframe
22
Removing the Steering Gear Box Mounting Bolts & Stiffener
23
Removing the Steering Gearbox Mounting Bracket Bolts
24
Removing the Rear Mount Base Bracket Bolts
25
Removing the Transmission Lower Mounts Nuts
26
Removing the both MID-Mounts
27
Attaching Special Tool to the Subframe
29
Removing the Four Bolts Securing the Stiffeners
30
Four Bolts Securing the Front Subframe
30
Removing the Transmission Lower Mounts
31
Removing the Intermediate Shaft
32
Removing the Rear Mount/Base Bracket
33
Removing the Transmission Housing Mounting Bolts
34
Removing the Front Mount Bracket
35
Removing the Torque Converter
38
Drive Plate Removal & Installation
39
Checking the Transmission Lower Front Mount & Lower Rear Mount
39
Transmission Installation
40
Removing the Drive Plate & Washer from the Engine Crankshaft
40
Attaching the Transmission to the Engine
42
Installing the Transmission Housing Mounting Bolts
42
Installing the Front Mount Bracket with the NEW Bolts
45
Installing the Rear Mount Bracket
46
Installing the NEW Set Ring on the Intermediate Shaft
47
Installing the Transmission Lower Mounts
48
Support the Front Subframe with the Special Tool
49
A Jack & Lifting It up to Body
49
Slide the Steering Gearbox in the Gearbox Mounting Bracket on Subframe
50
Installing the MID-Mounts Mounting Bolts
51
Aligning the Reference Marks with Edge of both Rear Stiffener
52
Installing the Rear Mount Base Bracket Bolts
54
Installing the Transmission Lower Mounts Nuts
54
Installing the Steering Gearbox Mounting Bolts & Stiffener
55
Installing the Steering Gearbox Mounting Bracket Bolts
56
Securing Power Steering Fluid Line Bracket on the Subframe with Bolt
57
Installing the Rear Mount Stop
58
Attaching the Torque Converter to the Drive Plate
60
Securing the Power Steering Fluid Line with the Clamps
61
Securing the Power Steering Fluid Line Bracket
62
Installing the Exhaust Pipe
63
Installing the Damper Forks with Damper Pinch Bolts
64
NEW Self-Locking Nuts
64
Installing the NEW Front Mount Bolt
65
Removing the Engine Support Hanger
66
Removing the Special Tool Adapter from the
66
Engine
67
Installing the Clamp Bracket
67
Installing the Strut Brace
68
Installing the Transmission Upper Mount Bracket
69
Transmission Upper Mount Bracket Plate & Ground Cable
69
Connecting the ATF Cooler Hose
70
Connecting the 3Rd Clutch Transmission Fluid Pressure Switch Connector
72
Connecting the Shift Solenoid Harness Connector
73
A/T Clutch Pressure Control Solenoid Valve B Connector
73
Solenoid Valve C Connector
73
Connecting the Countershaft Speed Sensor Connector
74
Mainshaft Speed Sensor Connector
74
Installing the A/T Clutch Pressure Control Solenoid Valve a Connector
75
2Nd Clutchtransmission Fluid Pressure Switch Connector
75
Other manuals for Acura TSX 2004
Manual
48 pages
Related product manuals
Acura TSX 2007
382 pages
Acura TSX 2005
270 pages
Acura 2009 TSX
526 pages
Acura 2008 TSX
390 pages
Acura 2004 TSX
1 page
Acura 2006 TSX
2 pages
Acura 2005 TSX
2 pages
Acura 2005 Acura TSX
288 pages
Acura TSX 2012
324 pages
Acura TSX 2014
19 pages
Acura 2012 TSX
20 pages
Acura 2010 TSX
524 pages

 Loading...