Trigger out ports.
Connecting video output to a medical imaging recorder:
• Connect a DVI-D or 3G-SDI cable to video output group 2 on the back of the displaying
unit. See section 2.4 for Video out port locations.
• Connect the other end of the DVI-D or 3G-SDI cable to the corresponding video-in port
on the medical imaging recorder.
Connecting trigger output to a medical imaging recorder:
• Connect a 3.5 mm jack or D-SUB9 cable to the trigger output channel you wish to use (A,
B, C or D). See section 2.4 for Trigger out port locations.
• Connect the other end of the cable to the corresponding trigger input port on the
medical imaging recorder.
NOTE: It is important that the assigned function on the trigger output port of the displaying
unit matches the function assigned to the connected input port of the medical imaging
recorder.
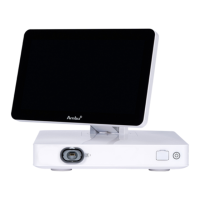
7. Operating the Displaying Unit
This section describes the functions in the user interface of the displaying unit. To use the
functions, it is a prerequisite that the system is turned ON and an Ambu visualization device is
connected to the appropriate connector port.
Letters in grey circles refer to the
illustrations in the Quick Guide on page 2.
7.1. Preparation and Inspection of the Displaying Unit Before Use
1. Closely examine the displaying unit and other parts for any damage. Do not use the
displaying unit if it is damaged in any way.
A
2. Clean and disinfect the displaying unit (see chapter 9).
3. Connect the displaying unit to a suitable power outlet using the included power cable
B
and turn on the power outlet. The orange indicator light in the power button turns
on to indicate that the displaying unit is in STANDBY mode.
4. Adjust position and orientation of the touch screen to your preference.
D
5. Turn ON the displaying unit by pressing the power button
E
. The indicator light in the
power button switches from orange (STANDBY mode) to green (ON). If an Ambu
visualization device is connected, a live image is available while the user interface is
loading.
6. Connect the Ambu visualization device to the displaying unit by plugging its connector
into the VDI port placed on the front of the base. Make sure that the connector and port
colours are matching, and the arrows are aligned.
F
7. Verify that a live video image appears on the screen, by pointing the distal end of the
Ambu visualization device towards an object, e.g. the palm of your hand.
G
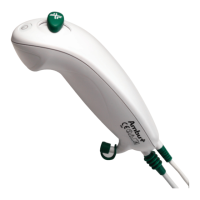
7.2. Preparing and Operating the Ambu Visualization Device
Please refer to the Instructions for Use for the specific visualization device.
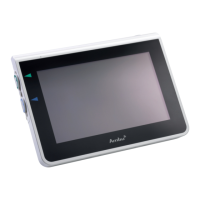
7.3. Live View Functions
When the displaying unit is turned ON, the user interface will load after approximately 20
seconds to show the Live view
screen. If an Ambu visualization device is not connected, an
animation showing how to correctly connect an Ambu visualization device is playing in the
live image area. If a visualization device is connected, the live image is available soon after the
displaying unit is turned ON. Even if a network error or other problems in the system occur, the
Live view will still be available making it possible to use the displaying unit for clinical
purposes.
When the user interface appears, a tool bar
1
is visible on the left side of the screen which is
always accessible. It contains the Live view
, Archive , Login and Settings tabs.
The Live View
tab will initially be active and will be highlighted with a green colour
2
.
24