

M
Michael WeaverAug 31, 2025
What to do if Biolase Dental equipment shows 'Emergency switch'?
- JJordan RiveraAug 31, 2025
If your Biolase Dental equipment displays 'Emergency switch' because the E-switch is pressed, press the E-switch again.
What to do if Biolase Dental equipment shows 'Emergency switch'?
If your Biolase Dental equipment displays 'Emergency switch' because the E-switch is pressed, press the E-switch again.
How to resolve lost footswitch communication on Biolase EPIC X?
If the Biolase Dental equipment displays 'Lost Footswitch communication' due to wireless interference, reposition the console/footswitch to improve communication.
How to fix 'Footswitch battery is low' on Biolase EPIC X?
If your Biolase Dental equipment displays 'Footswitch battery is low' because the battery on the footswitch is low, replace the footswitch battery.
How to resolve 'Battery is not connected' message on Biolase EPIC X?
If your Biolase Dental equipment displays 'Battery is not connected' because the battery is not connected, plug in the battery.
What to do if Biolase EPIC X Dental equipment displays 'Footswitch held'?
If your Biolase Dental equipment says 'Footswitch held' because the footswitch is held, release the footswitch.
What to do if Biolase Dental equipment shows 'Battery critically low'?
If the Biolase Dental equipment displays 'Battery critically low' because the battery is critically low, plug in the DC supply.
How to fix 'Battery is low' on Biolase EPIC X?
If your Biolase Dental equipment shows 'Battery is low' because the battery is low, plug in the DC supply.
What to do if my Biolase EPIC X Dental equipment shows shutdown temperature?
If the Biolase Dental equipment shuts down due to high temperature because the system is too hot, allow 5-10 minutes for the laser to cool down.
Lists conditions or patient factors that prohibit or require caution when using the Epic X.
Details essential safety advice, usage restrictions, and protective measures for safe operation.
Provides physical dimensions, weight, and general operational parameters of the Epic X.
Outlines voltage, frequency, and power supply requirements for the device.
Details laser classification, wavelength, power output, and modes of operation.
Describes the aiming beam specifications and classification.
Lists all items included in the Epic X laser system package.
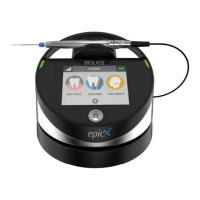
Describes the base console, its controls, indicators, and touch screen.
Covers the Deep Tissue Handpiece and the wireless footswitch operation.
Essential guidelines for safe operation, including eyewear and handling of the laser.
Details the laser and electrical safety classifications applicable to the device.
Describes system monitors, interlocks, and emergency controls for safe operation.
Covers facility requirements, environmental conditions, and initial unit setup.
Provides instructions for proper handling, storage, and connection of the fiber optic cable.
Details how to assemble the surgical handpiece and attach disposable tips.
Explains the process for connecting the Whitening and Deep Tissue handpieces.
Guides on powering on the device, entering the access code, and navigating the home screen.
Covers accessing settings, changing parameters, and re-establishing footswitch pairing.
Explains entering Ready/Standby modes and activating the laser via the footswitch.
Describes pulse mode selection, peak power display, and continuous mode.
Details using the touchscreen for selecting procedures and customizing settings.
Provides steps for safely powering down the laser console after use.
Introduces the device and emphasizes training and practice before clinical use.
Covers tip initiation and pre-programmed settings for soft tissue procedures.
Presents a table of preset parameters for various surgical indications.
Details the requirements and preset values for teeth whitening applications.
Explains pain therapy use, preset values, and considerations like skin type.
Outlines routine cleaning of the console screen and front panel.
Provides detailed steps for cleaning and steam sterilizing the surgical handpiece.
Instructions for inspecting and cleaning the lens at the end of the fiber optic cable.
Guides on installing, replacing, and disposing of the console's lithium-ion battery.
Details how to change the batteries in the wireless footswitch.
Advises on careful handling during transport and environmental conditions for storage.
Provides fixes for common warning and alert messages displayed by the system.
Offers solutions for various error codes encountered during system operation.
| Laser Type | Diode |
|---|---|
| Wavelength | 940 nm |
| Display | Touchscreen |
| Fiber Optic Connector | SMA 905 |
| Electrical Requirements | 100-240 VAC, 50/60 Hz |
| Footswitch | Wireless |
| Power | 0.1-10W |
| Operation Modes | Continuous Wave, Pulsed |
| Pulse Duration | 10 μs - 1000 μs |
| Cooling System | Air cooled |
| Aiming Beam | Red Diode (635 nm) |