34
IMPORTANT NOTE:
- Please keep connecting the power during the rmware update process.
- Please make sure your WI-FI connection is stable.
- When the update process start, do not operate the smart phone and console until the update nished.
- During rmware update the console will stop upload data to weather server. It will reconnect to your WI-FI
router and upload the data again once the rmware update succeed. If the console cannot connect to your
router, please enter the WSLink app to setup again.
- After the rmware update, If the setup informations are missing, please input the setup information again.
- Firmware update process have potential risk, which cannot guarantee 100% success. If the update fail,
just press and hold the [ + / WIND ] or [ - / BARO ] key with 10 seconds and then redo the above step to
update again.
8.2 BATTERY REPLACEMENT
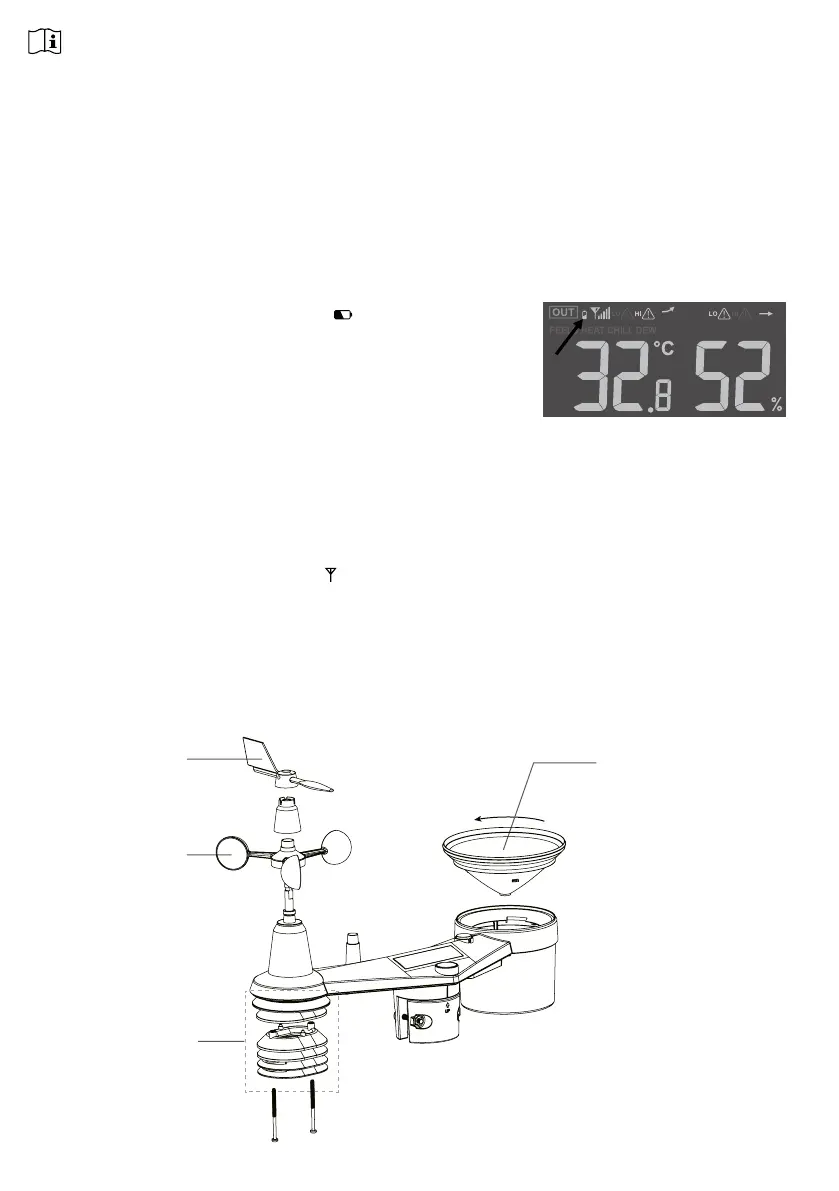
When low battery indicator “ ” is displayed
near the antenna icon, it indicates that the
7-in-1 wireless sensor array battery power
is low respectively. Please replace with new
batteries.
8.2.1 RE-PAIRING THE SENSOR ARRAY MANUALLY
Whenever you changed the batteries of the 7-in-1 weather sensor array or other additional sen-
sors, re-synchronization must be done manually.
1. Change all the batteries to new ones of the wireless sensor array.
2. Press [ SENSOR / WI-FI ] key on the console to enter sensor synchronization mode (as
indicated by the ashing antenna
).
8.3 RESET AND FACTORY RESET
To reset the console and start again, press the [ RESET ] key once or remove the backup battery
and then unplug the adapter.
To resume factory settings and remove all data, press and hold the [ RESET ] key for 6 seconds.
8.4 WIRELESS 7-IN-1 SENSOR ARRAY MAINTENANCE
CLEANING THE RAIN
COLLECTOR
1. Rotate the rain collector by
turning it 30° anti-clockwise.
2. Gently remove the rain collector.
3. Clean and remove any debris
or insects.
4. Install the collector when it is
clean and fully dried.
REPLACE THE WIND VANE
Unscrew and remove the wind
vane for replacement.
REPLACE THE WIND CUPS
1. Unscrew and remove the
top cap.
2. Remove the wind cup for
replacement
CLEANING THERMO-HYGRO
SENSOR
1. Remove the 2 screws at the
bottom of the radiation shield.
2. Gently pull out the shield.
3. Carefully remove any dirt or
insects on the sensor (do
not let the senssors inside
get wet).
4. Clean the shield with water to
remove any dirt or insects.
5. Install all the parts back when
they are clean and fully dried.



 To Next Page