Apex2
9
Controls and fittings
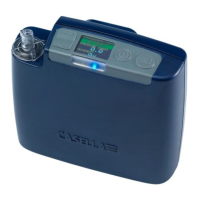
The Apex 2 has a limited number of easy to use controls and two pipe fittings.
Controls and menu structure
The up / down arrows, which are used to scroll through menu and setting items
and also to change values.
The On / Off button, which is used to turn the pump on and off, and to return to
a previous screen.
The enter key, which is used to enter sub-menu items and to save changed
values.
This is one of three dashboard screens that cycle after you turn on
the pump. The same information is also displayed when the pump is
running (see Operation on page 11). To temporarily maintain a single
screen as the visible screen, press and hold .
This is the menu that you use on a regular basis to reset, set the flow
and calibrate the pump between sample runs. It also gives you
access to timer control (see Setup before starting a run on page 12
and Timer programmes (Plus and Pro models only) on page 15).
The settings can be used to change the functionality of the pump or
to access diagnostic information. You’ll probably only access the
settings infrequently (see Settings on page 18).
Scroll up / increase
Scroll down / decrease
Status indicator
Blue light flashes when pump running
Red light flashes when there is a fault or during charging
Colour display
View all run parameters
and menu items