- 6 -WXZ468RMP
Open Comm. PORT
Initialization of JIG
Incoming
connection
FM S-Meter Slope
FM S-Meter Start
FM S-Meter Point
FM IF-Count
BAND - Alignment
AREA
FM
MW(AM) LW
Settings
TUNER RDS TUNER
Alignment
LEVEL
Alignment
Alignment
Check
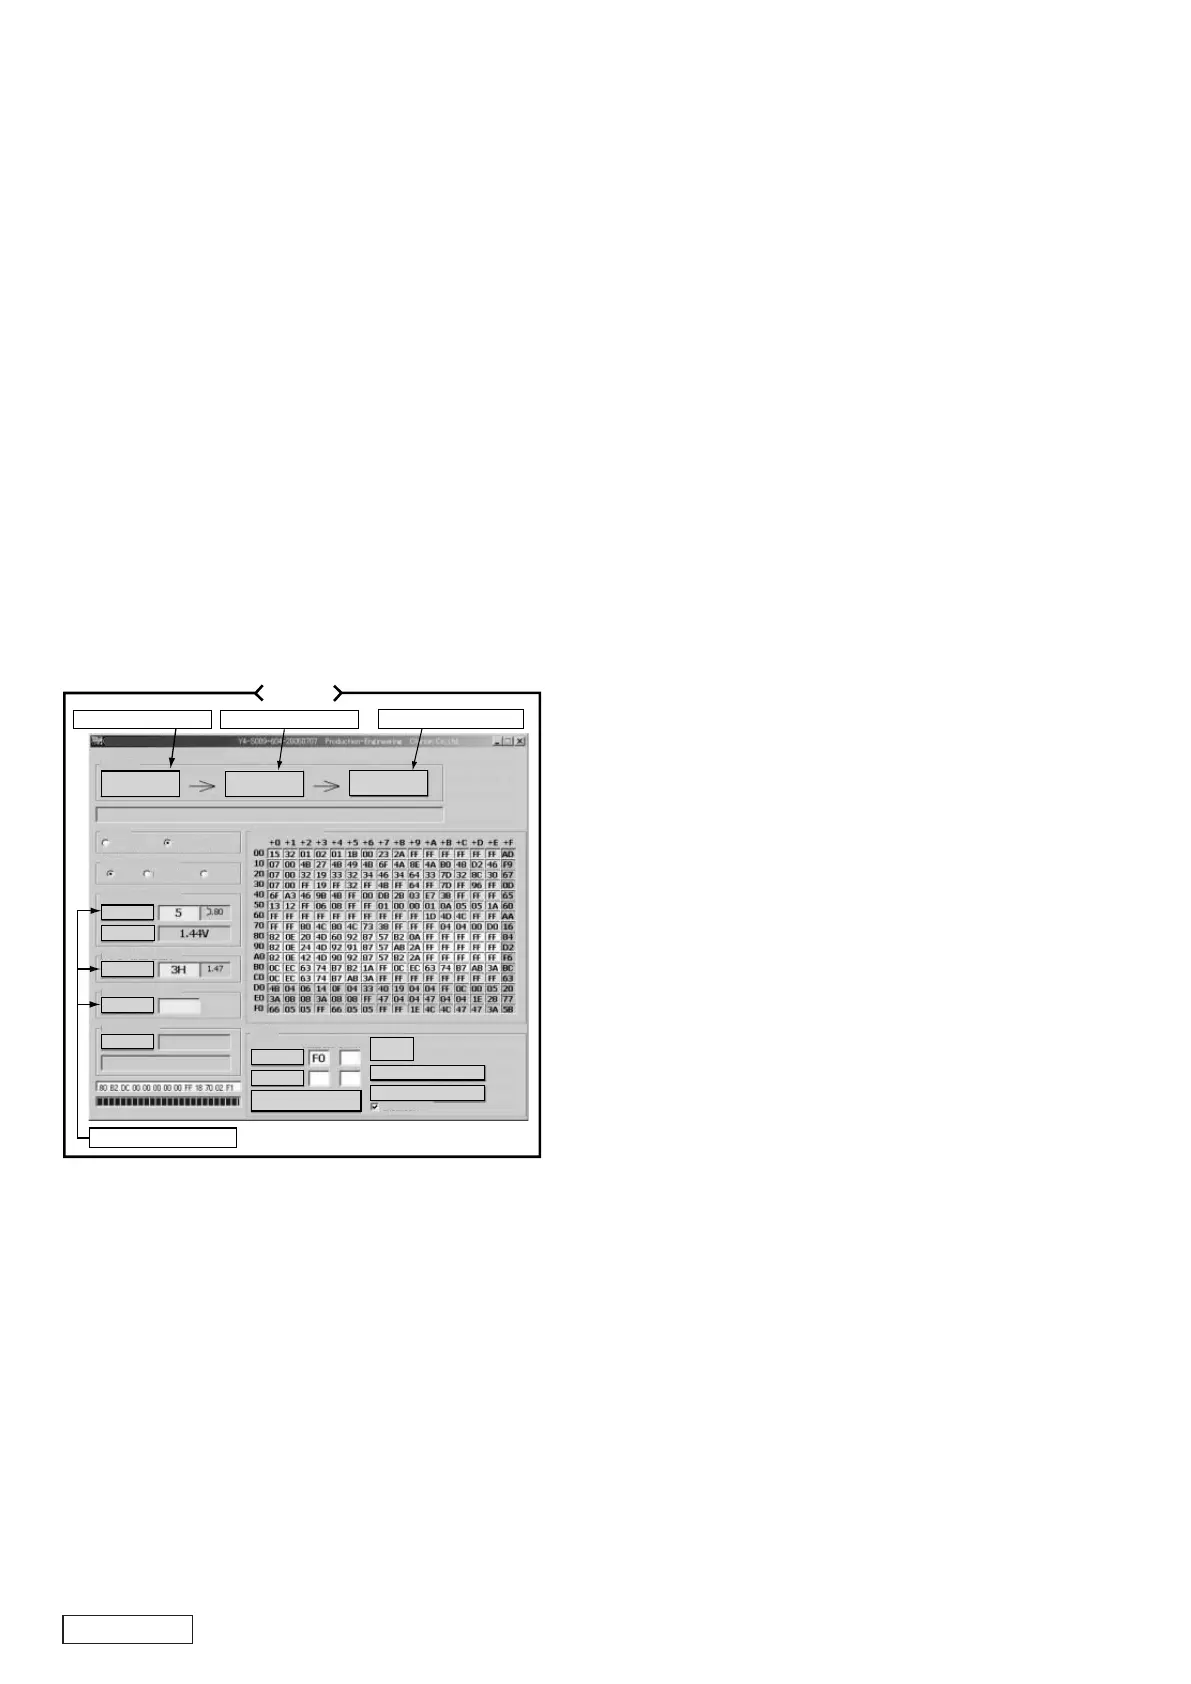
MENU ALIGNMENT ROM RAM
CCC Tuner Alignment for Ce-NET
FM S-Meter Adjustment
ROM DATA MAP
ROM
Address DATA
DATA Read
DATA Write
DATA
Read ALL
CheckSUM
DATA Write (0x70-0xFF)
DATA Write (0x00-0xFF)
OK
Display
A. Open Comm. PORT
B. Initialization of JIG
C. Incoming connection
ADJUSTMENT OF CCC-TUNER
: 880-2150A
The data of receiving area and adjustment point are written
in the memory of a spare tuner pack. It is possible to re-
ceive a broadcast with no adjustment. However, please
adjust it to use the unit with the better conditions.
Measuring instrument
1. Personal computer with Windows98SE/WindowsME/
Windows2000 or WindowsXP operating system
2. Adjustment software : CCC-TUNER Alignment for
CeNET soft
3. CeNET analyzer
4. SG
5. AM ANT Dummy box
Writing the parameter
[ Strat up ]
1. Install the adjustment software in the personal computer.
2. Connect the unit to the personal computer with the
CeNET analyzer.
3. Open the adjustment software in the computer, and turn
on the unit.
4. Click the " A. Open Comm.PORT " button of the display.
The communication of the personal computer and the
analyzer starts.
5. Click the " B. Initialization of JIG " button of the display.
The personal computer sends the command for opera-
tion of the analyzer.
6. Click the " C. Incoming connection " button of the dis-
play. The unit recognizes the external jig. The prepara-
tion completes.
[ Setting of reception band ]
1. The indicator blinks according to the reception when the
connected processing ends normally.
2. The adjustment band is automatically set by the main
microcomputer of the unit and memorized in EEPROM
in CCC-TUNER.
3. Press the reset button of the unit to set the data.
Adjustment for S-meter
1. Connect the antenna input terminal of the unit to S.S.G.
2. Adjustment in order of Slope, Start and Point.
The reception frequency of the set is as follows.
* Reception frequency of FM : 98.1MHz
* Reception frequency of MW : 999kHz
* Reception frequency of LW : 216kHz
Click the " Alignment " button of [ FM S-Meter Slope ] of
the display. Then, a set level of SG is displayed.
Set the ATT value of SG to the level.
Input 26dBu at this unit. Click the " OK " button, and the
acquisition of the first data starts.
3. A set level of SG is displayed again after a while.
Change the ATT value of SG to the level.
Input 46dBu at this unit.
4. When the adjustment is completed, it is displayed with
" COMPLETED ". Then click the " OK " button.
The acquired value is displayed in the display.
5. Click the " Alignment " button of [ FM S-Meter Start ] of
the display. Set the ATT value of SG to the level. Input
26dBu at this unit.
6. When the adjustment is completed, it is displayed with
" COMPLETED ". Then click the " OK " button.
The acquired value is displayed in the display.
7. Click the " Alignment " button of [ FM S-Meter Point ] of
the display. Set the ATT value of SG to the level. Input
46dBu at this unit.
8. When the adjustment is completed, it is displayed with
" COMPLETED ". Then click the " OK " button.
The acquired value is displayed in the display.
9. The adjustment of FM was completed.
Change the reception band of the unit to MW, and ad-
just MW in the order from " Slope " as well as FM.
After adjusting MW, adjust LW as well as MW.
10.After all the adjustments, press the reset button of the
unit to set the data.
Confirmation after all adjustments
Reconfirm the version of the parameter file after all ad-
justments are completed.
1. Press the [ADJ] button to switch to the adjust mode.
2. Turn the [SEARCH] knob to select "SYS CHECK" .
* Microcomputer version display : Keep pressing the [1]
button until the display changes.
Display : " MAIN *. ** "
* Model name and destination display : Keep pressing
the [3] button until the display changes.
Display : " * PE***** "
* CCC-TUNER version display : Keep pressing the [4]
button until the display changes.
Four items of the following are switched with the
[SEARCH] knob.
(1) E2PROM Version display : " E2pVer_*** "
(3) Test Version : " TestVer_** "
(2) MapType display : " MapType_** "
(4) Tuner Hardware Version : " Hard___*** "

 Loading...