11
1300 663 907
After Sales Support
help@cocoonproducts.com.au
Model number:
HE210303
02/2022
8CH 1080P SECURITY CAMERA SYSTEMDVR INITIAL SETUP
DVR Initial Setup
Initial Setup
Prior to installing the security system, we highly recommend
that you test all components to ensure they are in good working
order. To do this, the DVR unit must be connected (temporarily)
to an HDMI compatible TV screen or computer monitor (not a
laptop or computer) to complete your initial setup. Once setup
is fully complete, the TV screen or computer monitor can be
disconnected and setup as per your requirements.
DVR Unit Connections
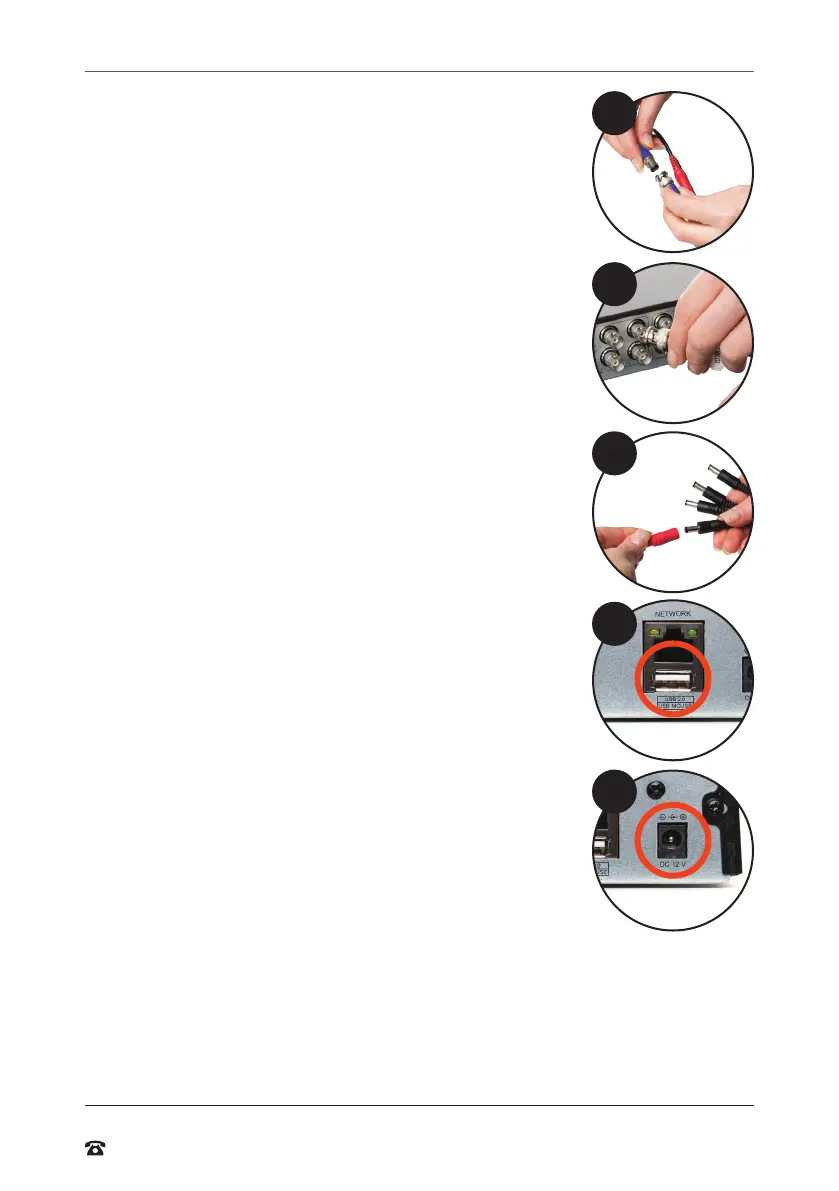
1. Connect each of the camera BNC extension cables to the
camera and power connectors taking note of the labelling on
the extension cable i.e. Do not connect the incorrect end of
the BNC cable to the DVR or the camera as it will not function
2. Connect the other end of the BNC extension cables to the
DVR pors marked ‘Video In’
3. Connect the 8-way power splitter to each of the BNC
extension cables (red)
4. Connect the ‘to camera’ power adaptor to the 8-way splitter
cable and plug into a mains outlet, then switch the outlet on
5. Connect the included HDMI cable to the back of the DVR unit
and
connect the other end of the cable to your monitor or TV (not
a computer or laptop)
NOTE: You must switch your TV or monitor to the correct INPUT
once the DVR unit has been powered on, for example HDMI 1
6. Connect the mouse to the USB por (on the back of the DVR
unit)
NOTE: Ensure you are connecting the 12V / 3A power adaptor
labeled ‘to cameras’ to the 8-way splitter cable
7. Connect the 12V / 2A power adaptor labeled ‘to DVR’ to the
DVR unit labeled DC12V and plug the other end into a mains
outlet
8. Switch the outlet on. The DVR unit will begin the boot
sequence
NOTE: Both the DVR unit and cameras operate as soon as they
are connected to a power source and the power adaptors are
switched on. To turn the cameras or DVR unit of, switch of the
power adaptors at the power outlet.
9. The Cocoon DVR system allows you to view footage remotely
either on compatible Smarphone, Tablets or internet-ready Windows PCs or Macs. If
you are wanting to set this up (instructions provided in “Use Apple or Android mobile
to access footage” on page 16) you must have a constant, smooth and stable
Internet connection from your modem/router via a LAN cable.
To connect your DVR to the internet:
a. Plug one end of the Ethernet cable into the back of the DVR into the network por
b. Plug the other end of the Ethernet cable into a spare LAN (not WAN) por on your
network’s modem / router
1
2
3
6
7