16
CraftBot 3
5.4.3. DUAL HEAD CALIBRATION (X-Y)
The X-Y axis must be calibrated so that the coordinate system of the two heads is completely aligned. So,
if we send both heads to the same coordinates then they should be at the same point. This is important
when we are printing an object with both heads. If there is any deviation, the print will be misaligned;
for example, if there is a gap between two materials or if the two materials are printed onto each other.
Calibration can be performed on the X and Y Axes individually, or on both axes at the same time in an
automated program by using centre XY button.
Calibration process:
1. Heat up the heads and load the laments into both extruders!
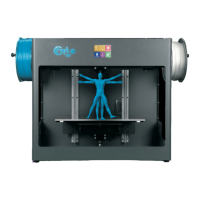
2. Select the Settings menu
on the LCD screen and go to the 5th page. Select the calibration icon
(to the oset coordinate systems)
3. Head and bed temperature must be entered (what material is placed into the extruder head: ABS-
PLA-PET)
4. Start the calibration of the X, Y, or the automated XY axes
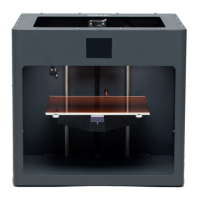
5. The printer will print the calibration lines with both printheads. It will print the number 1 next to the
rst line.
6. The user must determine which of the lines printed by the two heads is aligned fully.
This head’s number must then be chosen from the display after the printing. In the case of the
simultaneous calibration of both axes, the matching lines must be given rst for the X, then for the
Y axis.
7. To make sure it is calibrated and the 16th lines are aligned.
8. When your lines are Not aligned at the 16th lines:
• Chose the head’s number in the LCD screen, and wait for the text message. If you see the red
message, the calibrate is not correct so you need to start a new XY calibration with the new rate.