2 — INSTALLATION AND WIRING
Curtis 1239E-1269E Manual, os 37.0 RevA – May 2021
Return to TOC
pg. 6
HIGH POWER CONNECTIONS
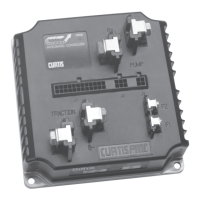
ere are ve high power terminals, identied on the controller housing as B+, B–, U, V, and W.
Working on electrical systems is potentially dangerous. Protect all personnel against
uncontrolled operation, high current arcs, and outgassing from lead acid batteries:
UNCONTROLLED OPERATION — Some conditions could cause the motor to run out of control.
Disconnect the motor or jack up the vehicle and get the drive wheels off the ground before
attempting any work on the motor control circuitry.
HIGH CURRENT ARCS — Batteries can supply very high power, and arcing can occur if they
are short circuited. Always open the battery circuit before working on the motor control circuit.
Wear safety glasses, and use properly insulated tools to prevent shorts.
LEAD ACID BATTERIES — Charging or discharging generates hydrogen gas, which can build
up in and around the batteries. Follow the battery manufacturer’s safety recommendations.
Wear safety glasses.
WARNING
Terminal Function 1239E
1239E
Connector
1269E
1269E
Connector
B+ Positive High Power Battery
ü
M8
ü
Amphenol
PL282X-301-70
B– Negative High Power Battery
ü ü
U Motor phase U
ü
R
(red)
Amphenol
PL28W-301-70
V Motor phase V
ü
Y
(yel)
Amphenol
PL28U-301-70
W Motor phase W
ü
B
(blk)
Amphenol
PL282X-301-70
Table 1 High Powered Connections
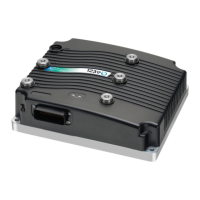
e 1269E controller utilizes the Amphenol RADSOK technology (Amphenol PowerLok connectors)
for the high power connections. ese connectors include the High Voltage Interlock (HVIL) which
open secondary switches when the connector is disconnected (unlocked). e 1269E wiring diagram
illustrates these HVIL switches and the 2-pin connector. erefore, the 1269E does not employ the
M8 threaded terminals as the 1239E models. On the 1269E controller, the motor phases are labeled
R, Y, B corresponding to the 1239E’s U, V, and W (see Table 1).
Lug Assembly
Five M8 terminals are provided on the 1239E models. Lugs should be installed as follows, using M8
bolts sized to provide proper engagement (see diagram):
• Place the lug on top of the terminal, followed by a safety washer with its convex side on top. e
washer should be a SCHNORR 700800, or equivalent.