6Installation
Installerreferenceguide
12
AZQS100~140B8V1B+AZQS100~140B7Y1B
Splitsystemairconditioners
4P3855291–2014.08
Conventionalflaretool
Flaretoolfor
R410A(clutch
type)
Clutchtype
(Ridgidtype)
Wingnuttype
(Imperialtype)
A 0~0.5mm 1.0~1.5mm 1.5~2.0mm
5 Checkthattheflaringisproperlymade.
a Flare’sinnersurfacemustbeflawless.
b Thepipeendmustbeevenlyflaredinaperfectcircle.
c Makesuretheflarenutislifted.
6.4.6 Tobrazethepipeend
The indoor unit and outdoor unit have flare connections. Connect
both ends without brazing. If brazing should be needed, take the
followingintoaccount:
▪ When brazing, blow through with nitrogen to prevent creation of
large quantities of oxidised film on the inside of the piping. This
filmadverselyaffectsvalvesandcompressorsintherefrigerating
systemandpreventsproperoperation.
▪ Setthenitrogenpressureto20kPa(justenoughsoitcanbefelt
ontheskin)withapressurereducingvalve.
a Refrigerantpiping
b Parttobebrazed
c Taping
d Manualvalve
e Pressurereducingvalve
f Nitrogen
▪ DoNOTuseantioxidantswhenbrazingpipejoints.
Residuecanclogpipesandbreakequipment.
▪ Do NOT use flux when brazing coppertocopper refrigerant
piping. Use phosphor copper brazing filler alloy (BCuP), which
doesnotrequireflux.
Flux has an extremely harmful influence on refrigerant piping
systems.Forinstance,ifchlorinebasedfluxisused,itwillcause
pipe corrosion or, in particular, if the flux contains fluorine, it will
deterioratetherefrigerantoil.
6.4.7 Usingthestopvalveandserviceport
Tohandlethestopvalve
Takethefollowingguidelinesintoaccount:
▪ Thestopvalvesarefactoryclosed.
▪ Thefollowingillustrationshowseachpartrequiredinhandlingthe
valve.
a Serviceportandserviceportcap
b Valvestem
c Fieldpipingconnection
d Stemcap
▪ Keepbothstopvalvesopenduringoperation.
▪ Do NOT apply excessive force to the valve stem. Doing so may
breakthevalvebody.
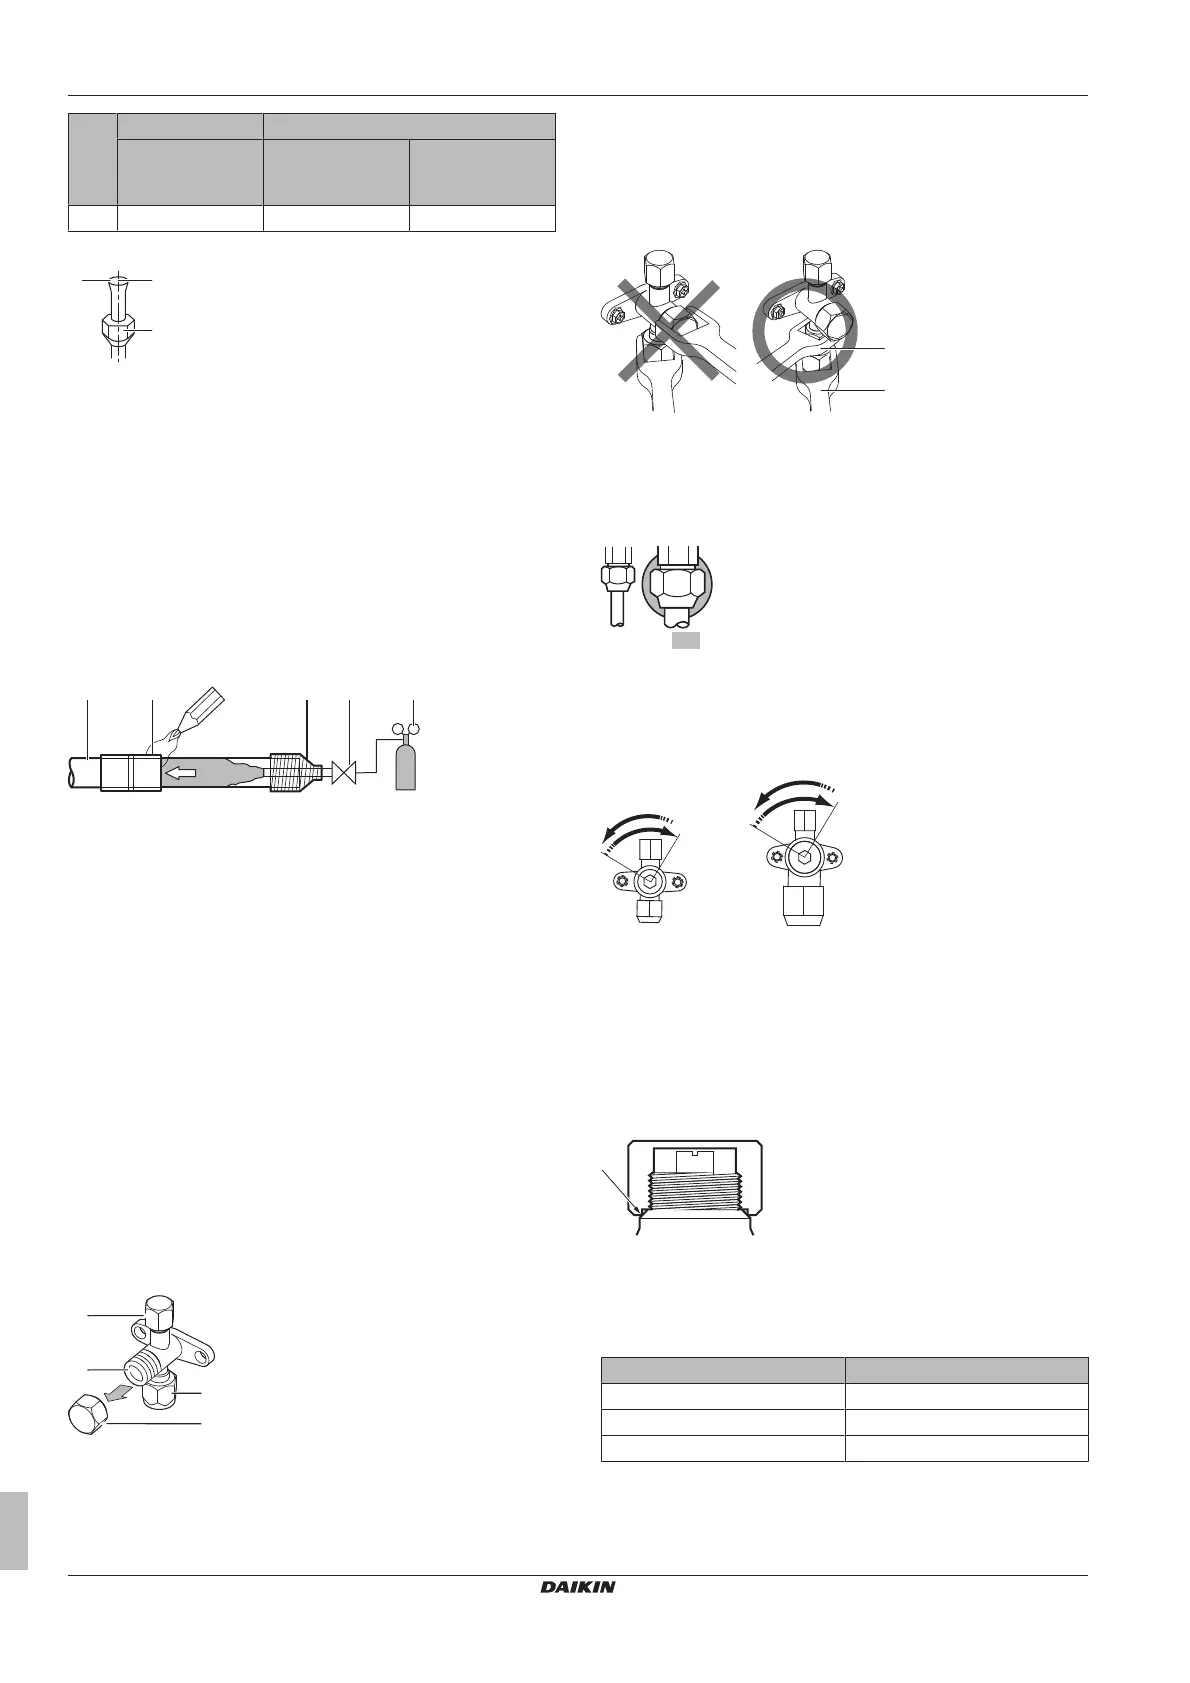
▪ Alwaysmakesure tosecurethe stopvalvewith a spanner,then
loosenortightentheflarenutwithatorquewrench.DoNOTplace
the spanner on the stem cap, as this could cause a refrigerant
leak.
a Spanner
b Torquewrench
▪ When it is expected that the operating pressure will be low (e.g.
whencooling willbe performedwhiletheoutsideairtemperature
islow),sufficientlysealtheflarenut inthestopvalveonthegas
linewithsiliconsealanttopreventfreezing.
Siliconsealant,makesurethereisnogap.
Toopen/closethestopvalve
1 Removethevalvecover.
2 Insert a hexagon wrench (liquid side: 4 mm, gas side: 6 mm)
intothevalvestemandturnthevalvestem:
Counterclockwisetoopen.
Clockwisetoclose.
3 Whenthevalvestemcannotbeturnedanyfurther,stopturning.
Thevalveisnowopened/closed.
Tohandlethestemcap
Takethefollowingguidelinesintoaccount:
▪ Thestem capissealed whereindicated withthearrow. DoNOT
damageit.
▪ Afterhandling the stopvalve,make suretotighten the stemcap
securely.
▪ Forthetighteningtorque,refertothefollowingtable.
▪ Checkforrefrigerantleaksaftertighteningthestemcap.
Item Tighteningtorque(N∙m)
Stemcap,liquidside 13.5~16.5
Stemcap,gasside 22.5~27.5
Serviceportcap 11.5~13.9