6Installation
Installerreferenceguide
18
AZQS100~140B8V1B+AZQS100~140B7Y1B
Splitsystemairconditioners
4P3855291–2014.08
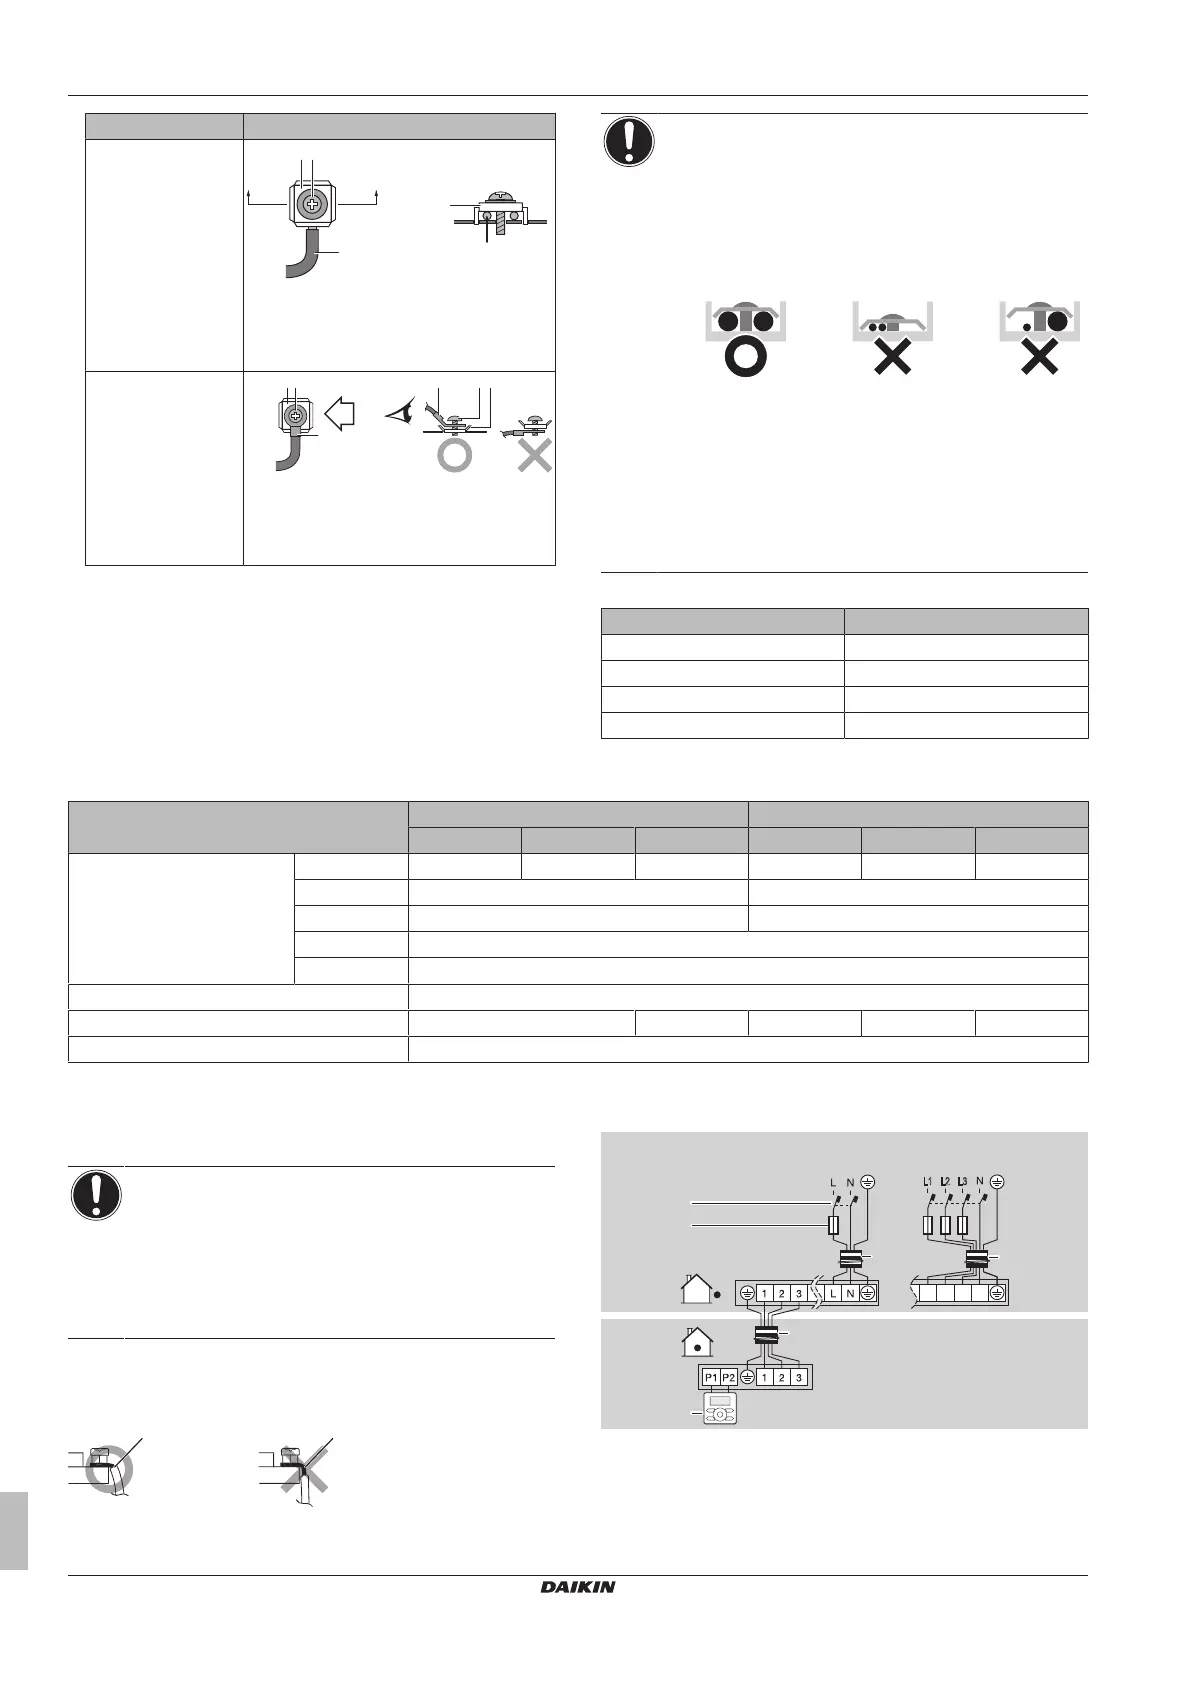
Wiretype Installationmethod
Singlecorewire
aCurledsinglecorewire
bScrew
cFlatwasher
Strandedconductor
wirewithround
crimpstyleterminal
aTerminal
bScrew
cFlatwasher
NOTICE
Precautionswhenlayingpowerwiring:
▪ Do not connect wiring of different thicknesses to the
power terminal block (slack in the power wiring may
causeabnormalheat).
▪ When connecting wiring which is the same thickness,
doasshowninthefigurebelow.
▪ Forwiring,usethedesignatedpowerwireandconnect
firmly, then secure to prevent outside pressure being
exertedontheterminalboard.
▪ Use an appropriate screwdriver for tightening the
terminal screws. A screwdriver with a small head will
damage the head and make proper tightening
impossible.
▪ Overtighteningtheterminalscrewsmaybreakthem.
Tighteningtorques
Item Tighteningtorque(N•m)
M4(X1M) 1.2~1.8
M4(earth) 1.2~1.4
M5(X1M) 2.0~3.0
M5(earth) 2.4~2.9
6.7.5 Specificationsofstandardwiringcomponents
Component AZQS_V1 AZQS_Y1
100 125 140 100 125 140
Powersupplycable MCA
(a)
29.5A 31.5A 32.8A 15.2A 17.2A 21.8A
Voltage 230V 400V
Phase 1~ 3N~
Frequency 50Hz
Wiresizes Mustcomplywithapplicablelegislation
Interconnectioncables Minimumcablesectionof2.5mm²andapplicablefor230V
Recommendedfieldfuse 32A 40A 16A 20A 25A
Earthleakagecircuitbreaker Mustcomplywithapplicablelegislation
(a) MCA=Minimumcircuitampacity.Statedvaluesaremaximumvalues(seeelectricaldataofcombinationwithindoorunitsforexactvalues).
6.7.6 Toconnecttheelectricalwiringonthe
outdoorunit
NOTICE
▪ Follow the wiring diagram (delivered with the unit,
locatedattheinsideoftheservicecover).
▪ Fixtheearthwiretothestopvalveattachmentplateso
thatitdoesnotslide.
▪ Make sure the electrical wiring does NOT obstruct
properreattachmentoftheservicecover.
1 Remove the service cover. See "6.2.2 To open the outdoor
unit"onpage9.
2 Stripinsulation(20mm)fromthewires.
a Stripwireendtothispoint
b Excessivestriplengthmaycauseelectricalshockor
leakage.
3 Connecttheinterconnectioncableandpowersupplyasfollows:
c
a
d
e
1~50 Hz
220-240 V
3N~50 Hz
380-415 V
V1 Y1
L1 L2 L3
L1 L2 L3
N
b
b
a Interconnectioncable
b Powersupplycable
c Earthleakagecircuitbreaker
d Fuse
e Userinterface