m2 Version 3.11 Manual RS.8A.N5.02 © Danfoss 10-2007 9
Inhibiting a Point
Point Oset
This area also displays 'inhibit', 'defrost' and 'pulldown' icons, if
the point has been setup for 'Local'.
- an inhibited point.
- a point in inhibit pulldown.
- a point in defrost.
- a point in defrost pulldown.
Note: If a point has a local oset applied to it, this will be indicated by the
presence of the oset icon
located under the units indicator.
When the Detail Scan mode is selected, the display will cycle through all the
activated points in turn pausing for 3 seconds on each one so that the current
status may be read.
Press either the ‘ ’ key or the ‘ ’ key to return to the Main Menu or the ‘ ’
key to display the historical graph data.
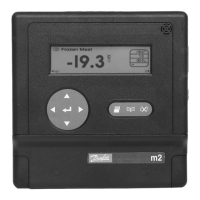
To inhibit a point so that it cannot create an alarm, select the required point and
press ‘↵’. The Conrm Inhibit Yes/No message is displayed. Use the ‘ ’ or ‘ ’
key to toggle the answer and press ‘↵’. When a point is inhibited a symbol is
displayed alongside the point type. To uninhibit a point repeat the operation.
If the alarm condition is exceeded on an inhibited point (i.e. Pull-down), then
the animated pull-down arrows will be displayed next to the inhibit symbol .
The inhibit function can be password protected. This can be congured by
accessing the 'Passcode Setup' screen.
Any points on the m2 can have an oset applied to the displayed readings to
compensate for cable runs loss etc. These osets are point specic and may
only be dened from the m2 keypad, although their value is readable when
accessing the unit remotely. Under normal circumstances these osets (if
required) will be entered at installation and should only be modied by Danfoss
personnel. Any point which has an oset active will display the oset icon
on
both the Point Detail and Point Overview screens.
In the Point Detail screen, pressing the ‘ ’ key displays the Print Range option
box. Use the ‘ ’, ‘ , ‘ ’ and ‘ ’ keys to enter the required value and the ‘↵’ key
to move through each eld. Press the ‘ ’ key and the Printing in Operation
screen is displayed and the data is sent to the printer.
Single Point Log Printout