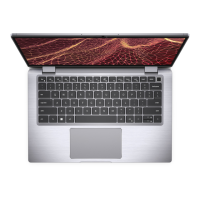
Steps
1. Connect the I/O-board data cable to the connector on the system board.
NOTE:
When replacing the system board, technician must remember to connect the I/O-board cable to the I/O
connector that is located under the system board; Failing to do so, will result in additional repair time of replacing
the system board again. Turn the system board over to access the I/O connector that is located under the system
board
2. Slide the ports on the system board into the slots on the palm-rest assembly and align the screw holes on the system board with the
screw holes on the keyboard assembly.
3. Connect the keyboard-backlit cable to the system board and close the latch to secure the cable.
4. Connect the keyboard cable to the system board and close the latch to secure the cable.
5. Connect the touchpad cable to the system board and close the latch to secure the cable.
6. Connect the fingerprint-reader cable to the system board and close the latch to secure the cable.
7. Connect the I/O-board cable to the system board and close the latch to secure the cable.
8. Adhere the tape that secures the I/O-board cable to the system board.
9. Connect the coin-cell battery cable to the system board.
10. Connect the P-sensor cable from the system board.
Removing and installing components
55

 Loading...