Chapter 7:Appendix
DTM temperature controller operating manual
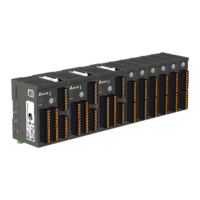
1) Use a flat screwdriver or other tools to open the DIN Rail fasteners
2) Replace the modules in the
direction shown in the diagram. Make sure to fit them on the expansion
channel guides in order to ensure correct replacement
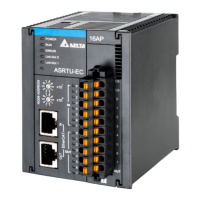
Ethernet and Internet connection:
Notes: Connect CAT-5e network cable to the DTME08 or DTME04 RJ-45 port, as shown in the
figure on the right.
7.2.4 Installation Guidelines
1. Open space should be left on all sides when installing a temperature controller; this will ensure that the
temperature controller can radiate heat normally and will facilitate installation and removal of
accessories.
There should be 100mm of clearance on the upper, lower, right, and left sides of the
equipment.
2. Screws should be tightened to a torque of 3.80kg-cm (3.30 Ib-in).
3. In order to avoid signal interference, power cords, load cords, and measurement signal cords should be
run in different cable troughs.
4. The temperature controllers input power source should be a 12AWG - 24AWG single-core bare cable
or multiple-core cable with 300V voltage resistance and resistance to 60/75°C.
5. The devices outer shell has warning markings indicating the input power supply location. If the input
power is connected to another foot, this may cause the controller to burn out, and may injure persons
nearby or start a fire.
6. If load requirements are too large when using a relay output device, this may cause the cables and
crimp type terminals to become hot. When their temperature exceeds 50°C, please take care to avoid
risk of burns.
7. To avoid the danger caused, in the same expansion cassette or I/O expansion module, when a
channel is connected to high voltage, other channels cannot be connected to a safe low voltage
circuit.
8. Use needle-type crimp terminals less than 2.35mm in size.