Service and Maintenance
• 6.2.3 Clean I purge
or
change fuel
iii
pre-filter
6.2 Fuel System
6.2.4 Bleed Fuel System
with
Fuel Pre-filter
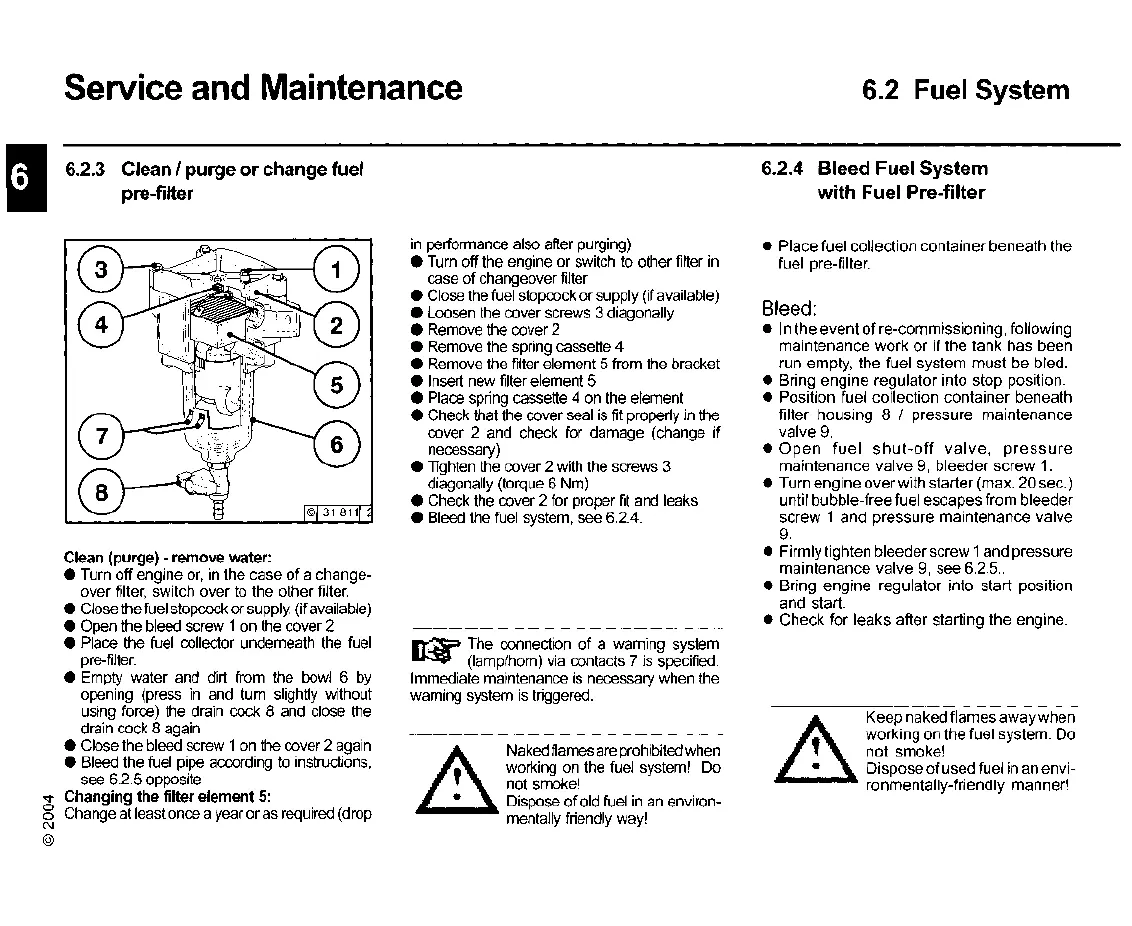
Clean (purge) - remove water:
• Turn off engine
or,
in
the case
of
a change-
over filter, switch over to the other filter.
• Close the fuel stopcock orsupply. (ifavailable)
• Open the bleed screw 1
on
the cover 2
• Place the fuel collector underneath the fuel
pre-filter.
• Empty water and dirt from the bowl 6 by
opening (press
in
and tum slightly without
using force) the drain cock 8 and close the
drain cock 8 again
• Close the bleed screw 1
on
the cover 2 again
• Bleed the fuel pipe according
to
instructions,
see 6.2.5 opposite
~
Changing the filter element
5:
g Change at least once a year oras required (drop
N
@
in
performance also after purging)
• Tum off the engine or switch to other filter
in
case of changeover filter
• Close the fuel stopcock or supply (if available)
• Loosen the cover screws 3 diagonally
• Remove the cover 2
• Remove the spring cassette 4
• Remove the filter element 5 from the bracket
• Insert new filter element 5
• Place spring cassette 4
on
the element
• Check that the cover seal
is
fit properly
in
the
cover 2 and check for damage (change if
necessary)
• Tighten the cover 2 with the screws 3
diagonally (torque 6 Nm)
• Check the cover 2 for proper fit and leaks
• Bleed the
fuel
system, see 6.2.4.
~
The connection of a warning system
~
(lamp/horn) via contacts 7
is
specified.
Immediate maintenance
is
necessary when the
warning system
is
triggered.
.&
Nakedflamesare prohibitedwhen
,
•...••
....
....
working
on
the fuel system!
Do
not smoke!
••••••••••
<.
Dis~se
of
old fuel
in
an environ-
mentally friendly way!
• Place fuel collection container beneath the
fuel pre-filter.
Bleed:
• In the event
of
re-commissioning, following
maintenance work
or
if
the tank has been
run empty, the fuel system must be bled.
• Bring engine regulator into stop position.
• Position fuel collection container beneath
filter housing 8 / pressure maintenance
valve
9.
•
Open
fuel
shut-off
valve,
pressure
maintenance valve
9,
bleeder screw
1.
• Turn engine
over
with starter(max. 20 sec.)
until bubble-free fuel escapes from bleeder
screw 1 and pressure maintenance valve
9.
• Firmlytighten bleederscrew 1and pressure
maintenance valve
9,
see 6.2.5
..
• Bring engine regulator into start position
and start.
• Check for leaks after starting the engine.
.&
'
Keep naked flames awaywhen
,
'.
.••......
. working on the fuel system. Do
,
.,
'..
not smoke!
../"
....••••
~
.•
~..
Dispose
of
used fuel in an envi-
ronmentally-friendly manner!