33
ENGLISH
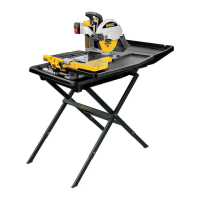
Locking the Sliding Table (Fig. B2, L)
The table can be locked in the following positions:
- Front position (cutting disc freely accessible)
60
.
- Plunge position (cutting disc over middle of table)
61
.
- Outfeed position (cutting disc at fence)
62
.
1. Move the table
4
to the desiredposition.
2. Lock the table by rotating the pin lock
22
and pushing it into the hole in therail.
Adjusting the Water Nozzles (Fig. A, B2, M)
The water nozzles
7
are adjustable to provide the necessary flow of coolingwater.
• Adjust the nozzle by moving the handle
63
into the requiredposition.
- Maximum capacity (nozzles fully retracted)
64
.
- Minimum overspray (nozzles in line with cutting disc)
65
.
- Off position to eliminate water overspray between cuts and for replacing the cutting
disc
66
.
INSTRUCTIONS FOR USE
Ensure the machine is placed to satisfy your ergonomic conditions in terms of table height
and stability. The machine site shall be chosen so that the operator has a good overview and
enough free surrounding space around the machine that allows handling of the workpiece
without any restrictions.
To reduce effects of vibration make sure the environment temperature is not too cold,
machine and accessory is well maintained and the workpiece size is suitable for thismachine.
WARNING:
• Always observe the safety instructions and applicableregulations.
• Check that the machine has been set upsecurely.
• Check that the workpiece is properlysupported.
• Make sure the cutting disc is not contacting the workpiece before the machine is
switchedon.
• Allow the motor to reach full speed beforecutting.
• Apply only a gentle pressure to the machine. Do not force the cuttingaction.
• Keep your hands out of the path of the cutting disc. Do not place your hands within
the marked area as shown in FigureN.
Prior to Operation
• Place the tile saw on a horizontal, stable, non-slipsurface.
• Install the appropriate cuttingdisc.
• Make sure all locking knobs and clamp handles aretight.
• Fill the water basin with the sufficient amount of water for the water pump to be
fullysubmerged.
• Use only clean water. No other liquid should beused.
Switching On and Off (Fig. O)
• To switch the machine on, set the on/off switch
1
to positionI.
• To switch the machine off, set the on/off switch
1
to position0.
Wired into the mains cable is the portable residual current device (PRCD) containing the
no-volt release switch and the motor overload protector with manual reset. In case of a power
shut-off, proceed as follows:
• Make sure the on/off switch
1
is in the offposition.
• Press the reset button on thePRCD.
Locking the switch
• In order to avoid unauthorised use of the machine, lock the switch using apadlock.
Basic saw cuts
General Handling
• Try a few simple projects using scrap material until you develop a “feel” for themachine.
• Always make dry runs (without power) before finish cuts so that you can check the path of
thecuttingdisc.
Vertical Straight Cross Cut (Fig. P)
1. Set the bevel angle to 0°.
2. Lower the arm to bring the cutting disc into a suitableposition.
3. Place the workpiece flat on the table and against the fence, with the finished side up. Align
the marking on the workpiece with the marking in the kerfindicator.
4. Keep both hands away from the path of the cuttingdisc.
5. Switch the machine on and allow the cutting disc to reach full speed. Wait until the
cutting disc is completely covered withwater.
6. Slowly feed the workpiece into the cutting disc, keeping it firmly pressed against the fence.
Do not force. The cutting disc speed should be keptconstant.
7. After completing the cut, switch the machine off, allow the cutting disc to stop and
remove theworkpiece.
Bevel Cross-Cut (Fig. Q)
Bevel angles can be set at 22.5° and 45°.
1. Loosen the bevel adjustment knob
12
and set the bevel asdesired.
2. Tighten the bevel adjustment knobfirmly.
3. Proceed as for a vertical straight cross-cut.
Diagonal Cut (Fig. A1, R1, R2)
The edge guide
5
allows cutting of angles at 45°.
1. Place the edge guide
5
with the mounting bracket
67
over thefence.
2. Flip the edge guide
5
into position for the required application:
- Flip the edge guide to the right for cutting small pieces from largetiles.
- Flip the edge guide to the left for any otherapplication.
3. Set the edge guide to the requireddistance.
4. Tighten the knob
68
to secure the guide inplace.
5. Proceed as for a vertical straight cross-cut.
Plunge Cut (Fig.S)
A plunge cut is used to remove the centre of a tile, e.g. for electrical outlets, drains,etc.
1. Mark the area to be cut on both sides of thetile.
2. Fit the appopriate size of cuttingdisc.
3. Adjust the cutting depth to allow the cutting disc to saw only halfway through
theworkpiece.
4. Place the workpiece flat on the table and against the fence, with the finished side up. Align
the marking on the workpiece with the marking in the kerfindicator.
5. Switch the machine on and allow the cutting disc to reach full speed. Wait until the
cutting disc is completely covered withwater.
6. Move the table until the marking on the workpiece is underneath thecuttingdisc.
7. Lower the arm to feed the cutting disc into the workpiece. Do not overcut the mark. As
soon as the marking has been cut, lock the arm into its highestposition.
8. Repeat as for the othermarkings.
9. Turn the workpiece upside down. Proceed as described above for the second cuts to meet
thefirst.
10. After completing the cut, switch the machine off, allow the cutting disc to stop and
remove theworkpiece.
Grooving (Fig. T)
A groove is made into a tile e.g. to accommodate hiddenwiring.
1. Adjust the cutting depth asrequired.
2. Place the workpiece flat on the table and against the fence, with the down side up. Align
the marking on the workpiece with the marking in the kerfindicator.
3. Proceed as for a vertical straight cross-cut.
4. Repeat the procedure to make a widergroove.
Optional Accessories
WARNING: Since accessories, other than those offered by
, have not been tested
with this product, use of such accessories with this tool could be hazardous. To reduce the
risk of injury, only
recommended accessories should be used with thisproduct.
Range of Cutting Discs Available
Type of cutting disc Dimensions (diameter x bore) Usage
DT3733 250 x 25.4 mm Ceramic tile
DT3734 250 x 25.4 mm Porcelain/stone tile
D240001 Leg stand
Consult your dealer for further information on the appropriateaccessories.
Transporting (Fig. B1, U)
The detachable parts can be stored in the water basin for easytransportation.
1. Drain the water basin. SeeMaintenance.
2. Remove the edge guide and the extensiontable.
3. Lock the sliding table inposition.
4. Remove the watercollectors.
5. Lift the machine out of the water basin asshown.
6. Place the collectors into the water basin in the orientation asshown.
7. Turn the water basin upsidedown.
8. The edge guide and the extension table can be placed in the water pan beforenested.
9. Lift and hold the machine at the carrying points
73
asshown in Fig.B1.
WARNING: When carrying the machine, always seek assistance. The machine is
too heavy for one person tohandle. Always lock the sliding table before moving or
transportingsaw.
MAINTENANCE
Your
power tool has been designed to operate over a long period of time with a
minimum of maintenance. Continuous satisfactory operation depends upon proper tool care
and regularcleaning.
WARNING: To reduce the risk of serious personal injury, turn tool off and
disconnect tool from power source before making any adjustments or removing/
installing attachments or accessories. Be sure the trigger switch is in the OFF position.
An accidental start-up can causeinjury.
WARNING: To assure product SAFETY and RELIABILITY, repairs, maintenance and
adjustment should be performed by a
factory service centre or a
authorized service centre. Always use identical replacementparts.
 Loading...