EasyManuals Logo

dynabook TECRA A40-J Series Maintenance Manual

dynabook TECRA A40-J Series
168 pages
To Next Page IconTo Next Page
To Previous Page IconTo Previous Page
Page #113 background imageLoading...
Page #113 background image
Maintenance Manual (960-945) 4-37
Replacement Procedures
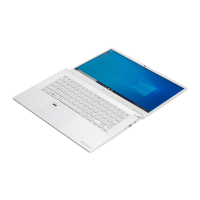
Figure 4-39 Removing the LCD unit (2)
5. Take out the LCD unit.
Be careful that the LCD/Webcam harness is connected to the connector
on the back of the LCD unit.
6. Peel the pull tape and disconnect the LCD/Webcam harness from the
connector on the LCD unit.
Figure 4-40 Removing the LCD unit (3)
4.27.2 Installing the LCD unit
To install the LCD unit, follow the steps below.
1. Connect the LCD/Webcam harness to the connector on the LCD unit
and secure it with the pull tape and glass tape.

Table of Contents

Other manuals for dynabook TECRA A40-J Series

Questions and Answers:

Question and Answer IconNeed help?

Do you have a question about the dynabook TECRA A40-J Series and is the answer not in the manual?

dynabook TECRA A40-J Series Specifications

General IconGeneral
Operating SystemWindows 10 Pro
Battery LifeUp to 10 hours
GraphicsIntel Iris Xe Graphics
BluetoothBluetooth 5.1
ProcessorIntel Core i5-1135G7 or i7-1165G7
Display14.0" FHD (1920 x 1080) Anti-Glare
RAM8GB/16GB DDR4
Storage256GB/512GB SSD
WirelessIntel Wi-Fi 6 AX201
Ports2 x USB 3.2 Type-A, 1 x USB 3.2 Type-C, HDMI, Ethernet, MicroSD card slot
SecurityFingerprint Reader, TPM 2.0
WebcamHD Webcam

Related product manuals