5.2.8 Date Format
The “Date Format” setting controls how dates are displayed. Press the “+”
button repeatedly to select between “DD-MM-YYYY”, “YYYY-MM-DD”,
and “MM-DD-YYYY”.
5.2.9 Date and Time
The “Date and Time” setting can be used to manually set the time, and it can
be used to set the console’s time zone and whether or not daylight savings
time should be handled automatically. If you are using the units with Wi-Fi
connected, the time setting itself will be handled for you automatically, but
you will have to set the correct time zone and daylight savings time handling.
Use the “next” and “previous” buttons to move to the desired input box and
then use the “+” and “-” keys to change the value.
The automatic daylight savings time adjustments are enabled when the box is
solid red.
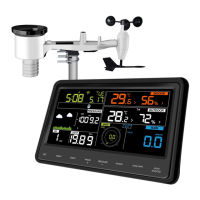
5.2.10 Sensor Type
The weather station is meant to use the WH69 type indoor sensor (included in
package). This sensor type is displayed here but currently cannot be changed.
Future firmware versions may accommodate additional/optional sensors and
make this editable.
5.3 Calibration Mode
Calibration mode can be activated from “normal mode” by pressing the
MENU twice. Doing so will show a screen titled “Calibration” that offers 11
individual buttons for changing calibration values for specific sensors.
Use the GRAPH or TEMP button to move to the next, or previous, setting
(indicated by a right arrow above the button). The selected setting will be
highlighted in yellow. Press the RAIN button to change the settings for the
selected item. You will be shown a page with just that one value on it,
highlighted in yellow. You are now able to change the value for the