Do you have a question about the Elegoo JUPITER SE and is the answer not in the manual?
Explains automatic resin feeding and recycling operations.
Loosening screws for build plate movement.
Positioning the build plate and setting Z-axis zero.
Fine-tuning Z-axis based on leveling card resistance.
Steps to load resin and start a test print.
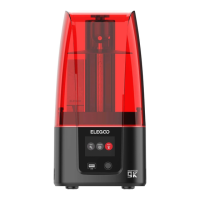
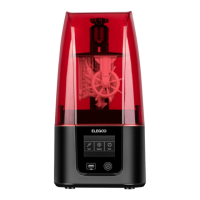
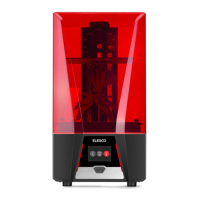
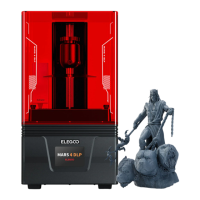
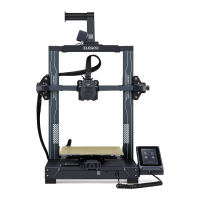
The ELEGOO JUPITER SE is a 3D printer designed for resin-based additive manufacturing, offering a range of features for both novice and experienced users. Its primary function is to create three-dimensional objects from photopolymer resin using a light source to cure the resin layer by layer.
The JUPITER SE operates on the principle of stereolithography (SLA) or Digital Light Processing (DLP), where a UV light source selectively cures liquid resin in a vat, building the model from the bottom up. It features a Z-axis mechanism that moves the build plate, an LCD display for user interaction, and a resin tank to hold the photopolymer resin. A notable feature is its automatic resin feeding and recycling module, which streamlines the printing process by ensuring a continuous supply of resin and facilitating the recovery of unused resin. The device includes a USB air purifier to help manage resin odors and maintain a cleaner printing environment.
The printer comes with a comprehensive packing list, including essential tools and accessories for operation and maintenance. Key components include the USB Air Purifier, Build Platform, Resin Tank, U Disk for model transfer, Mask and Gloves for safety, Funnel for resin handling, Backup Screws, User Manual, Adapter, Tool Kit, and Scraper for model removal. Additionally, it features an Auto Resin Feeding Main Module and two Bottle Cap Modules for the automated resin system, along with Cover Handles for the anti-UV cover.
The printer's interface includes a Rotary Handle, Z Axis, Build Plate, Air Purifier, LCD Display Screen, Resin Tank, Touch Screen, Switch, USB Interface, DC Socket, Screw Knob, and the Auto Resin Feeding Module. The exterior also features a Light Source Module, Extension Port, Anti-UV Cover, and Cover Handles.
The automatic resin feeding module is designed for convenience. To install, the resin tank is removed, and the module is inserted into the right USB port and secured with screws. The bottle cap module is then attached to an ELEGOO 1000g resin bottle, and the hoses and signal detection terminal are connected to the main module. Before printing, users should ensure sufficient resin in the bottle. The printer's system settings allow users to enable and configure the feeding function, including default state and speed. During printing, if the resin level is detected as insufficient, the device automatically refills the tank. The feeding status can also be monitored and adjusted from the printing interface.
The automatic resin recycling function is accessed via the "System" menu. When activated, a resin tube moves to the bottom of the resin tank to collect unused resin until the resin bottle is full, at which point recycling stops. If a significant amount of resin remains, users are advised to replace the resin bottle and reactivate the function. For small amounts of residual resin that cannot be recycled automatically, users can remove the screw knobs from the resin tank and place one underneath to tilt the tank for more complete drainage.
Several precautions are outlined for the automatic resin feeding and recycling module:
The manual also addresses common FAQs for the automatic resin feeding and recycling system, troubleshooting issues such as the feeding not taking effect, the resin bottle showing empty despite having resin, continuous resin addition when the tank is sufficient, inability to recycle resin, and continuous recycling when the bottle is full. These issues are typically resolved by checking USB connections, probe placement, signal detection terminal insertion, and screw tightness.
Leveling the build platform is a crucial step before the first print. This involves loosening four fixing screws on the build plate and the rotary handle, allowing the build plate to move freely. A leveling card is then placed between the build plate and the LCD screen. Users click "Move Z axis to zero" on the touch screen. Once the printer stops, the build plate is pressed down, and the four fixing screws are tightened. The leveling card should offer slight resistance when pulled. If there's no resistance, the Z-axis needs to be moved down in 0.1mm increments until slight resistance is felt. If there's too much resistance, the Z-axis needs to be moved up in 0.1mm increments. After leveling, users return to the previous menu and click "Set Z=0" to confirm the new Z-axis home position. Finally, the leveling card is removed, and an exposure test is performed via the "Tool" -> "Exposure" -> "Next" menu to verify the LCD screen and LED light source functionality.
For test printing, the USB air purifier is plugged into the left USB port. The resin tank is positioned so its inner edge presses the probe platen, ensuring the probe is inside the tank, and the screw knobs are tightened. Resin is slowly added to the tank, not exceeding the MAX line. The printer cover is then placed, and a U disk with a pre-sliced test model is inserted to begin printing. After printing, the model is allowed to drip, then the build plate's rotary handle is loosened, and the model is removed with a scraper. Post-processing can be done using ELEGOO's cleaning and curing machine.
Software installation and setup involve installing the appropriate version of the Chitubox slicing software from the provided USB flash drive. Users can open 3D model files (.stl type) and manipulate them using the left-click, mouse wheel, and right-click functions to adjust viewing angle, size, and position. In Chitubox, users select ELEGOO JUPITER SE as the default printer in "Parameter Settings." The default build volume parameters typically do not need to be changed. Resin parameters such as density and cost can be entered to calculate model-specific resin costs. Various print parameters, including Layer Height, Bottom Layer Count, Exposure Time, Bottom Exposure Time, Transition Layer settings, and various lift/retract distances and speeds, can be adjusted. After setting all parameters, the model is sliced, saved to the U disk, and then transferred to the printer for printing.
Maintaining the JUPITER SE is crucial for its longevity and consistent performance. Users are advised against using sharp or pointy tools to scrape the resin tank to prevent damage to the release liner film. The resin tank should be cleaned thoroughly before switching to a different resin color. Before and after each print, the build plate must be cleaned with paper towels or alcohol to ensure no bumps or burrs are present. A daily check of the machine's exterior and all mechanical parts for any damage or abnormalities is recommended before each printing session.
Optimal printing conditions include maintaining the printing environment at 25-30 degrees Celsius and ensuring good ventilation to facilitate heat dissipation and resin odor volatilization. If the Z-axis produces friction noise, lubricant should be applied to the lead screw. This lubrication should be checked and applied every 2-3 months, with increased frequency if printing more often.
If the printer will not be used for more than 48 hours, any remaining resin in the tank should be poured back into the resin bottle and sealed properly. Any residue should be filtered out. The release film in the resin tank is a consumable part and should be inspected before each print for looseness, scratches, or severe whitening. If any of these conditions are present, the film should be replaced promptly. It is recommended to replace the release film at least once every 1-2 months, or more frequently with increased printing.
Care must be taken when removing the printing platform to avoid damaging the LCD screen. The LCD screen has an estimated service life of over 2000 hours, which can decrease with higher printing frequency. Regular screen cleaning and unplugging the machine after printing are good practices. If screen exposure issues or a significantly reduced service life affect print quality, the screen should be replaced.
For any problems, users are encouraged to contact ELEGOO support at 3dp@elegoo.com and are warned against disassembling or modifying the printer themselves, as this will void the warranty.
| Layer Resolution | 0.01-0.2mm |
|---|---|
| Material Compatibility | 405nm UV Resin |
| Light Source | UV LED |
| Layer Thickness | 0.01-0.2mm |
| Wavelength | 405nm |
| Printing Technology | MSLA (Masked Stereolithography) |
| Connectivity | USB |
| Technology | MSLA |
| Printing Speed | Up to 70 mm/h |
| Control | Touchscreen |
| Resolution | 4098 x 2560 |