Emerson FB1200 Flow Computer Instruction Manual
D301782X012
March 2019
104 Index
Figures
A-1. Data Plate (No Battery) – Class I Division 2
Non-incendive (UL) ........................................... 90
A-2. Data Plate (Lead Acid Battery) – Class I
Division 2 Non-incendive (UL) ........................... 91
B-1. Data Plate (No Battery) – Class I Div 1
Explosion Proof (UL) .......................................... 95
B-2. Data Plate (Lead Acid Battery) – Class I Div 1
Explosion Proof (UL) .......................................... 96
C-1. Data Plate – ATEX nA Non-Sparking ............... 98
D-1. Data Plate – ATEX Ex db Flame-proof ........... 101
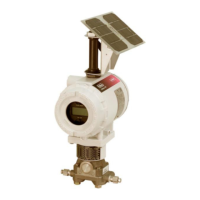
1-1. FB1200 Flow Computer ................................... 2
1-2. FB1200 Flow Computer (MV or Static
Pressure Version) ................................................ 4
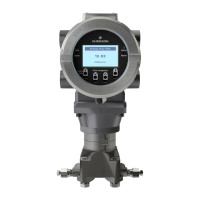
1-3. FB1200 Flow Computer (No Integral Sensor) ... 5
1-4. Retaining Clamps and Tie Holes for Tamper-
resistant Seals ..................................................... 6
1-5. HMI Module with LCD ...................................... 9
1-6. HMI Module without LCD ................................ 9
2-1. FB1200 Flow Computer Dimensions –
Multivariable Sensor Version ............................. 13
2-2. FB1200 Flow Computer Dimensions (No
Integral Sensor) ................................................ 14
2-3. FB1200 Flow Computer Dimensions
(with Static Pressure Sensor) ............................. 15
2-4. Front End Cap with Retaining Clamp Fitted .... 16
2-5. Retaining Clamp in Place ............................... 16
2-6. Retaining Clamp and Screw ........................... 17
2-7.Removing or Tightening the End Cap with
Prybar ............................................................... 17
2-8. Front (left) and Rear (right) End Caps ............. 17
2-9. Front (left) and Rear (right) End Caps
Removal ........................................................... 18
2-10. Transmitter with Coplanar Flange ................ 19
2-11. Transmitter with Coplanar Flange and
Optional Flange Adapters ................................. 19
2-12. Transmitter with Traditional Flange and
Optional Flange Adapters ................................. 19
2-13. Bolt Installation ........................................... 20
2-14. O-rings (w/ Flange Adapters ........................ 21
2-15. Traditional Flange Mounting Kit ................... 22
2-16. Coplanar Mounting Kit ................................ 23
2-17. Inline Mounting Kit ...................................... 24
2-18. Housing Rotation Set Screws ....................... 25
2-19. Ground Lug ................................................. 26
2-20. Terminal Plate ............................................. 27
2-21. DC Power Connections
................................ 32
2-22. Connecting the Battery Pack
....................... 33
2-23. Attaching Mounting Hardware to the Solar
Panel ............................................................... 35
2-24. Integral mounted solar panel ...................... 37
2-25. Solar panel remote mounted
(pole mounted) ............................................... 38
2-26. Wiring Solar Power ..................................... 39
2-27. Adjusting Solar Panel Tilt Angle .................. 40
2-28. Connecting a Device to COM1 Using
RS-232 ............................................................. 42
2-29. Connecting a Device to COM1 Using
RS-422 ............................................................. 43
2-30. Connecting a Device to COM1 Using
RS-485 ............................................................. 44
2-31. Connecting a Device to COM2 or COM3
Using RS-232 (with Optional I/O) ..................... 45
2-32. Connecting a Device to COM2 or COM3
Using RS-232 (without optional I/O) ................. 46
2-33. Connecting a Device to COM2 or COM3
Using RS-485 (with optional I/O) ...................... 47
2-34. Connecting a Device to COM2 or COM3
Using RS-485 (without optional I/O) ................. 48
2-35. Location of Ethernet Port ............................ 49
2-36. Ethernet Jumper ......................................... 50
3-1. Base I/O on CPU (with optional I/O)............... 52
3-2. Base I/O On CPU (without Optional I/O) ........ 53
3-3. Optional 6-channel Expansion I/O Board ....... 54
3-4. 4-20 mA AI Wiring (Base I/O with Optional
I/O Module) ..................................................... 56
3-5. 1-5 V AI Wiring (Base I/O with Optional I/O) .. 56
3-6. AI Wiring (Base I/O without Optional I/O
Module) ........................................................... 57
3-7. 4-20 mA AI Wiring (with Optional 6-channel
Expansion I/O Module) ..................................... 58
3-8.
1-5 V Analog Input (AI) Wiring (with Optional
6-channel Expansion I/O Module)
..................... 58
3-9.
AO Wiring (Base I/O with Optional I/O)
......... 60
3-10. AO Wiring – (Base I/O without Optional
I/O) .................................................................. 60
3-11.
AO Wiring (with Optional 6-channel
Expansion I/O Module)
..................................... 61
3-12. DI Wiring (Base I/O with Optional I/O) ......... 63
3-13. DI Wiring (Base I/O -without Optional I/O) .. 64
3-14.
DI Wiring - (with Optional 6-channel
Expansion I/O Module)
..................................... 64
3-15. DO Wiring (Base I/O with Optional I/O) ....... 66
3-16. DO Wiring (Base I/O without Optional I/O) .. 67
3-17. DO Wiring (with Optional 6-channel
Mixed I/O Module ............................................ 67