Home
Epson
Scanner
Perfection 1240U
Page 121 (Removing the Cover for Thick or Large Documents)
Epson Perfection 1240U - Removing the Cover for Thick or Large Documents
166 pages
Manual
To Next Page
To Next Page
To Previous Page
To Previous Page
Loading...
Maintenance
and
Troubleshootin
g
6-5
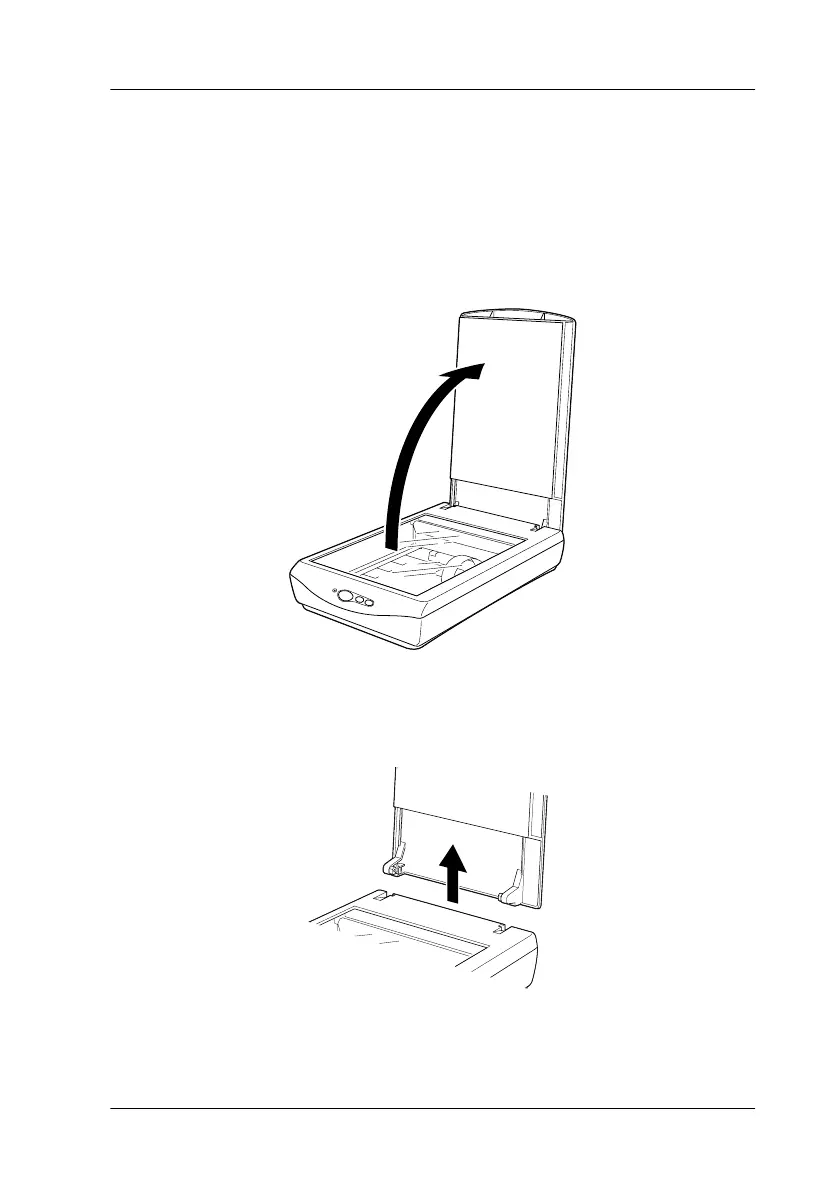
Removing
the
Cover
for
Thick
or
Large
Documents
For
thick
materials
or
documents
that
are
larger
th
an
the
document
table,
remove
the
document
c
over.
1.
Open
the
d
ocument
cover.
2.
Pull
the
cover
straig
ht
up.
120
122
Table of Contents
Main Page
Default Chapter
3
Table of Contents
3
Features
9
About this Guide
10
Chapter 1 Using the Buttons
12
The 3 Buttons Feature
12
EPSON SMART PANEL for Scanner
13
About Applications in the EPSON SMART PANEL Window1-4
14
Assigning an Application to the Start Button
22
Using the Copy Button to Copy
23
Using the Scan Button to Scan
24
Assigning Another Application to the Buttons on Windows
27
Chapter 2 Scanning Basics
32
Selecting a Mode
32
Full Auto Mode
32
Manual Mode
33
Scanning from the Full Auto Mode
34
Scanning from the Manual Mode
38
Optimizing Image Scanning
40
Manually Optimizing Images
41
Displaying a Preview Image
42
Adjusting the Highlight Setting
43
Adjusting the Shadow Setting
44
Adjusting the Gamma Setting
46
Applying a Preset Tone Curve
47
Adjusting the Gray Balance Intensity Setting
51
Adjusting the Saturation Setting
52
Using the Tone Curve
53
Saving Your Own Tone Curve
56
Deleting a Customized Tone Curve
56
Closing the Tone Correction Dialog Box
57
Optimizing OCR Scanning
57
Scanning Text
57
Improving Character Recognition
57
If You Still Have Problems
59
Potential Text Recognition Problems
59
Chapter 3 Understanding EPSON Twainfeatures
62
Overview
62
Previewing Images
63
Document Source
66
Image Types
67
Image Type List
67
Image Type Button
69
Destination
73
Destination List
74
Destination Button
75
Unsharp Mask
76
Source and Target Image Sizes
77
Image Controls
79
Tone Correction
82
Color Adjustment
85
Auto Exposure
86
Reset Button
87
Auto Locate
87
Settings
89
Configuration
90
Scan Button
93
Tool Tip (for Windows Users)
93
Chapter 4 Calibrating Your System
96
Overview
96
Calibrating Your Screen
96
For Windows 98 and 2000 Users
97
For Macintosh Users
99
Using ICM/Srgb (for Windows Users)
100
Using Colorsync (for Macintosh Users)
101
Chapter 5 Option
104
Using the Film Adapter
104
Unpacking the Film Adapter
104
Installing the Film Adapter
105
Scanning Transparent Materials
106
Film Holders
107
35 MM Strip Film
107
MM Strip Film (to be Scanned from EPSON Photo Print)5-6
108
120/220 (6 CM X 9 CM) Film
108
X 5 Inch Film
109
Loading Slides and Film
109
Scanning Normal (Reflective) Documents
115
Chapter 6 Maintenance and Troubleshooting
119
Maintenance
119
Cleaning the Scanner
119
Maintenance and Troubleshooting
119
Replacing the Fluorescent Lamp
120
Removing the Cover for Thick or Large Documents
121
Transporting the Scanner
122
Problems and Solutions
123
Error Indicator
124
Operating Problems
125
The Fluorescent Lamp Does Not Come on
125
The Scanner Does Not Scan
125
The Scanner Software Does Not Work Properly
126
Quality Problems
126
The Entire Image Is Distorted or Blurred
126
Part of the Image Is Distorted or Blurred
127
Edges of the Document Are Not Scanned
127
Colors Are Patchy or Distorted at the Edges of the Image
127
The Image Is Faint or out of Focus
127
The Image Is too Dark
128
Straight Lines in the Image Come out Jagged
128
The Image Does Not Look the same as the Original
128
A Line of Dots Is Always Missing from the Scanned Image
129
When Scanning Printed Matter, Textured Patterns of Dots Appear Inside Particular Areas of the Image
129
Image
129
Printed Colors Are Different from those in the Original Image.6-14
130
The Printed Image Is Larger or Smaller than the Original
130
Scanned Images Cannot be Printed or Come out Garbled When
130
The Colors of Negative Film Preview Images Look Strange
130
Software Setup Problems
131
You Cannot Install EPSON TWAIN
131
Software Operation Problems
131
You Cannot Start EPSON TWAIN
131
You Can't Select Optional Equipment (Film Adapter)
132
Scanning Problems
132
Image Is Dark, with Little or no Detail
132
Scanned Image
133
Moiré (Cross-Hatch) Patterns Appear in the Scanned Image
133
Colors Differ from the Original
133
Poor Character Recognition During OCR Scanning
134
Pressing the Button on the Scanner Does Not Start Scanning.6-18
134
Scanned Image by Using the Button Is Missing
134
Upgrading from Windows 98 to Windows 2000
135
Uninstalling EPSON TWAIN
135
During Windows 2000 Installation
136
For Windows 98 Users
139
For Windows 2000 Users
142
Sizing up Your System
144
RAM and Hard Disk Size
144
Accelerator Boards
144
Video Cards
145
Monitors
145
File Compression Software
145
Appendix A Technical Specifications
148
System Requirements
148
For Pcs
148
For Macintosh Computers
148
Scanning
149
Electrical
150
AC Adapter
151
Environmental
152
Safety Approvals (Scanner
153
Safety Approvals (AC Adapter
154
CE Marking (Scanner
155
CE Marking (AC Adapter
156
USB Interface
157
Initialization Methods
158
Film Adapter
159
Appendix B Contacting Customer Support
161
Overview
162
Glossary
163
Other manuals for Epson Perfection 1240U
Product Support Bulletin
40 pages
Product Information Guide
6 pages
Declaration Of Conformity
2 pages
Related product manuals
Epson Perfection 1200
10 pages
Epson Perfection 1250
58 pages
Epson Perfection 1270
46 pages
Epson 1260 - Perfection Scanner
4 pages
Epson PERFECTION 1650
3 pages
Epson Perfection 1670
8 pages
Epson Perfection 1660
2 pages
Epson Perfection 1660 Photo
2 pages
Epson Perfection 1670 Photo
46 pages
Epson Perfection 1650 Photo
3 pages
Epson 1660 - Perfection Photo
24 pages
1640SU - Perfection Photo Scanner
40 pages
 Loading...