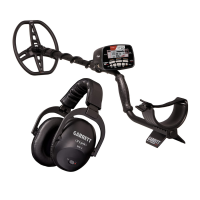
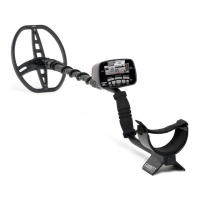
6 Garrett Metal Detectors
ATX
™
7
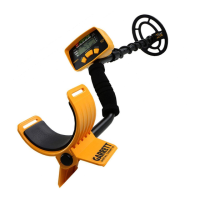
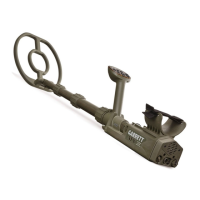
Telescoping Stem
Searchcoil
Stem Nuts
Stem Rotation Lock
Armrest
Armrest
Lock
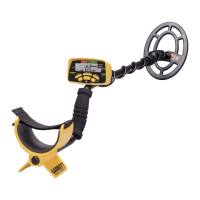
Adjusting the searchcoil and stem:
Fold open the searchcoil� Disengage the armrest and stem rotation locks
to allow stem to rotate� Rotate the stem and searchcoil to level and release
the spring-loaded rotation lock to allow it to automatically reengage� The
searchcoil can also be locked at 90º to the left or right for scanning walls
and embankments� When the searchcoil is locked in your preferred orienta-
tion, reengage the armrest lock�
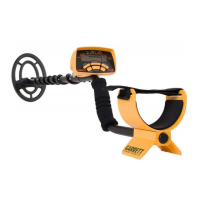
The ATX can be operated with the stems fully collapsed (preferred for
shallow diving), fully extended, or anywhere in between� To extend the tele-
scopic stem to the desired operating length, begin by loosening the bottom
stem nut closest to the search coil� Fully extend the bottom stem and tighten
the bottom stem nut� Then, loosen the middle stem nut, extend the middle
stem, and tighten the nut. The upper stem should be used for nal adjust-
ments to the desired operating length�
The correct operating length should allow you to stand upright (no stoop-
ing forward) and swing the coil in front of you without stretching or bending�
Adjusting the armrest:
To move the armrest forward or backward, open the armrest locking lever,
slide the armrest to the desired position, and lock the lever�
Armrest locking lever shown in open position. Armrest locking lever shown in locked position.
EQUIPMENT SETUP
Adjusting searchcoil tension:
To adjust the tension on the searchcoil, use a thin coin or a at-head screw-
driver� Turn the screw clockwise to increase tension (see below)� When prop-
erly tightened, the searchcoil should maintain its position parallel to the
ground while still allowing tilting during operation� Do not overtighten.
Attaching the headphones (if desired):
Remove the dust cap from the headphone connector on the back panel�
Ensure the headphone connector is clean� Align the headphone plug with the
connector pins in the proper orientation� If the detector will be submerged,
be sure to lubricate the O-ring on the connector with silicone grease�
Fully insert the connector until it snaps snugly into place� Slide the metal
locking collar onto the threads and tighten by hand� DO NOT over tighten�
Hand-tighten connector collar.Lubricate O-ring for underwater operation.
O-ring