9 Handing the product over to the end user
20 Installation and maintenance instructions ENERGY 0020177748_03
8.1.2 Resetting the remaining burner anti-cycling
time
▶ Press and hold the reset button for more than
three seconds.
◁
is shown in the display.
9 Handing the product over to the end
user
▶ When you have finished the installation, attach the sticker
supplied (in the end user's language) to the product
cover.
▶ Explain to the end user how the safety devices work and
where they are located.
▶ Inform the end user how to handle the product.
▶ In particular, draw attention to the safety information
which the end user must follow.
▶ Inform the end user that they must have the product
maintained in accordance with the specified intervals.
▶ Instruct the end user about measures taken for routing
the combustion air supply and flue system.
9.1 Informing the operator about the
maintenance intervals
▶ Inform the operator that they must have the product
maintained in accordance with the specified intervals.
10 Inspection and maintenance
10.1 Using original seals
If you replace components, use only the enclosed original
seals; additional sealing materials are not required.
10.2 Observing inspection and maintenance
intervals
▶ Adhere to the minimum inspection and maintenance in-
tervals. The inspection may require maintenance to be
carried out earlier, depending on the results.
– Inspection and maintenance work (→ Appendix)
10.3 Procuring spare parts
The original components of the product were also certified
by the manufacturer as part of the declaration of conformity.
If you use other, non-certified or unauthorised parts during
maintenance or repair work, this may void the conformity of
the product and it will therefore no longer comply with the
applicable standards.
We strongly recommend that you use original spare parts
from the manufacturer as this guarantees fault-free and safe
operation of the product. To receive information about the
available original spare parts, contact the contact address
provided on the reverse of these instructions.
▶ If you require spare parts for maintenance or repair
work, use only the spare parts that are permitted for the
product.
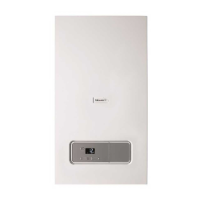
10.4 Checking the CO₂ content
1. Start up the product with the check programme (P.01)
and set the value.
– Setting value for the programme P.01: 100
Check programmes – Overview
2. Wait until the value that is read is stable.
– Waiting period for reading a stable value: 5 min
 Loading...