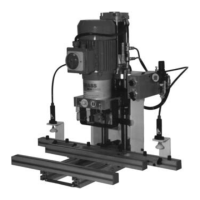
7-2 Setting-Up the Ecopress
7-204 Mounting the Pendulum Stop ( Accessory ) Illustrations 7-204-01/02/03/04/05/0/6
Tools needed: Allen wrench 5 mm
Allen wrench 2.5 mm
Open end fork wrench 8/19 mm
- Turn off the main switch.
- Place the pendulum stop in the bore hole (1) with an alignment pin. Illustration 7-204-01
- Screw in M6 x 25 Allen screw (illustration 7-204-02) into the thread (2). Illustration 7-204-01
- Tighten the screw with the Allen wrench (4). Illustration 7-204-02
- Hang up the pendulum (5). Illustration 7-204-03, thereby, marking the upper side.
Caution: This side must always be above.
- Adjust the set screw (6) (illustration 7-204-03) with an Allen wrench and open end fork wrench, according to
illustration 7-204-04, so that the same dimensions are legible at position 8 (illustration 7-204-03) and at
position 9 (illustration 7-204-04).
Dimension = 10 mm for back panels for Grass Nova Zarge (System 7000 )
Dimension = 12 mm for back panels for Grass Zarge System 6000
- Illustration 7-204-05/06 right back panel stop / left bore hole for Zarge 6036 with boring distances laterally of 12 mm
und depth of 37.5 mm
If the pendulum stop is not needed, the pendulum can be removed and stored with the tools. The pendulum can be
hung again at a later time (with the marked side upward).
39
7. Operating the Ecopress