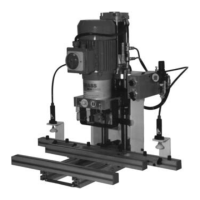
7-3 Adjusting the Ecopress
7-307 Operating the Stop Adjustment Gauge (Accessory) Illustration 7-307-01/02/03
Tools needed: Open end fork wrench 8/10 mm
Center-zero point gauge is an accessory.
Stop adjustment gauge is an accessory.
- After adjusting the side stops on the right side, the adjustment of the left side is made (for example, for left and right
door at the hinge mounting).
- Put pin A (illustration 7-307-01) in the bore hole B (illustration 7-307-01) of the center zero point gauge (accessory).
- Loosen the flap screw C (illustration 7-307-02). Slide the adjustment ring D (illustration 7-307-02) against the
stop latch E (illustration 7-307-02) of the side stops. Tighten the flap screw.
Caution: Flap screw must point upward.
Use more adjustment rings, if necessary.
- Press down all stop latches.
- Swing the adjustment gauge about 180∞ on the left side.
- Loosen a stop on the left side. Slide the stop toward the adjustment ring until the stop latch touches the
adjustment ring.
If the same hole patterns are repeated, it is recommended to get a stop adjustment gauge for each hole pattern and
exchange the flap screws for set screws.
This allows for exact and precise dimensions on both sides by means of a stop adjustment gauge for desired hole
patterns.
47
7. Operating the Ecopress