Puma 20/40 Service instructions | 57
5.2.3 Driving wheels (Puma 20/40)
Replacing the drive wheel, indoor/outdoor
Preparation
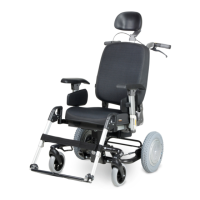
• Switch off the wheelchair via the remote control.
• Be sure that the freewheel switch is in ‘drive’ mode. If
the freewheel switch is in ‘push’ mode this will make
loosening the bolts impossible.
• Use a lifting device to raise the drive wheels clear of the
ground.
Instructions
• The following operations are required to replace the
driving wheel:
• Remove the cap, unlock the locking plate, remove the bolt
and the locking washer.
• Replace the new drive wheel.
• Screw the bolt with ring and a new locking plate into the
shaft, lock the locking plate and put the cap back again.
• Check the tyre pressures.
Notice
• Use a lifting device to raise the wheelchair / Puma 20/40
carrier.
• Infl ate the tube to the correct pressure! (See ‘Technical
specifi cations’)
Relevant article numbers
Puma 20
• 00000.1703 Lock nut M10 P20
• 9005992 Drive wheel Indoor 12 1/2 x 2 1/4, air
• 9005995 Drive wheel Indoor 12 1/2 x 2 1/4, puncture proof
• 9005993 Drive wheel outdoor 3.00-8, grey air
• 9005996 Drive wheel outdoor 3.00-8, grey puncture proof
Puma 40
• 9002600 Drive wheel bolt and ring P40
• 9006009 Drive wheel indoor 12 1/2 x 2 1/4, air
• 9006012 Drive wheel indoor 12 1/2 x 2 1/4, puncture proof
• 9006010 Drive wheel outdoor 3.00-8, grey air
• 9006013 Drive wheel outdoor 3.00-8, grey puncture proof
• 9006011 Drive wheel outdoor 3.00-8, black air
• 9006014 Drive wheel outdoor 3.00-8, black puncture proof
Tools used
• Lifting device
• Screwdriver
• Hammer (plastic)
• Torque wrench, socket, 13 mm
• Water pump pliers
Icons
•
Dispose of waste parts in accordance with local
regulations
•
Bolts are provided with Loctite thread locker!
• Note! Be aware of the issue!
1
Note! Suitable work area required!
2