1) Enter the table name of the third-party database.
2) Set the mapped table elds between the client soware and the third-party database.
6.
Click Connecon Test to test whether database can be connected.
7.
Click Save to save the
sengs.
The aendance data will be wrien to the third-party database.
Congure Break Time
You can add break me and set start me, end me, duraon, calculaon mode and other
parameters for the break. The added break
me can also be edited or deleted.
Steps
1.
Click Time & Aendance → Timetable .
The added
metables are displayed in the list.
2.
Select an added metable or click Add to enter seng metable page.
3.
Click Sengs in the break me area to enter break me management page.
4.
Add break
me.
1) Click Add.
2) Enter a name for the break me.
3) Set related parameters for the break me.
Start Time / End Time
Set the me when the break starts and ends.
No Earlier Than / No Later Than
Set the earliest swiping me for starng break and the latest swiping me for ending
break.
Break
Duraon
The duraon from start me to end me of the break.
Calculaon
Auto Deduct
The xed break duraon will be excluded from work hours.
Must Check
The break duraon will be calculated and excluded from work hours according to actual
check-in and check-out me.
Note
If you select Must Check as calculaon method, you need to set aendance status for
late or early returning from break.
5.
Click Save to save the sengs.
6.
Oponal: Click Add to connue adding break me.
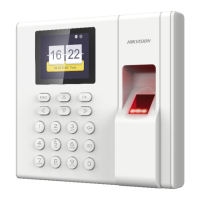
DS-K1A802A Series Fingerprint Time Aendance Terminal User Manual
91

 Loading...