18
PMML0140A rev.1 - 07/2009
INSTALLATION OF
REMOTE CONTROLLER
5.1.6. TIMER OPERATION PROCEDURE
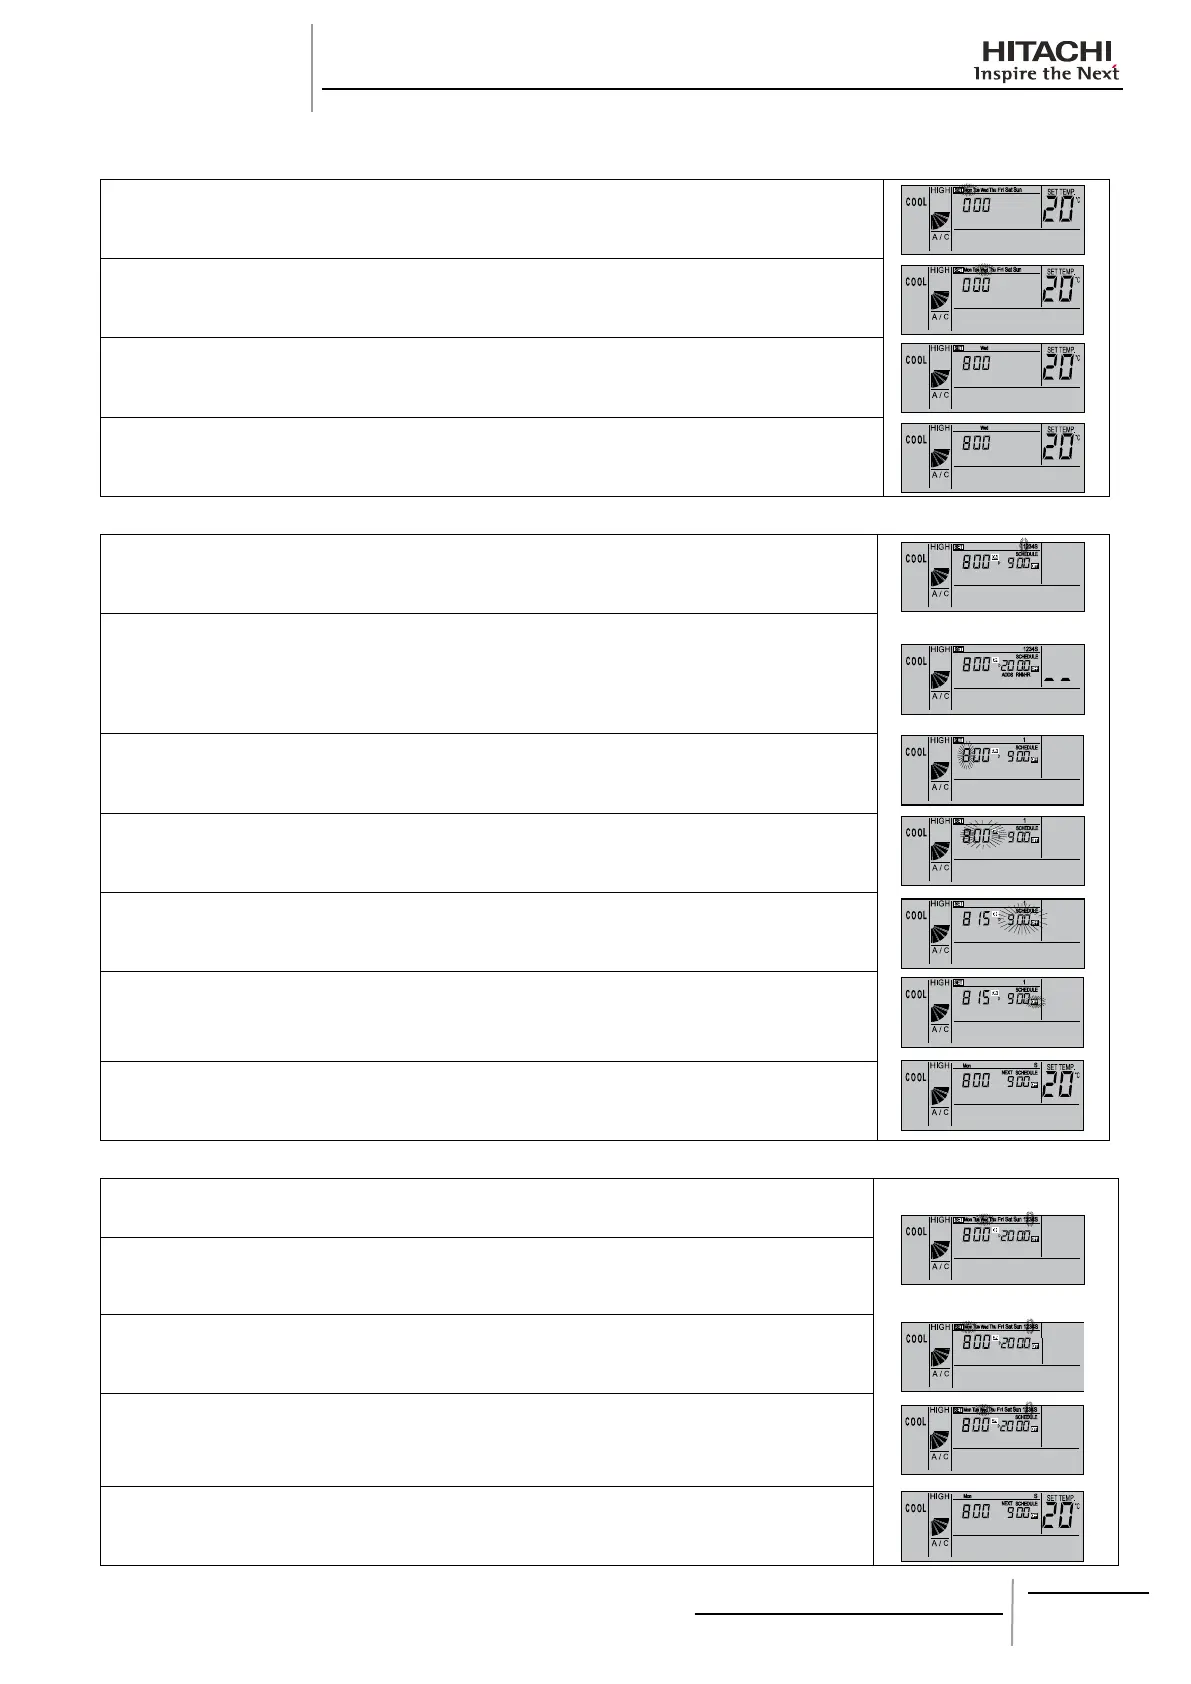
Setting current day and time•
1. Hold down the SELECT () DAY switch for more than 3 seconds to change to current day
setting mode. SET is indicated and the day blinks. All the days except the current day are
indicated.
2. Hold down the SELECT (
) DAY switch until the current day blinks, then press OK.
The date is indicated, and the time blinks.
3. Press the SELECT (
) DAY / SCHEDULE switches to adjust the “hour” setting, and then
press again. “Hour” is indicated and “minutes” blinks.
4. Press the SELECT (
) DAY / SCHEDULE switches to adjust the “minutes” setting, and
then press again. The current time setting mode ends and returns to normal mode. “Minutes”
is indicated and the SET indication goes out. The “seconds” start from zero.
Setting the timer (programming)
•
1. Press the TIMER switch. SET and SCHEDULE are indicated. Schedule number “1” blinks
and other numbers are indicated.
2. When the SCHEDULE switch (
) is pressed, the schedule number moves
[1] → [2] → [3] → [4] → [S] → [1]→….
Select [S] to set the ON/OFF time and temperature shifts.
−
By pressing the TIMER switch, the SET and SCHEDULE indicators go out and the mode −
changes back to normal.
3. When the OK switch is pressed, the selected schedule number is indicated. The other
schedule number indicators go out, and the ON time “hour” indicator for the number selected
blinks.
4. Press the SELECT (
) DAY / SCHEDULE switches to adjust the “hour” setting, and
then press again. “Hour” is indicated and “minutes” blinks.
5. Press the SELECT (
) DAY / SCHEDULE switches to adjust the “minutes” setting, and
then press again. “Minutes” is indicated and the OFF time “hour” setting blinks.
6. Set the OFF time the same way as the ON time. After setting the “minutes”, the OFF time is
indicated. If the schedule number [1][2][3][4] is selected, the indication changes to set the
schedule number shown in 2. If [S] is selected, see the section on setting temperature shifts
for details.
7. By pressing the (
) DAY / SCHEDULE switches, the SET and SCHEDULE indicators
go out and the mode returns to normal.
Deningthescheduletobeapplied
•
1. Hold down the () DAY/SCHEDULE switches for more than 3 seconds and the SET
indicator appears. All the days and schedule numbers are indicated.
2. Press the (
) DAY/SCHEDULE switches until the day you wish to set blinks. When
pressed, the day blinks [Mon] → [Tue] →… → [Sun]→ [Mon~Sun] → [Mon~Fri] → [Sat, Sun]
→ [Mon]... If several days are blinking, the same setting will be applied to all the days.
3. Press the (
) DAY switch until the schedule number you wish to set blinks.
4. Press the (
) SCHEDULE, and the SCHEDULE indication appears. Then the schedule
number indicated in step 3 is applied to the days set in step 2. Press the OK switch to
activate or deactivate the schedule. If the schedule is activated, the word SCHEDULE is lit
up.
5. Press the TIMER switch and the mode returns to normal.
:
SET
Mon Tu e
Wed
Thu
Fri
Sat
Sun
:
SET
1234S
ADDS
SCHEDULE
RNkHR
ON
OFF
:
:
SET
Mon Tu e
Wed
Thu
Fri
Sat
Sun
:
SET
Mon Tu e
Wed
Thu
Fri
Sat
Sun
1234S
ON
OFF
:
:
SET
Mon Tu e
Wed
Thu
Fri
Sat
Sun
1234S
ON
OFF
:
:
SET
Mon Tu e
Wed
Thu
Fri
Sat
Sun
1234S
SCHEDULE
ON
OFF
:
 Loading...