Do you have a question about the Inficon Gemini MPG504 and is the answer not in the manual?
General safety guidelines and precautions for handling and operating the gauge.
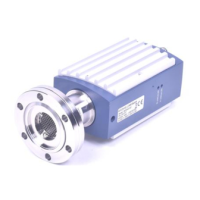
Instructions and safety warnings for connecting the gauge to the vacuum system.
Details on grounding, handling vacuum and dirt-sensitive components.
Guidance on gauge mounting orientation and connecting to the vacuum system.
Guidelines for connecting the gauge to the power supply safely and effectively.
Explains the meaning of different LED states for the MAG50x series.
Explains the meaning of different LED states for the MPG50x series.
Steps to put MAG5xx gauges into operation via FCC or D-sub connectors.
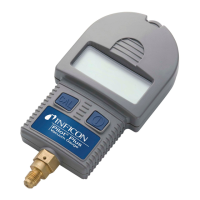
Steps to put MPG5xx gauges into operation and required stabilizing time.
Explains that readings are gas-dependent and require correction.
Safety precautions for dealing with potentially contaminated parts during removal.
Steps for physically removing the gauge from the system and protecting it.
Instructions for adjusting the MAG5xx and MPG5xx gauges, including calibration.
Detailed steps for performing zero point adjustment using the <ADJ> button or interfaces.
Procedures for cleaning the gauge and replacing defective parts like the Pirani filament.
Warnings and precautions related to the use and disposal of cleaning agents.
Instructions for removing and inspecting the measuring chamber and ionization chamber.
Using an ohmmeter to perform measurements on contact pins for fault identification.
Procedure for replacing the ionization chamber and ignition aid.
Step-by-step guide for removing and preparing the ignition aid for replacement.
Guide for inserting the new ignition aid into the mounting tool and onto the anode.
Steps for inserting the new ionization chamber and mounting the retaining ring.
Final steps for assembling the cleaned or new measuring chamber cpl.
Instructions for setting the calibration value of the new spare sensor.
Steps for inserting, fastening, and adjusting the new measuring chamber.
Details on performing ATM and HV adjustment for MPG5xx after replacement.
Basic troubleshooting step of power cycling the gauge.
| Accuracy (Capacitive) | ±0.25% of reading |
|---|---|
| Protection Class | IP40 |
| Measurement Principle | Pirani, Capacitive |
| Measurement Range (Pressure) | 1E-4 Torr to 1000 Torr |
| Response Time | <1 second |
| Operating Temperature | 0°C to 50°C |
| Storage Temperature | -20°C to 70°C |
| Power Supply | +24 VDC ±10% |
| Communication Protocol | RS-485 |