42 Keysight Infiniium 90000A Series Oscilloscopes User’s Guide
2 Using the Oscilloscope
Setting Up Triggers
Use the trigger controls to set the conditions on which the oscilloscope will trigger
and acquire an input signal. You can set up a variety of trigger conditions. Edge
triggers and the parameters for edge triggering can be set up from the front panel.
Trigger configuration settings you make using the user interface are reflected in
the front-panel status indicators, and will remain set unless you change them or
press the [Default Setup] key.
Setting the oscilloscope to trigger on an edge
1 Press the [Source] key until the desired trigger source LED is illuminated.
You can choose any of the channels or the Aux or Line input as the source for an
edge trigger.
2 Press the [Slope] key until the desired slope LED is lit.
You can have an edge trigger on a rising or falling edge, or both.
3 Press the [Sweep] key until the desired LED is lit (Trig’d or Auto).
When Auto is selected, if a trigger does not occur within a certain amount of
time, an acquisition is automatically saved and displayed. In Auto trigger mode,
you are able to see your signals while setting up the desired trigger.
When Trig’d is selected, the oscilloscope must find the trigger before saving
and displaying captured data.
4 Turn the trigger Level knob to adjust the voltage level at which the oscilloscope
will trigger.
Use the Trigger dialog box to select any of the different modes of triggering, the
parameters and conditions for each trigger mode, and advanced configuration
items.
You can also mouse over the trigger level field and use the resulting controls to set
a specific trigger level when the scope is set for edge trigger on a specific channel.
You can also drag the trigger reference indicator at the left side of the display, or
drag the trigger line itself, which appears when you click or touch the grid.
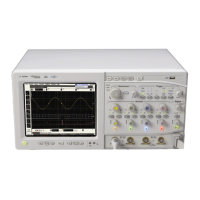
Figure 21 Trigger controls and indicators
Set trigger level
Open the Trigger
dialog box
set the trigger level
select rising or falling
edge for the trigger
select Auto or Trig’d
select the trigger source
select Edge mode
set low or high sensitivity
for the trigger
 Loading...