STEPS
1. Install Fence frames, covers and
top caps, as required.
2. Attach (2) horizontal rail cradles (D)
to the end leg, using (2) ¼-20 x 1"
machine screws (H) per cradle (D).
3. Install (2) end caps into the ends of the starter
rails attached to the leg using a rubber mallet.
NOTE: This should complete the
rail/ leg assembly for the desk end
opposite the fence attachment.
4. Attach the starter rails to the cradles in
the end leg by first fastening (2) cradle
clamp brackets (E) loosely to each cradle
using (4) ¼-20 x
5
/
8
" machine screws (I).
5. Slide one end of each starter rail into a
cradle/clamp assembly with rail paint
holes facing up and toward the center of
the desk assembly. If glass tops are being
used, holes are to face down and toward
the center of the table desk assembly.
NOTE: Starter rails are typically 3" shorter than
top width. i.e.: 72" wide tops use 69" wide rails.
6. Position the outer edge of each cradle (A) 4"
from the end of the rail. Use gauge to properly
position the leg. See Install Gauge Guidelines.
Tighten the screws (I) in the cradle
clamp brackets (E).
7. Attach (1) Fence end support cradle (B or C)
to each Fence to plate weldment (A) using (2)
#14 x 1" FH wood screws (J) per weldment.
8. Determine the approximate position of the
desk along the width of the Fence. Insert
(2) Fence cradle/weldment assemblies
(created in Step 7) into the T-slot under the
Fence crown, rotating them so the holes
in the weldment plate are facing up.
The distance between these assemblies
along the Fence wall can be calculated by
matching the distance between the cradles
attached to the end leg. The starting point of
these assemblies should take into account
the assumed rail overhang dimension &
position of the top to be installed in Step 12
9. Locate (2) 1
1
/
8
" rail extensions (K),
and insert (1) end cap into each.
10. Place (1) rail extension/end cap assembly
into each of the cradle/weldment
assemblies attached to the Fence.
NOTE: The end cap should protrude on the
Fence side by approx.
1
/
16
". Use the Installation
Gauge to ensure correct placement.
11. Place the free rail ends of the previously
assembled leg/rail assembly into the Fence
cradle/weldment assemblies (next to the
rail extension/end cap assemblies).
12. Attach the starter rails to the cradle/
weldment assemblies (with extensions) by
first fastening (2) cradle clamp brackets
(E) loosely to each cradle (B) using (4)
¼-20 x
5
/
8
" machine screws (I).
13. Slide the end of each starter rail into the
cradle/clamp assembly. Tighten the screws
(I) in the cradle clamp brackets (E)
14. If applicable, add suspended storage
units at this time. (See suspended
storage installation instructions.
15. Surfaces 48" wide and greater require a spacer
(F) for additional support. When necessary, a
spacer (F) should be placed between the top
of each rail and the underside of the return
top, centered on the width of the return top.
Spacers (F) are attached to the return top using
(1) #12 X ¾" black wood screw (G) per spacer.
16. Lay desk top on base assembly. Use gauge
to properly position top. See Install Gauge
Guidelines. Attach top using (2) #14 x 1" FH
wood screws (J) per cradle into pre-drilled
holes in the underside of the return top.
17. Adjust glides as needed to level the assembly.
Desk Supported by 25"H or 28 ½"H Fence
Pattern Numbers Represented:
Fence Desk Support Adapters, YBAFE_
Legs for Desks or Returns (Desk Height), YEL__
Starter Rails with End Caps, YBRS_
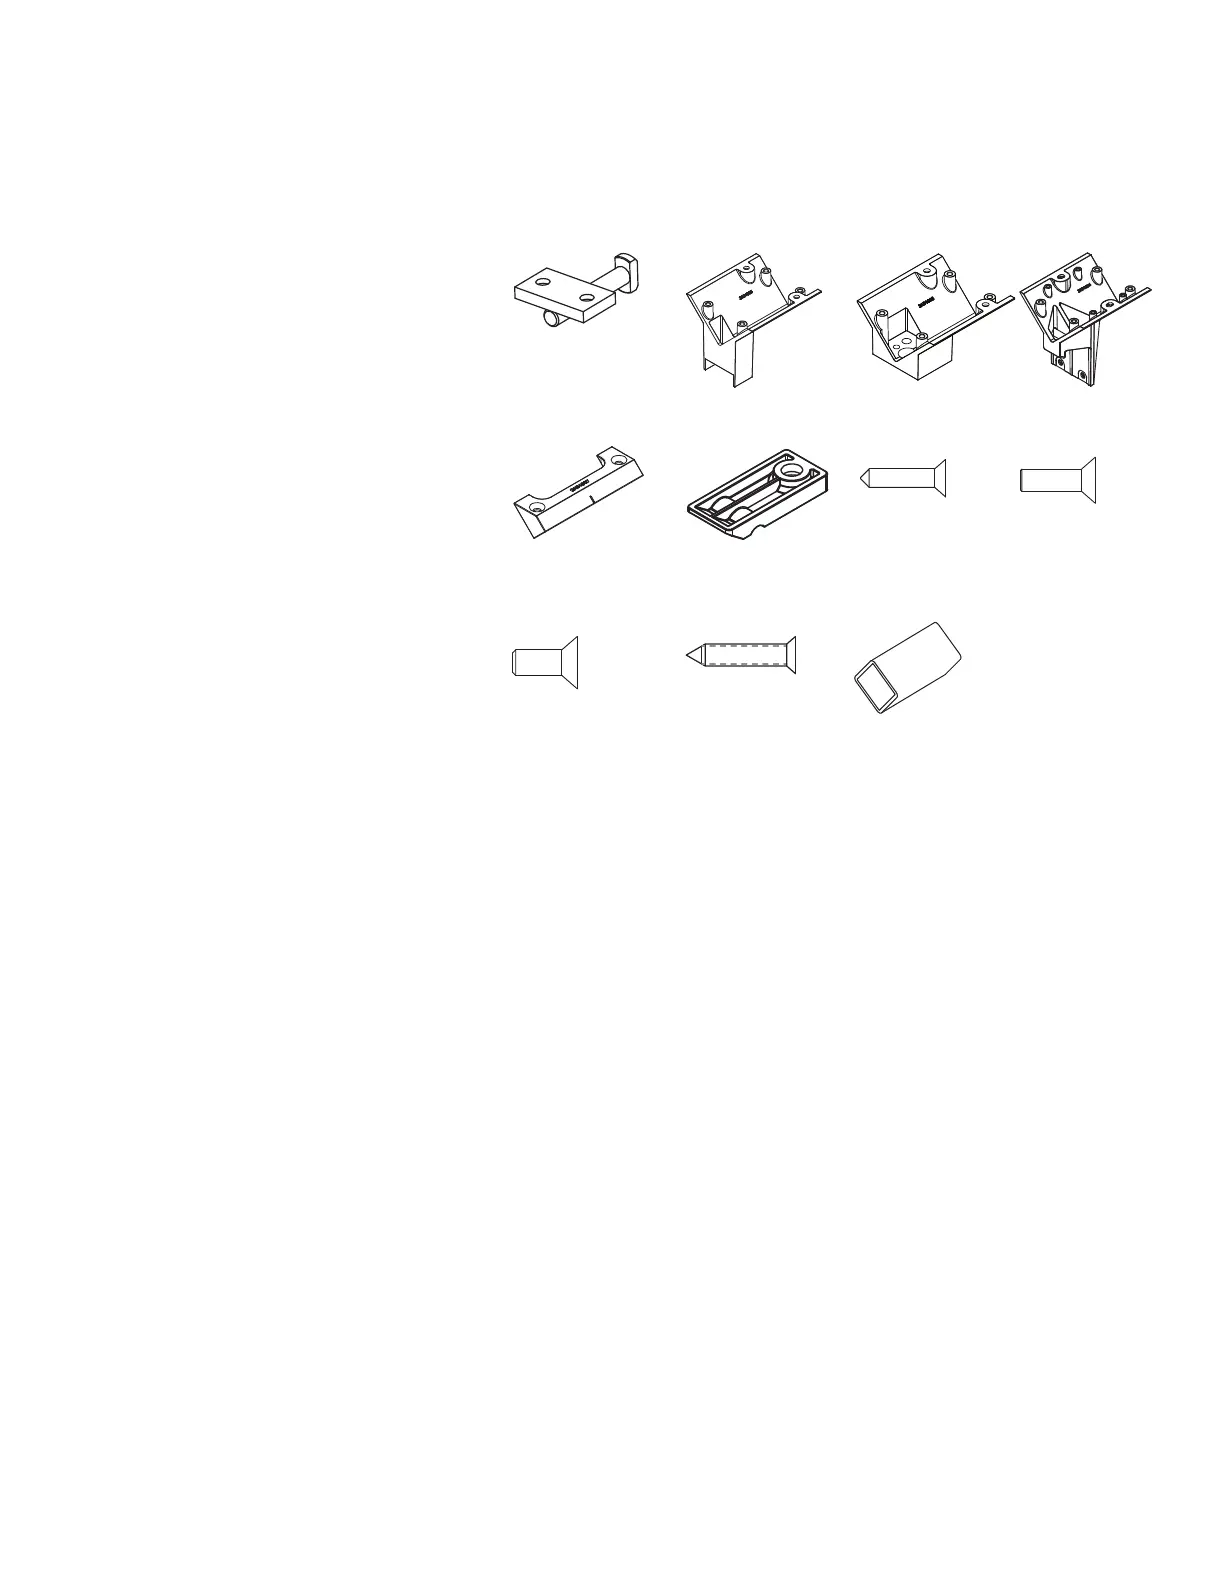
Parts List:
Fence to Plate Weldments (A)
Fence End Support Cradle (B) for 25"H Fence (or)
Desk to Pedestal Cradle (C) for 28"H Fence
Horizontal Rail Cradle (D)
Cradle Clamp Bracket (E)
Spacer (F)
#12 X ¾" Black Wood Screw (G)
¼-20 x 1" Machine Screw (H)
¼-20 x
5
/
8
" Machine Screw (I)
#14 x 1" FH Wood Screw (J)
1
1
/
8
" Rail Extension (K)
Fence Frame, Covers & Crown Top Caps
Desk End Leg
Starter Rails
End Caps
Desk Top
Tools Needed:
Drill
Phillips #2 and #3 bits
Install Gauge
Rubber Mallet
(A) 3AB403040 (B) 3AB4005* (C) 3AB4026* (D) 3AB4004*
(E) 3AB4007* (F) 3AB401252 (G) 7196440
(H) 7194140
(I) 7189140 (J) 7434100 (K) 3AB100641*