5 Installation/ Commissioning
25 of 50
KSB Guard
4079.83/01-EN
WARNING
Work in the immediate vicinity of rotating parts
Risk of hand injury!
▷ Always have this work performed by trained personnel.
▷ Take particular caution when performing this work.
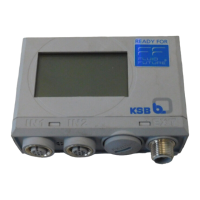
Positioning the sensor unit Observe the following information when positioning and fastening the sensor unit:
▪ Mount the sensor unit at a suitable location on the bearing bracket or drive
lantern up to a maximum height of 2m.
Recommended mounting position (ðSection10.1,Page40)
▪ Preferably affix the sensor unit to magnetic material.
▪ The location on the bearing bracket or drive lantern where the sensor unit is
mounted should be level. Use the adhesive to compensate for minor uneven
spots or curvatures.
▪ The sensor unit must also be glued in addition to the magnetic holders. The
adhesive surface should not be on top (with the unit upside down).
▪ The adhesive should be processed at room temperature (18-25°C).
ü The operating manual for the pump set is accessible and has been observed.
ü All safety instructions for the adhesive have been read and observed.
1. Remove any coarse dirt from the mounting area.
2. Clean the back of the sensor unit using the supplied cleaning pad.
3. Clean the mounting area using the supplied cleaning pad.
4. Spread the supplied adhesive over the back of the sensor unit.
5. Position the sensor unit on the cleaned area of the bearing bracket or drive
lantern. The sensor unit is optimally aligned when the x-axis of the sensor unit is
parallel to the shaft and the y-axis of the sensor unit is horizontal.
6. Firmly press down the sensor unit.
7. Allow the sensor unit to dry on the bearing bracket or drive lantern to ensure
that the position of the sensor unit is not unintentionally changed during the
following assembly steps. The adhesive bond must be able to withstand slight
vibrations at the sensor unit. The waiting time strongly depends on ambient
conditions.
NOTE
At an ambient temperature between +25°C and +30°C, the supplied adhesive will
have sufficiently cured after approximately 24hours. After 3days, the adhesive will
have fully cured. Increased temperatures (e.g. +60°C to +90°C) accelerate the
curing process.