Home
Kyocera
Copier
FS-1060DN
Page 27
Kyocera FS-1060DN - Page 27
131 pages
Manual
Save Page as PDF
To Next Page
To Next Page
To Previous Page
To Previous Page
Loading...
2M2/2M3
1-2-7
*:
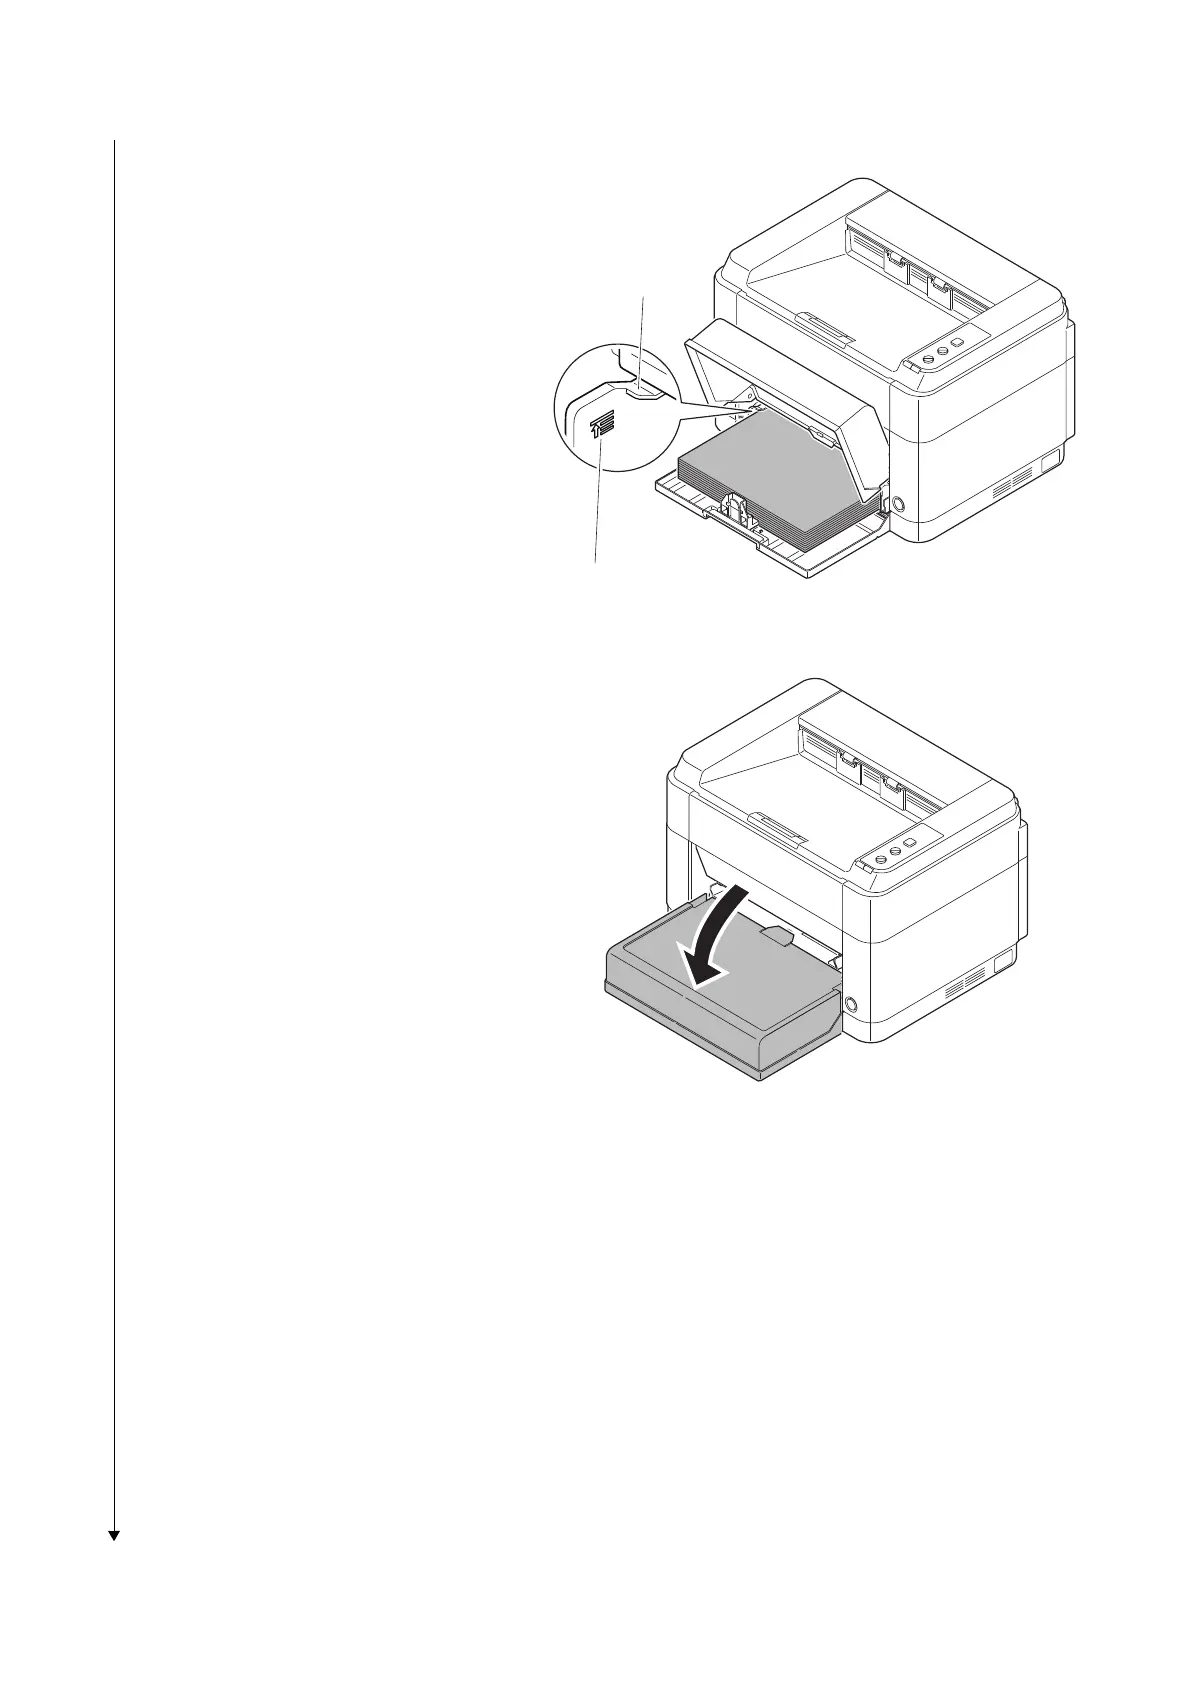
Load an amount of p
aper that fits under
the tabs on the wid
th guides.
*:
Ensure that the loaded p
aper does not
exceed the level indicated.
Figure 1-2-12
5.
Close the cassette cover
.
Figure 1-2-13
Ta
b
s
Exceed the level indicated
26
28
Table of Contents
Main Page
Safety Precautions
5
Installation Precautions
7
Specifications 1
8
Table of Contents
11
Assembly and Disassembly
12
Mechanical Construction
12
Specifications
15
Parts Names
17
Machine
17
Operation Panel
18
Machine Cross Section
19
20/21 Ppm Model
19
25/26 Ppm Model
20
Installation Environment
21
Unpacking and Installation
22
Installation Procedure
22
Maintenance Mode
33
Executing a Maintenance Items
33
Event Log
38
Maintenance Menu
43
Maintenance Menu 1
44
Service Package
45
Maintenance Kits 2
46
Paper Misfeed Detection
47
Paper Misfeed Indication
47
Paper Misfeed Detection Condition
48
Self-Diagnostic Function
50
Self Diagnostic Codes Indication
50
Self Diagnostic Codes
52
Image Formation Problems
54
No Image Appears (Entirely White)
54
No Image Appears (Entirely Black)
55
Part of Image Is Missing
56
Gray Background
56
White Streaks Are Printed Vertically
57
Black Streaks Are Printed Vertically
57
White or Black Streaks Are Printed Horizontally
57
Spots Are Printed.printing Incomplete or out of Position
58
Printing Incomplete or out of Position
58
Paper Is Wrinkled
58
Offset Occurs
59
Fusing Is Loose
59
Faint or Blurred Printing
59
Dirt on the Top Edge or Back of the Paper
60
Spots in the Printed Objects
60
Electric Problems
61
Mechanical Problems
63
Error Messages
64
Precautions for Assembly and Disassembly
67
Precautions
67
Drum
67
Toner
67
How to Tell a Genuine Kyocera Mita Toner Container
68
Outer Covers
69
Detaching and Refitting the Top Cover
69
Detaching and Refitting the Right Cover
70
Detaching and Refitting the Left Cover
71
Fuser Section
72
Detaching and Refitting the Fuser Unit
72
Pwbs
73
Detaching and Refitting the Main Pwb,High Voltage PWB and Power Source PWB
73
Detaching and Refitting the Operation Panel PWB
77
Others
78
Detaching and Refitting the Laser Scanner Unit
78
Detaching and Refitting the Main Motor Unit
80
Direction of Installing the Principal Fan Motor
86
Paper Feed/Conveying Section
87
Cassette Paper Feed /Paper Conveying Section
87
Manual Feed Section(25/26 Ppm Model Only)
88
Drum Section
90
Developer Section
91
Optical Section
92
Laser Scanner Section
92
Transfer/Separation Section
95
Fuser Section
96
Duplex Conveying/Eject Section
98
Electrical Parts Layout
101
Pwbs
101
Switches and Sensors
103
Others
104
Main PWB
105
Relay PWB PWB
108
Power Source PWB
110
Operation Panel PWB
112
Maintenance Kits
113
Procedure for Replacing Maintenance Kit
114
Preparation
114
Detaching the Drum Unit
116
Detaching the Developer Unit
116
Detaching the Toner Disposal Box
117
Detaching and Refitting the Paper Feed Pulley and Lower Paper Feed Guide
117
Refitting the Toner Disposal Box
122
Refitting the Developer Unit
122
Refitting the Drum Unit
123
Detaching and Refitting the Transfer Roller
124
Notice after Replacing Maintenance Kit
125
Procedure for Only Replacing Drum Unit
126
Procedure for Only Replacing Developer Unit
126
Cleaning the Printer
127
Appendixes
128
Repetitive Defects Gauge
128
Wiring Diagram
129
Related product manuals
Kyocera FS-C8020MFP
378 pages
Kyocera FS-C8025MFP
378 pages
Kyocera 6030
124 pages
Kyocera 5035
292 pages
Kyocera 5230
226 pages
Kyocera KM-1620
124 pages
Kyocera KM-5530
252 pages
Kyocera TASKalfa 265ci
355 pages
Kyocera 6551ci
570 pages
Kyocera KM-3040
364 pages
 Loading...