To delete a Calendar entry
1. Select the “Calendar” option and press ENTER.
2. Use the and keys to select the entry you want to delete and press the BACKSPACE key.
3. The screen will display “DELETE?”. Use the and keys to select “Yes” and press ENTER to conrm and delete
the selected entry (or select “No” and press ENTER to cancel the deletion).
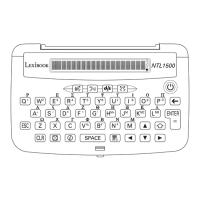
PHONE BOOK MODE
1. Press MENU then use the and keys to select “Organiser” and press ENTER.
2. Use the and keys to select “Phone Book” and press ENTER to conrm.
3. To browse through the Phone Book’s entries, use the and keys.
To add a new Phone Book entry
1. Select the “Phone Book” option and press ENTER.
2. Press ENTER and input the name of the contact. Press the ENTER key to conrm.
3. Press the NUM key to switch to number input and enter the phone number of the contact. Press ENTER to conrm.
4. Press the NUM key again to switch back to character input and enter a note. Press ENTER to conrm and save the
contact. The message “STORED” will be displayed on screen.
Note: To exit the mode without saving the contact, press the ESC key at any time. The screen will display “QUIT?”.
Use the and keys to select “Yes” and press ENTER. Or select “No” and press ENTER to resume adding the entry.
To edit or delete a Phone Book entry
Same procedure as in the “Calendar” mode (see p.11)
TO DO MODE
1. Press MENU then use the and keys to select “Organiser” and press ENTER.
2. Use the and keys to select “To Do” and press ENTER to conrm.
3. To browse through the entries, use the and keys.
To add a new To Do entry
1. Select the “To do” option and press ENTER.
2. Press ENTER and input a description (120 characters maximum).
3. Press ENTER to conrm and save the entry. The message “STORED” will be displayed on screen.
Note:
• Use the NUM key to toggle between character input and number input.
• To exit the mode without saving the entry, press the ESC key at any time. The screen will display “QUIT?”. Use the
and keys to select “Yes” and press ENTER. Or select “No” and press ENTER to resume adding the entry.
To edit or delete a To D entry
Same procedure as in the “Calendar” mode (see p.11)
DEMO MODE
Start-up Guide
1. Press MENU, then use the and keys to select “Demo” and press ENTER.
2. Use the and keys to select “Startup Guide” and press ENTER to conrm and launch the automatic step-by-step
guide (please refer to the “Start-up Guide” section p.5).
Note: The start-up guide will be launched in the selected display language.
User Demo
1. Press MENU, then use the and keys to select “Demo” and press ENTER.
2. Use the and keys to select “User Demo” and press ENTER to conrm and launch a short demonstration of the
MT1500’s features.
Note: The user demo will be played in the selected display language.
International Demo
1. Press MENU, then use the and keys to select “Demo” and press ENTER.
2. Use the and keys to select “International Demo” and press ENTER to conrm and launch an animated
demonstration of the MT1500’s features.
RESET
In the unlikely event that your unit should cease to function or stop operating you can reset it by a simple procedure.
1. Turn the unit over and locate the small RESET hole on the back of the product.
2. Insert a small, thin, blunt instrument, such as a paperclip, into the hole, press gently and then release.
3. Your unit should now have reset and the start-up guide will be launched automatically (please refer to the “Start-up
Guide” section, p.5).
Note: If the unit is still not working, the battery may need to be replaced.
 Loading...