Rev:11.08.19 Page 118 CCD-0001573-08
Grounding
The following steps describe the process of how the auto leveling sequence extends the jacks to the ground:
1. Depending on which end of the coach is lowest to the ground, the level sensor in the controller will
activate the jacks—the lowest end first, either front or rear.
A. If the rear of the coach is the lowest end, ground the lowest rear jack first.
B. If the front end is the lowest end, ground the front jack closest to the power unit.
2. Ground the remaining front or rear lowest end jack.
3. Lift lowest end jacks together until level.
4. The leveling system will then ground remaining end jacks.
A. If the rear of the coach is the remaining end, ground lowest jack first.
B. If the front of the coach is the remaining end, ground the front jack closest to the power unit.
5. Ground the remaining front or rear remaining end jack
6. Lift remaining end jacks together until level.
7. Visually inspect all jacks to ensure all footpads are touching the ground. If one of the rear jack footpads
is not touching the ground, put the system in manual mode. See Manual Leveling Procudure then
press the corresponding LEFT or RIGHT arrow buttons to lower the non-compliant jack to the ground.
Leveling:
The following steps describe the process of how the auto leveling sequence levels the coach, once the jacks
have been grounded. This process may repeat several times until level.
1. Front-to-Rear
2. Side-to-Side
3. Individually
4. Minor adjustments to confirm grounding.
Automatic Leveling Procedure
NOTE: Coach requires 12.75V DC to commence auto leveling function.
NOTE: The coach MUST be running and the parking brake MUST be engaged for the Class C Hydraulic
Leveling System to operate.
NOTE: Refer to the Wiring Diagram or Hydraulic Plumbing Diagram in this document for questions
regarding location and functions of the Class C Hydraulic Leveling System.
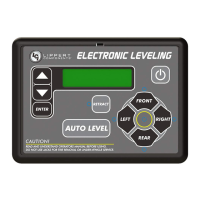
1. Press "On/Off" button to turn system on (Fig. 1K).
2. Press AUTO LEVEL button (Fig. 1F). LCD Screen will display "Remain Still."
3. The coach will level automatically and indicate "Auto Level - Success" in the LCD display (Fig. 1E).
NOTE: Display will then read "Level - Jacks: Down." Do not press any buttons until this message appears or
a "Function Aborted" error will be displayed.
Automatic Leveling Descriptive Logic
After starting the automatic leveling cycle it is very important that you do not move around in the
coach until the coach is level and the green LED light illuminates in the center of the touch pad.
Failure to remain still during the leveling cycle could have an eect on the performance of the
leveling system.