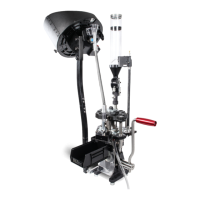
Tool Head Removal, Shell Plate Change, Primer Size Change, Swage Rod
Change
1) Tool Head
To remove the Tool Head, unthread and remove the center bolt. Lift the Tool Head up and off the press,
along with the main return spring. When reinstalling the Tool Head, thread the center bolt ¾ of the way
in and then lower it to its lowest position. Then fully tighten the center bolt.
2) Shell Plate Change
Remove the Tool Head, then loose the 4 set screws on the shell plate nut. Unthread the nut and remove
it. Next remove the 4 screws on the shell retainer spring mounts and remove them and spring. Loosen
the lock screws on the case ejection arm and pivot it up out of the way. Push in the case feed ram and
lift the shell plate off the press. Install new shell plate in reverse order. The shell plate nut should be
tight but still allow the plate to rotate smoothly. The 4 set screws on the nut should be snug but do not
over tighten. When reinstalling the spring/shell retainer spring mounts, use a case as a guide. The case
should pass the retainers smoothly but without looseness.
3) Primer Size Change
Remove the Tool Head and Shell Plate, then remove the primer tube assembly by removing the 2 screws
on the base. Then remove the 3 screws holding the plastic cover and remove the cover. Next remove
the screw in the center of the primer disc and lift off the disc. Remove the 2 screws holding the primer
disc guide plate and remove it. Next remove the 2 screws holding the body of the priming mechanism to
the press frame and the 1 screw connecting the link arm from the press to the primer mechanism. Be
careful not to lose the bushing in the link arm. Move the priming mechanism away from the press body
and lift out the primer punch. Using a large, well-fitted, slotted screwdriver, unthread and remove the
primer punch bushing from the priming mechanism. Replace the punch with the desired size punch.
Replace the bushing with the desired size, be sure there are no burrs on the top surface of the bushing
from the screwdriver. Reassemble the unit in reverse order from above. Adjust primer guide plate
against the disc as close as possible without creating drag on the disc. Also change the primer tube
installed inside the shield.
See Diagrams on next page.