Do you have a question about the Mark 7 APEX 10 and is the answer not in the manual?
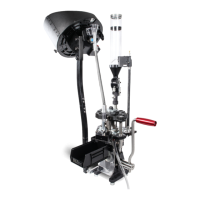
Thread the 4 baseplate risers into the bottom of the press. Apply grease to the threads for easy installation.
Determine press location, install handle and adapter, securing with set screws for right or left side mounting.
Install pole brackets, lower pole, pole connector, and upper pole to the press for the case feeder.
Install the Case Feed Adapter with screws to the Case Feed Upper Housing for quick case removal.
Mount the primer tube assembly and low primer sensor to the primer housing using provided screws.
Install the Powder Measure onto the Tool Head in station 6, threading it into the die station.
Install the Bullet Feeder on the side of the Case Feeder, angled at 45 degrees, and install the bullet drop tube.
Configure the Apex 10™ with recommended die positions for standard processing and loading in one pass.
Add cases to the Case Feeder, then thread the decapping die to lightly touch the shell plate.
Adjust the swage rod and die to properly swage the primer pocket in station 3 using a test case.
Insert primers into the tube, cycle the press, and adjust primer insertion depth for proper seating.
Use a dedicated station for neck expansion/flare in Station 5 for pistol or rifle calibers.
Adjust powder measure height and set powder charge by weighing dumps, ensuring consistency.
Adjust Mr.Bulletfeeder spring, bowl, and drop tube for proper bullet feeding and seating.
Set Overall Length (OAL) and crimp in stations 9 and 10 with a fully loaded shell plate.
Set the upper position of the stroke using the upper set screw on the rear of the machine.
Check the mount and bearing for tightness and ensure grease is on the bearing surface.
Adjust the Index Pawl if the shell plate is not lining up properly with alignment pins.
Remove and reinstall the Tool Head by unthreading and tightening the center bolt.
Remove and install the shell plate by loosening screws and pivoting components.
Change primer size by disassembling the priming mechanism and replacing the punch.
Swap the swage rod by loosening set screws, removing linkage, and unscrewing the rod.
| Stations | 10 |
|---|---|
| Category | Industrial |
| Priming System | Automatic |
| Control System | Programmable |
| Caliber Conversion | Automatic |