4. Case Neck Expansion
The APEX 10
TM
uses a dedicated station for neck expansion/flare in Station 5. For pistol calibers we
recommend the use of the Lyman Pro Case Flair die. For rifle calibers we suggest the use of a Lyman M
Die Neck Expander. We recommend doing an initial setup at this point to achieve just enough flare for the
bullet to fit inside the case mouth. The final adjustment is best dialed in later during the bullet drop setup.
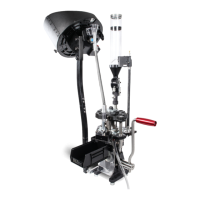
5. Powder Measure Die Height and Powder Charge Adjustment
Move the Tool Head to its lowest position and install the Powder Measure into Station 6. Thread
the powder measure into the die station so that the powder funnel contacts the case. Continue
to thread in the powder measure until it comes to a complete stop and the metering drum is at
the top of its travel. The internal compliance mechanism spring is now compressed and
bottomed out on its hard stop. The plunger assembly will reach the top of its travel while the
internal spring is compressing. Back off the powder measure ½ turn then, lock the measure in
place with the hex nut. Refer to image in the figure below. For pistol calibers, the drop tube should
not cause additional flare on the case mouth. If it does, back off the powder measure additional 1/8
turns until no additional flare is added. NOTE: If the Powder Measure die height is not set properly
the drum may not rotate fully to the dump position which may cause inconsistent powder charges.
Before adding powder to the measure, rotate the plunger assembly until it is at the middle point of
its travel. Turn the plunger adjustment knob all the way in until it bottoms out against the body of the
measure, and then turn it back in the other direction about a ¼ turn. This sets the plunger to give the
minimum charge. If threaded in too deeply, the metering drum will not rotate, and the measure may
suffer damage. Cycle the measure by hand to ensure that it rotates freely.
• To set the powder charge place a primed case in station 6 under the Powder Measure.
• Perform a single press cycle to actuate the Powder Measure.
• Verify the Adjustment lever completes the full stroke range as shown in the Figure below. If it
doesn’t adjust die height.
• Remove the case and weigh the charge.
• Empty the case and adjust the charge to the desired level by turning the adjustment knob. Turning
clockwise will decrease the charge, counterclockwise will increase the charge.
• Once the desired charge is achieved perform a few dumps – We recommend checking a minimum
of 5 dumps to make sure the charge is consistent. Note: Always discard the first powder dump
after making a charge adjustment and make sure to allow for enough drop time for a given load
by pausing at the bottom of the stroke before returning the Tool Head to the top of the stoke.
• Check the die nut and adjustment charge nut for tightness.