11921 Slauson Ave. Santa Fe Springs, CA. 90670 (800) 227-4116 FAX (888) 771-7713
24
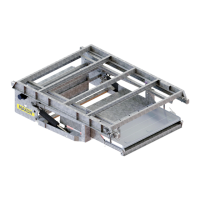
BOLT-ON MOUNTING PLATES 34-1/4” (GALVANIZED)
FIG. 24-1
34-1/4”
BOLT-ON MOUNTING PLATES 33-3/4” (GALVANIZED)
FIG. 24-2
33-3/4”
BOLT & LOCK
NUT (4 PLACES)
BOLT & LOCK
NUT (4 PLACES)
BOLT &
LOCK NUT
(4 PLACES)
BOLT &
LOCK NUT
(4 PLACES)
If necessary, unbolt mounting plates from galvanized main frame (FIG. 24-1). Then,
bolt in opposite position (FIG. 24-2). Torque mounting plate nuts and bolts 220 - 240
lb-ft.
STEP 2 - WELD LIFTGATE TO VEHICLE
NOTE: TE- Series Liftgates are equipped with 2 types of mounting plates.
• Mounting plates on painted Liftgates are temporarily bolted to the main
frame for shipping (FIG. 25-2). These mounting plates must be unbolted,
repositioned, and welded to main frame and truck frame as shown in these
instructions.
• On galvanized Liftgates, mounting plates are bolted to the main frame
(FIGS. 24-1, 24-2 and 25-1). Liftgates are shipped at a standard distance of
34-1/4” between mounting plates (FIG. 24-1). For narrower chassis, the
RH and LH plates may be unbolted from the main frame and bolted on the
opposite side at a distance of 33-3/4” between plates (FIG. 24-2). For
chassis that are wider than standard, a kit is available to set a distance of
42-1/4” between plates (FIG. 25-2).