11921 Slauson Ave. Santa Fe Springs, CA. 90670 (800) 227-4116 FAX (888) 771-7713
51
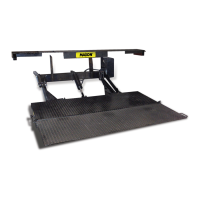
STEP 10 - REMOVE LOCKING ANGLE AND CHECK FOR
INTERFERENCE
1. Push control switch to UP position and hold just enough time to pressurize hydraulic
system. Release control switch. Hydraulic system is ready.
2. Remove cotter pins (FIG. 51-1) from 2 cylinder
pins. Remove the locking angle (FIG. 51-1).
NOTE: To operate Liftgate, locking angle must be removed from hydraulic cylinder.
REMOVING LOCKING ANGLE
FIG. 51-1
PLATFORM
(UNFOLDED)
LOCKING
ANGLE
COTTER
PINS
BACK OF
LIFTGATE
(REF)
CYLINDER
To prevent possible injury, never work in the area under the platform. Get ac-
cess to the locking angle from the back of the Liftgate.
WARNING
!
CAUTION
Do not fully pressurize the system in this step. Fully pressurize the system and
check for hydraulic leaks after Liftgate is fully welded.