11921 Slauson Ave. Santa Fe Springs, CA. 90670 (800) 227-4116 FAX (888) 771-7713
18
EXTENSION PLATE WELDS - VIEWED FROM UNDERNEATH
FIG. 18-2
CAUTION
To protect the original paint system, a 3” wide area of paint must be removed
from all sides of the weld area before welding.
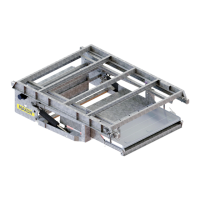
STEP 1 - INSTALL EXTENSION PLATES - Continued
EXTENSION PLATE WELDS - VIEWED FROM ABOVE
FIG. 18-1
NOTE: Before welding extension plate to vehicle body, make sure:
• Inboard edge of extension plate is fl ush with the top of sill on vehicle body.
• Top surface of extension plate is level with the ground.
Center the extension plate on vehicle body.
Weld the extension plate to vehicle body
rear sill as shown in FIGS. 18-1 and 18-2.
WELD EXTENSION PLATE TO VEHICLE
2 PLACES, MAKE 1” GAP
WHERE SHOWN
3/16”
1” GAP
1” GAP
REAR SILL
3/16”
WELD LENGTH & SPACE:
2”- 11 3/4” ( 96”W VEHICLE)
2”- 12 1/2” (102”W VEHICLE)
3/16”
3/16”
3/16”
3/16”
WELD LENGTH & SPACE:
2”- 11 3/4” (96”W VEHICLE)
2”- 12 1/2” (102”W VEHICLE)