Do you have a question about the Midtronics CTU-6000 and is the answer not in the manual?
IMPORTANT: Read this instruction manual before using the analyzer. WARNING: To avoid electric shock...
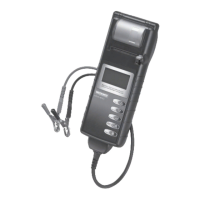
Details the physical layout and connectivity options of the Celltron ULTRA analyzer.
Lists various methods for establishing a specific reference value for string testing.
Sets percentage thresholds for generating warning or failure notices on test results.
Defines a name for the test string, storing test parameters for future use.
Establishes a minimum voltage limit to trigger a low voltage warning or failure.
Retrieves pre-stored reference values for specific battery models from the database.
Calculates a reference value based on a percentage of jars in the string.
Sets the reference value to compare test results against for determining string health.
Determines the appropriate connection method (clamps or probes) based on test requirements.
Illustrates the recommended sequence for testing jars and straps within a complete string.
Instructions on how to begin the testing process after inserting the memory card.
Detailed steps for correctly attaching the test cables to the positive and negative jar posts.
Instructions for connecting the test cables to the straps between jars.
Creates a placeholder in test results for missing or faulty jars/batteries.
Accessing and reviewing the saved test results from completed string tests.
Viewing a summary of averages, high, and low values for the entire string test.
Viewing individual test results for each jar and strap within the string.
Guidance on understanding and analyzing the meaning of test results for jars and strings.
Report detailing volt, mhos/siemens, and %REF for individual jars and straps tested.
Displays specific test results for individual jar posts and straps in the order they were tested.
Using reference value percentages to assess string strength and determine recommended actions.
Steps to transfer test data from the analyzer to a PC using IR receiver and software.
Troubleshooting steps for when the analyzer display shows no text or graphics.
Instructions and indicators for recharging the analyzer's internal battery pack.
Procedure for replacing the analyzer's battery pack if recharging is insufficient.
Troubleshooting steps for printer faults, including STATUS LED codes and alignment.
| Application | Battery testing |
|---|---|
| Type | Battery conductance tester |
| Battery Types | Flooded, AGM, Gel |
| Display | LCD |
| Power Supply | Internal rechargeable battery |