#65060/INTL-K-10.2020 MORIA 8
C. BATTERY TEST
Steps What to do
IMPORTANT WARNINGS
Related
picture
1 Switch EVOLUTION3E
console off by turning
button (B9) on «OFF»
Unplug the supply cord
Switch EVOLUTION3E
console ON by turning
button (B9) on «ON»
Check that battery charge level indicator (green LED) is switched
on (wait 15 seconds)
B9
A11
2 Switch EVOLUTION 3E
console by turning
button (B9) on «OFF»
Check that residual gas drain switch is working (audible sound) B9
B4
3 Plug again the supply
cord to the unit
Perform surgery on main supply only.
D. CONNECTING THE ASPIRATION TUBING
Steps What to do
IMPORTANT WARNINGS
Related
picture
1 Check the integrity of
the aspiration tubing
(#19138)
Visually check tubing integrity before and after set up.
MORIA strongly advises against the re-use of aspiration tubing as
it may damage connector, resulting in vacuum loss or damage the
vacuum pumps.
2 Connect the sterile,
single use aspiration
tubing (#19138) to the
unit:
• place the chamber
in position (H1)
• then get it down
(H2)
Change tubing for each patient.
Poorly connected tubing, either on the console or on the ring, may
also cause insufcient aspiration. It is very important to check the
integrity of all connections.
Warning:
• do not reverse the chamber position of the aspiration tubing
(H3)
• if liquid appears in the chamber, replace the chamber
immediately (H4)
• visually check tubing integrity before and after set up (H5)
If moisture seeps into the console, activate vacuum to remove it.
If water is sucked up, it is recommended to let the pumps run to let
residual water out.
A24
H
E. VACUUM TEST
Steps What to do
IMPORTANT WARNINGS
Related
picture
1 Clamp the aspiration
tubing at its end (close
to the ring connector)
Before connecting the suction ring on the aspiration tubing, check
that internal air lumen of the ring are not obstructed by surgical
residues.
This obstruction, resulting from insufcient or inappropriate
cleaning, would create pseudo-aspiration and risk the loss of
vacuum.
2 Press the test button
(A8)
The unit will check each
pump: P1, then P2.
Vacuum test ends with a
short audible “beep”.
This test procedure will check the efciency of the pumps and the
pressure (if gas turbine is selected).
The test should be made :
• prior to surgery,
• whenever tubing is changed,
• whenever a red indicator light is illuminated
The unit can only be operated if the test is passed.
The display (A7) indicates:
• “PE”
• then atmospheric pressure (mmHg)
• then “P1”
• then the pressure obtained by pump P1 (mmHg)
• then “P2”
• then the pressure obtained by pump P2 (mmHg)
• then atmospheric pressure (mmHg)
When atmospheric pressure “PE” is indicated on the display, one
can hear a single “beep”.
Stopping suction is indicated by a “beep” sound”.
A7
A8
3 The test is passed if
LED (A3) is ON
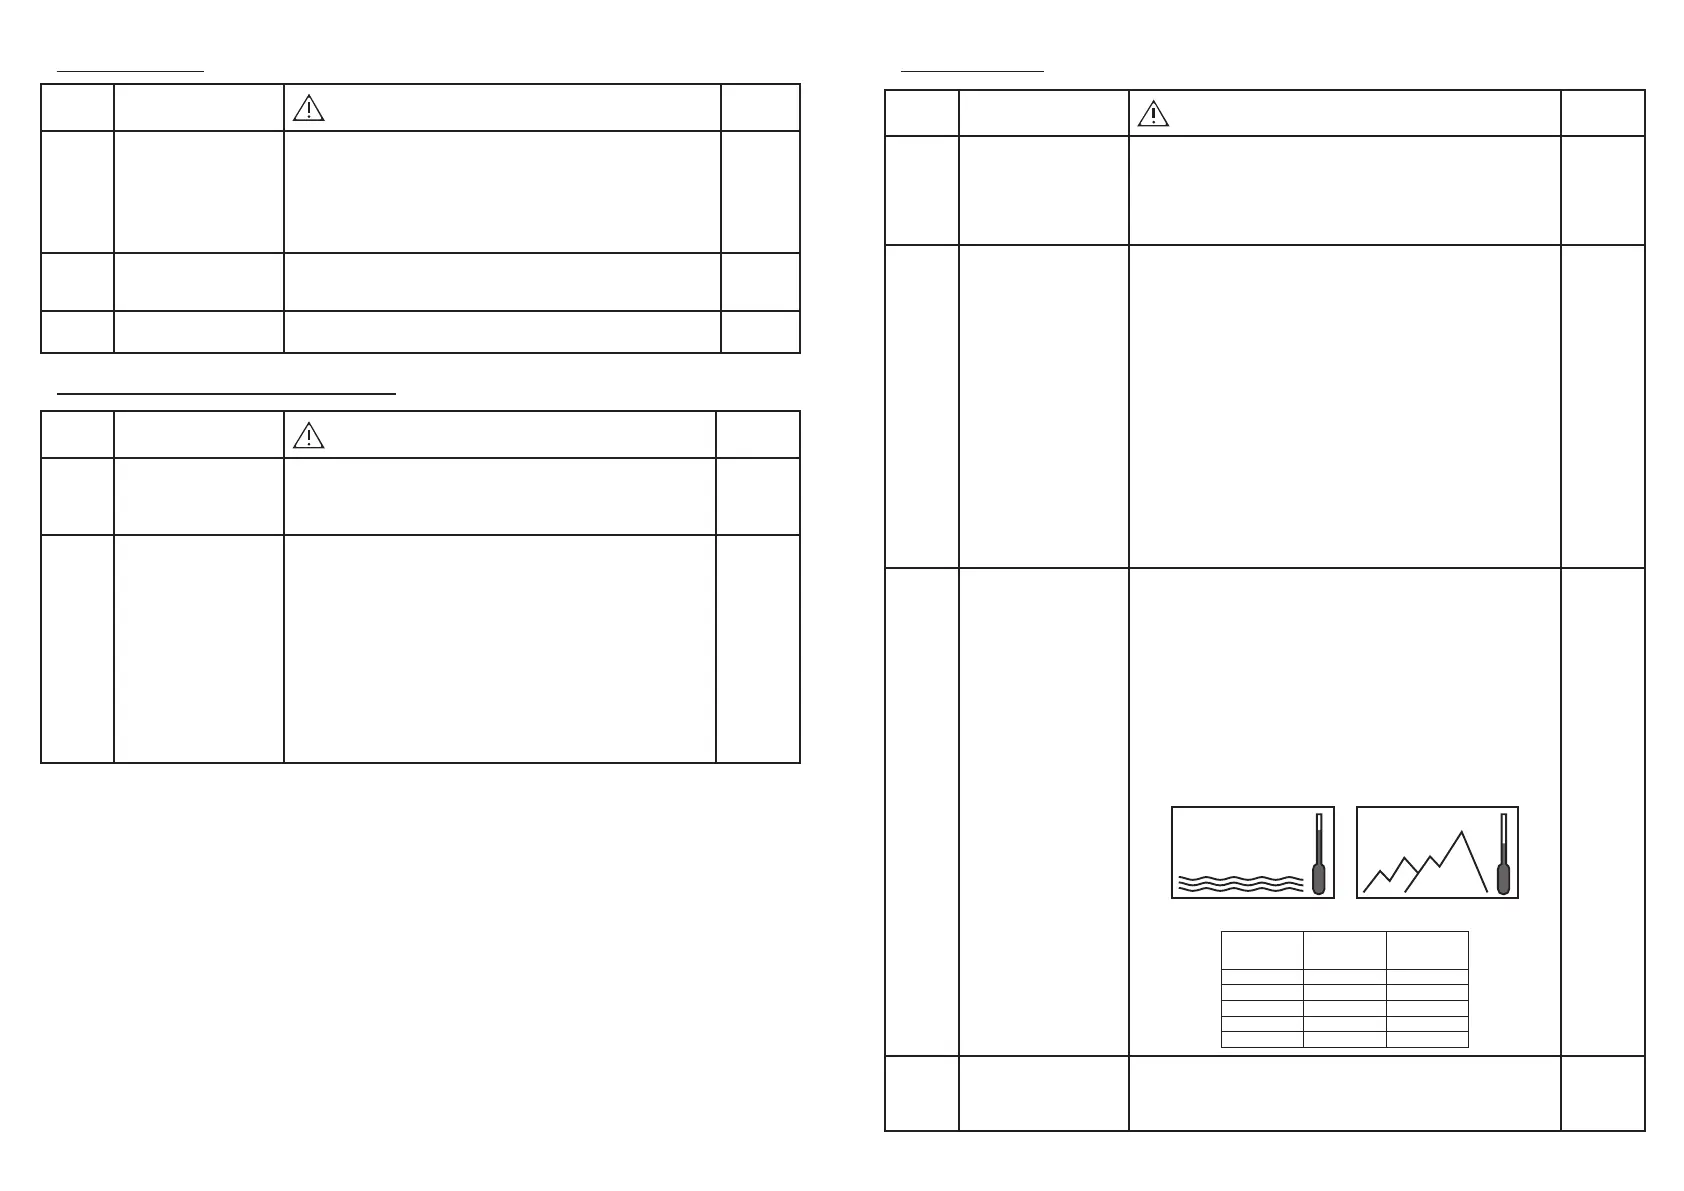
The vacuum level provided by the console depends on the local
atmospheric pressure, and thus on the elevation. The system
displays the actual vacuum value (in mmHg).
The higher the elevation, the less efcient the suction. The
atmospheric pressure decreases with elevation (approx: 8
mmHg/100 m).
The suction capacity is proportional to the difference in pressure
between the lowest level of vacuum pump and the local
atmospheric pressure.
The higher the vacuum power, the smaller the value displayed.
When the ring is xated on the eye the vacuum value must be less
than 250mmHg. If the value displayed is above, the unit must be
immediately turned off and sent back to Moria for a servicing.
526
mmHg
760
mmHg
Elevation (for example 3000 m)
Atmospheric pressure = 526 mmHg
At sea level (Elevation = 0 m)
Atmospheric pressure = 760 mmHg
Elevation Atmospheric
pressure mmHg
Indicative Vacuum
level provided by
the unit
0 m 760 152 mmHg
1000 m 675 135 mmHg
2000 m 596 119 mmHg
2500 m 560 112 mmHg
3000 m 526 105 mmHg
A3 ON
4 Stop clamping the
aspiration tubing.
Control unit is ready
to use.
 Loading...