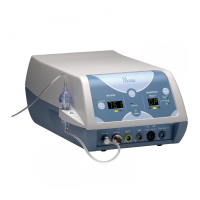
#65060/INTL-K-10.2020 MORIA 10
2. DISASSEMBLY OF THE NITROGEN/AIR SUPPLY
Before disassembly the nitrogen/air supply, no nitrogen/air pressure must remain in the console.
Steps What to do
IMPORTANT WARNINGS
Related
picture
1 Close the gas tank. After each surgical session, the console must be disconnected
from the dry medical grade nitrogen gas supply, or dry and ltered
medical grade air supply (internal circuit or tank).
For safety reasons, no nitrogen or air pressure must remain in the
console.
2 Operate the turbine by
pressing the Forward/
Turbine footpedal for
few seconds until the
turbine runs out of gas
and comes to a stop.
C2
3 After surgery, switch
off the vacuum by
pressing the vacuum
footpedal and remove
the vacuum ring from
the eye. Disconnect the
tubing from the ring and
the disposable head/
blade. Discard all in an
appropriate container.
C1
4 After use, switch off
the control unit and
disconnect the turbine.
Decontaminate and
sterilize (by autoclave)
the turbine.
B9
5 Press the Residual Gas
Drain Switch until there
is no pressure left in the
console
B4
6 Disconnect the nitrogen/
air gas supply (internal
circuit or tank) from the
control unit.
Disconnect the gas supply hose:
• rst push the blue ring toward the unit (step 1),
• then pull the hose towards the back (step 2)
B2–B3
D3a-D3b
H. AUTOMATED MODE (M2, M2SU, ONE USE-PLUS, EPI-K™)
Warning: Do not connect more than one keratome at a time to the EVOLUTION 3E console.
Steps What to do
IMPORTANT WARNINGS
Related
picture
1 Select the automated
mode
Press « Mode » button (A13) until green LED (A14) is ON
according the selected microkeratome.
« OP » appears on the display.
A13
A14
A15
2 Proceed a vacuum test
Refer to chapter VIII.C
A8
3 Plug the motor system
into the control unit
To plug One Use-Plus handpieces: A19
To plug M2-M2SU handpiece: A21
To plug Epi-K
TM
handpiece: A22
A19
A21
A22
4 Select the advance
speed (for M2, M2SU
and One Use-Plus)
The advance speed 1 is slower than the advance speed 2. The
blade oscillation rate is not modied.
See applicable nomograms:
• M2-M2SU : #65023
• One Use-Plus with plastic ring : #65041
• One Use-Plus with metal ring: #65067, 65077EN
• One Use-Plus for articial chamber : #65101
A20
5 Set the vacuum ring
on the eye and press
the vacuum footpedal.
Assemble the keratome
on the ring and activate
forward footpedal to
perform the cut.
After the cut is
performed, press
backward footpedal.
Refer to user manual:
• M2-M2SU: #65013
• One Use-Plus with plastic ring: #65039
• One Use-Plus with metal ring: #65040
• One Use-Plus for articial chamber: #65106
• Epi-K™ with metal ring: #65043
• Epi-K™ with plastic ring: #65044
Always check intraocular pressure with a tonometer (#19042) prior
to using any keratome.
6
After surgery, switch off
the vacuum by pressing
the vacuum footpedal
and remove the vacuum
ring from the eye.
Disconnect the tubing
from the ring and the
disposable head/
blade. Discard all in an
appropriate container.
C1
7
After use, switch off
the control unit and
disconnect the electrical
motor.
Decontaminate the
motor (see instructions in
each user manual).
B9
 Loading...