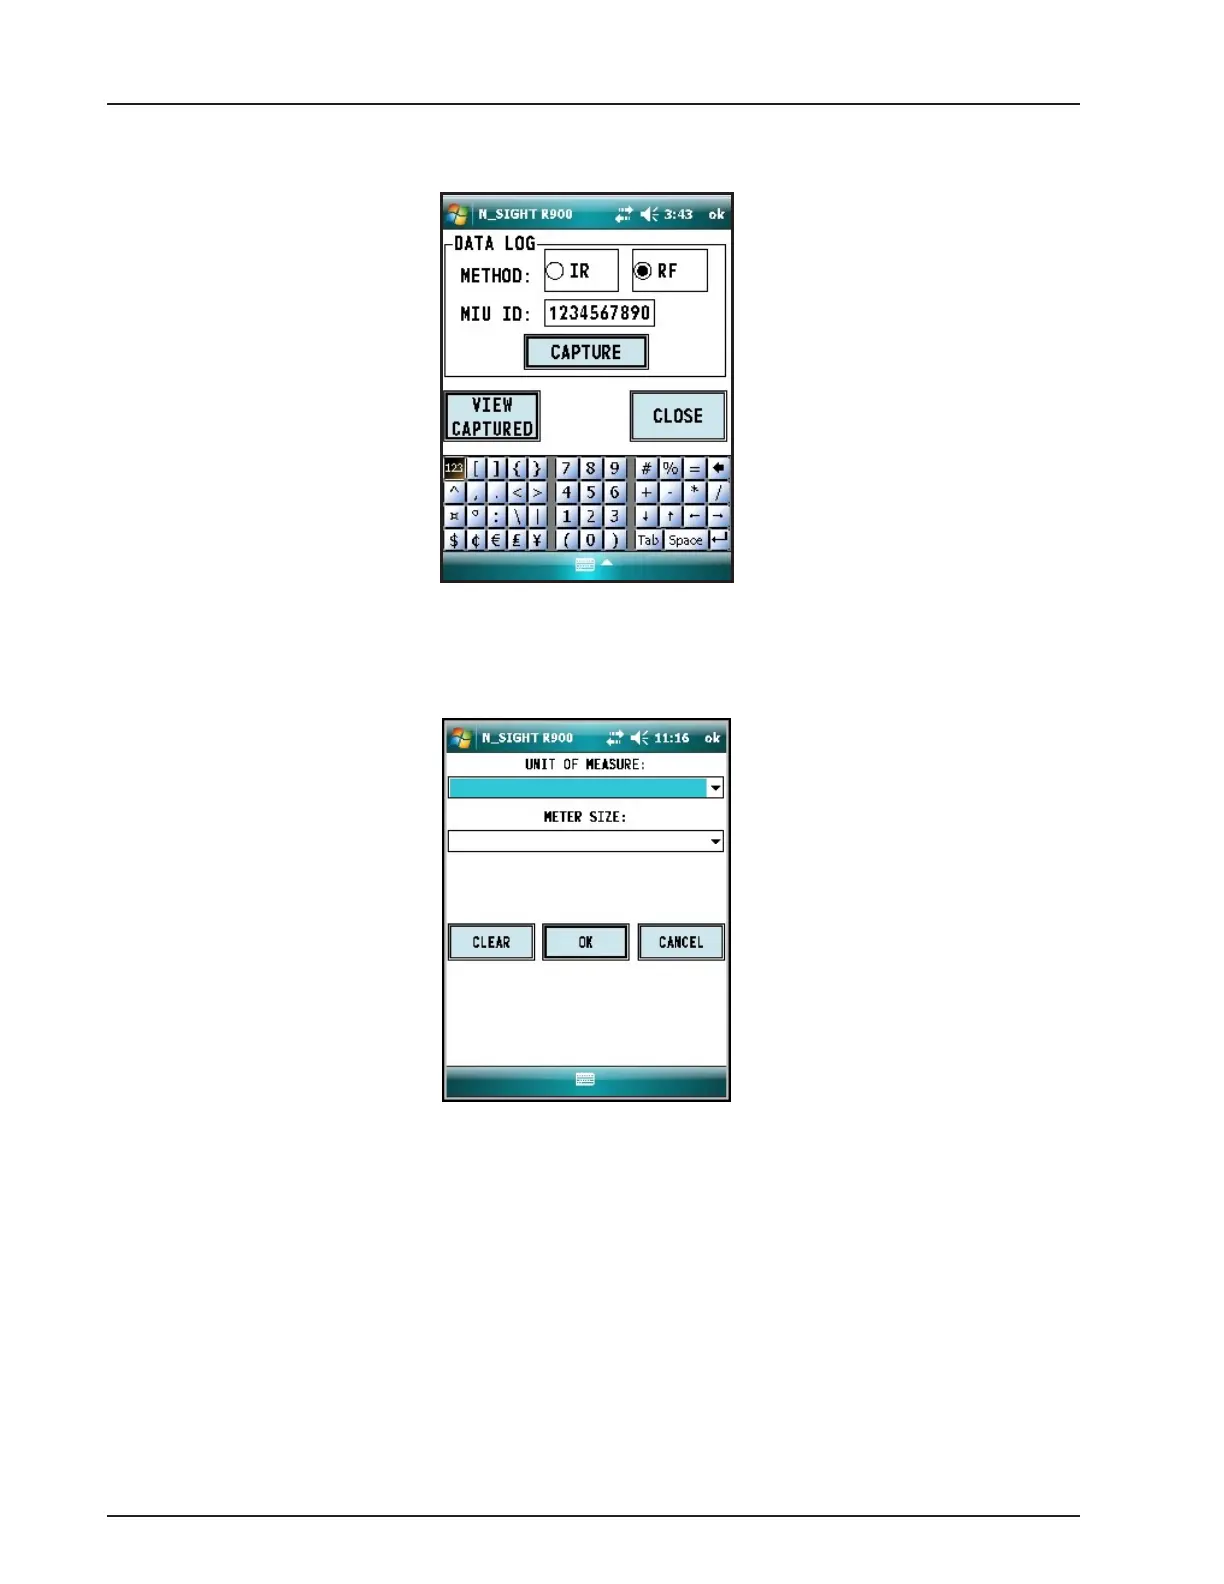
Home
Neptune
Media Converter
E-CODER R900i
Neptune E-CODER R900i User Manual
4
of 1
of 1 rating
48 pages
Give review
Manual
Specs
To Next Page
To Next Page
To Previous Page
To Previous Page
Loading...
8
.
Afte
r
yo
u
t
ype
the
M
IU
I
D
,
Clic
k
CAPTU
RE
.
Figu
re
2
1
–
C
apt
ure
But
t
o
n
9
.
Type
or
se
le
c
t
the
m
e
t
e
r
siz
e
an
d
info
rmat
io
n
i
n
t
he
appropriat
e
fields,
and
the
n
clic
k
OK
.
Figu
re
2
2
–
Un
it
of
Meas
ure
an
d
M
et
er
S
ize
E
-C
OD
E
R
®
)R
900
i
™
Install
a
tion
a
nd
M
ainte
na
nce
Gui
de
19
Chapt
er
5:
Dat
a
Lo
gging
E
x
tr
ac
t
ion
30
32
Table of Contents
Default Chapter
7
Table of Contents
7
Chapter 1: Product Description
13
Figure 1 - E-CODER ® )R900I
13
E-CODER ® )R900I™ Programming
14
Chapter 2: Specifications
15
Electrical Specifications
15
Table 1 - E-CODER )R900I™ Specifications
15
E-CODER) ® R900I™ Dimensions
16
Figure 2 - Inside Dimensions
16
Figure 3 - Antenna Dimensions
16
Chapter 3: Installing the E-CODER ® )R900I
17
Prior to Installation
17
Storage
17
Unpacking
17
Safety and Preliminary Checks
17
Site Selection
18
Installing the E-CODER ® )R900I
18
New Meter Installation
18
Retrofit Meter Installation
19
Connecting the E-CODER ® )R900I™ Through-The-Lid Antenna
19
Figure 4 - E-CODER ® )R900I™ Antenna
19
Installing the Antenna
20
Figure 5 - Insert the Antenna into the Pit Lid
20
Figure 6 - Locking Nut on Antenna
20
Figure 7 - Secure the Locking Nut
20
Attaching the Antenna to the MIU
21
Figure 8 - Installation Complete
21
Figure 9 - Remove the Protective Cap and Gasket
21
Figure 10 - Align the F Connector
21
Figure 11 - Seat the Connection
22
Chapter 4: Activating and Reading the E-CODER ® )R900I
23
Activating the LCD Using the Solar Panel
23
Figure 12 - Solar Panel for the E-CODER )R900I
23
Figure 13 - Activating the E-Coder®)R900I
23
Read the Meter
24
Table 2 - Icons and Displays
24
Common Causes of Leaks
25
Table 3 - Causes of Leaks
25
How to Tell if Water Is in Use
26
What to Do if There Is a Leak
26
If a Continuous Leak Is Repaired
26
If an Intermittent Leak Is Repaired
26
Chapter 5: Data Logging Extraction
27
About Data Logging
27
Accessing Data Logging
27
Figure 14 - HHU Home Screen
27
Figure 15 - N_SIGHT ® R900 Menu Screen
28
Figure 16 - Data Logger Option
28
Figure 17 - Reader ID Input
29
Figure 18 - HHU Time Confirmation
29
Figure 19 - Initialize RF Device
30
Figure 20 - Enter MIU ID
30
Figure 21 - Capture Button
31
Figure 22 - Unit of Measure and Meter Size
31
Initiating RF Activated Data Logging
32
Figure 23 - Start Button
32
Figure 24 - E-CODER )R900I™ Listens for Data
32
Figure 25 - E-CODER )R900I™ Receives Data
33
Figure 26 - Graph Button
33
Figure 27 - Example Data Logging Graphs
34
Sample Data Logging Graphs
34
Table 4 - Data Logging Graph Legend
34
Off Cycle Data Extraction
35
Belt Clip Transceiver
36
Chapter 6: Maintenance and Troubleshooting
37
Six- and Four-Wheel Encoders
37
Six-Wheel Encoder Normal Operation
37
Four-Wheel Encoder Normal Operation
37
Troubleshooting
38
Contact Information
38
By Phone
38
Table 5 - Example Reading Values
38
By Fax
39
By Email
39
Appendix 12: E-CODER ® )R900I™ Flags
41
Description of Flags
41
Table 6 - Eighth Digit Resolution by Meter Size
41
Glossary
43
Serial Number
43
Index
45
4
Based on 1 rating
Ask a question
Give review
Questions and Answers:
Need help?
Do you have a question about the Neptune E-CODER R900i and is the answer not in the manual?
Ask a question
Neptune E-CODER R900i Specifications
General
Brand
Neptune
Model
E-CODER R900i
Category
Media Converter
Language
English
Related product manuals
Neptune ProCoder
26 pages