OFITE, 11302 Steeplecrest Dr., Houston, TX 77065 USA / Tel: 832-320-7300 / Fax: 713-880-9886 / www.ote.com 39
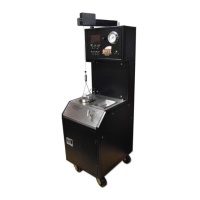
6. On the control panel, push the scroll wheel in to access the Main Menu.
Make sure the “15 VDC” switch is turned on.
If the software is running, the control panel will be disabled. Make sure
the software is closed before running a calibration.
7. Scroll to option 5, “Utilities” and push the scroll wheel in to enter.
8. Scroll to option 2, “Calibrate Pot” and push to enter.
From here you can scroll through the details of the last calibration.
9. Push the scroll wheel to begin the calibration.
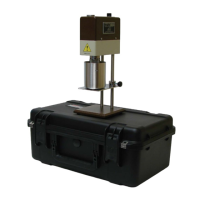
10. Push the scroll wheel to start the calibration. The screen will prompt you
to add weights to the potentiometer. After you add the weight, steady the
cord to minimize the amount of swinging. Firmly tap the surface of the
calibration stand to settle the weights and stabilize the potentiometer.
When adding weights, remember that the hook weighs 50 grams.
Therefore, to test the potentiometer at 200g, you only need to add 150g
to the hook.
11. Lift the weight about two inches directly upward and release it. Allow it to
fall straight down. When the reading stabilizes, push the scroll wheel to
accept it.
12. Continue adding weights when prompted. Push the scroll wheel to accept
each one.
13. After all weights have been recorded, the results will display on the
screen. Press either the Scroll Wheel to accept the results or Exit to reject
them and start over.
You must press the Scroll Wheel at the end to save the calibration. If
you do not save it, the instrument will use the last saved calibration
data.
You can also turn the Scroll Wheel to view each calibration point. If the
calibration fails, scrolling through the points will show you which point
cause the failure.
The API species that each calibration point must be within 5 Bc of
the standard. If any calibration point is outside this range, the entire
calibration will fail.